For many people, one of the most enjoyable things to do in life is to sit back and watch a good movie with family or friends. Of course in order to do this, they must first have a good DVD player.Having a DVD player on your Windows XP system is a good resource for watching DVDs, running software packages and recording music. In this guide, we will show you three parts about how to make full use of DVD players. Just follow it...Hot Search: DVD Player Software for Mac Reviews | DVD Player Software for Windows Review Part I: The Process About how to Fix a Windows XP DVD PlayerProblems with DVD players are common in the technical community, but there are several things that many users do not comply with when using their DVD player in the Windows XP operating system. Here is a step-by-step guide on how to fix the common problems you might experience with your Windows XP DVD player.
- 1. Turn on your computer and wait for Windows XP to boot up. Right-click on the "My Computer" icon on the desktop of your computer. Click "Properties." Click "Hardware." Click "Device Manager."
- 2. Scroll down the window until you come to DVD/CD-Rom Drives. If you do not see your DVD drive listed then you will need to open the tower.
- 3. Unscrew the screws that hold the side of the tower in place and put them in a safe spot. Look over the motherboard and do a light stress test on the cable coming from the back of the DVD drive to the motherboard.
- 4. Wiggle the power cord on the back of the DVD drive to see if it is loose. The power cord is normally red or yellow. Once the cables have been reconnected or tightened, you can reassemble the tower.
- 5. Go back to your computer screen and see if the DVD/CD-Rom Drive icon has your drive displayed. Click on the + sign to the left of it. Look at the attached devices and make sure that there is not a yellow exclamation point next to it. If there is a yellow exclamation point right click on it and select "Repair."
- 6. Right-click on your DVD player if there is not a yellow exclamation point next to it and select "Uninstall." Click "Yes" to the next pop-up and the drive will be uninstalled.
- 7. Click on the "Start" menu and select "Turn Off Computer." Click on "Restart" and wait for the computer to restart.
- 8. Click yes when the "Add New Hardware" window pops up. You will be asked whether or not you want to connect to the internet to find the appropriate drivers for your system. Click "Yes."
- 9. Install the proper drivers through the installation wizard and then restart your computer again. Once the computer has booted, your system will be ready to use the DVD player.
- 10. Insert a DVD into the drive and wait for it to start playing.
Part II: Top Software that DVD Player users needed: Which is the best solution to convert Blu-ray, DVD, video and edit them before streaming to DVD Player.1. Top Blu-ray Ripper: For people who want to transfer Blu-ray movies to DVD Player, you may need to roll off disc protection, choose target video format and adjust the best video size/bitrate/frame rate for DVD Player.2. Top DVD Ripper: You cannot miss a DVD to DVD Player Converter if you want to move DVD to your DVD Player.3. Top Multi-track BD/DVD Ripper: Not tech-savvy but wanna transfer Blu-ray/DVD for watching with multiple languages on media players via DVD Player? Then a Multi-track preserving tool can finish your task within a few simple clicks.4. Top Ultimate Video Converter: Need an excellent all-in-one solution to convert any media files, including rental or purchased Blu-ray, DVD, HD videos from Camcorders, all standard videos, online YouTube videos, TV shows, movies downloads etc for playing via DVD Player? All these can be solved with an easy-to-use video and audio converter.5. Top DRM Removal: We can’t stream iTunes purchased or rented TV shows to DVD Player because of the Apple’s Fairplay DRM protection unless we have a DRM converting tool to strip the iTunes DRM protection, and then do an iTunes m4v to DVD Player compatible formats recording without quality loss.These Pavtube converting tools can help your get out of all compatibility issues for DVD Player and other latest mobiles & tablets, such as Chromecast, Apple TV 3,Plex, PS3, NAS, Xbox, Galaxy Tab S, iPhone 6/6 Plus, iPad Air 2, iPad Mini 3, Google Nexus 7, Nexus 9, and other devices. (Read Pavtube Softwares Comparison).There you go! A few helpful tips to make the most of your DVD Player. Happy streaming!Part III: Refer to other DVD Player Guides from Pavtube:
Q: Does Premiere Pro import WMV files? Im working in a Mac and I can't. If I work in a Windows PC would it be able to import them? Is there a plug-in I have to install to make it work? Any good suggestions? - This post explains how to rewrap WMV video files to Adobe Premiere for easier playback, editing. Hot Search: Move files from a PC to Mac | Tivo to Adobe Premiere Elements 10 | OBS FLV to Adobe Premiere | H.265 to Adobe Premiere | Choose Best Suitable Editing ProgramsMany people may have some very wonderful WMV files and want to play WMV videos on Mac OS devices, like iTunes, Mac OS computer, etc. The problem here is that Mac devices support MOV most, but not WMV. How to Edit WMV Video Files in Adobe Premiere? To use WMV video in Adobe Premiere Pro smoothly, a good suggestion is to convert WMV to Premiere Pro more compatible MPEG-2 file type with a powerful third party problem for maintaining whole audio&video information. To achieve the goal, a professional WMV converter is needed indeed. Here, iMedia Converter for Mac is a best choice for Movies fans. With it, you can convert WMV to Premiere most compatible MPEG-2 format without quality loss and this is an ideal Video Converter Ultimate for fully supporting H.265/HEVC codec. The conversion is easy to handle and only with a few simple clicks, you can finish the conversion without facing any glitches. It also offers the optimal profiles for Avid Media Composer, FCP, iMovie and more. Download the program to start the WMV to MPEG-2 conversion task. Here is the review. Note: For Windows user, please get the Windows version - Pavtube Video Converter Ultimate. Download the program and you can edit WMV video in Adobe Premiere smoothly as you wish. Download the best Mac WMV Video Converter:
 Other Download:- Pavtube old official address: http://www.pavtube.cn/imedia-converter-mac/- Cnet Download: http://download.cnet.com/Pavtube-iMedia-Converter/3000-2194_4-76177788.htmlHow to Rewrap WMV videos for editing in Adobe Premiere via Mac OS X El Capitan?Step 1: Add WMV video files. Launch the Mac Video Converter and click the “Add video” button to browse your computer hard disc and load the WMV video files you want to convert to the software.
  Step 2: Output Adobe Premiere native editing format.From the "Format" drop-down list, go to select "Adobe Premiere Pro/Sony V..." >"MPEG-2" as the most suitable output format for Adobe Premiere.
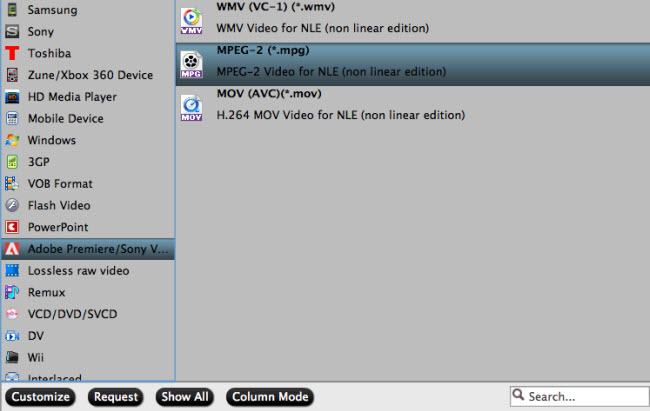 Note: You can easily get a clip or clips from a feature documentary for editing in addition to movies.Step 4: Click “Convert” button to start encoding WMV to MOV for importing to Adobe Premiere.Conclusion: When the conversion task is finished, click “Open” button to get the exported files and then import the converted WMV into Adobe Premiere to do further editing without hassle. Tips & Tricks:1. Adjust audio and video settings (optional)The Mac WMV converter for Adobe Premiere enables users to adjust audio and video settings before transcoding WMV files to MPEG-2. Click “Settings” button, then you will enter the following interface, on which you are allowed to customize size, bit rate, frame rate, sample rate, and audio channel to your required ones.2. Basic video editing (optional)This Mac video converter has some simple edit functions like cropping, splitting, adding effects etc. so you can touch up the video with basic video editing functions.After the conversion is complete, get the resulted files via clicking the Open button and then you can import converted WMV files to Adobe Premiere Pro in Mac for further editing without any hassle.Read More:
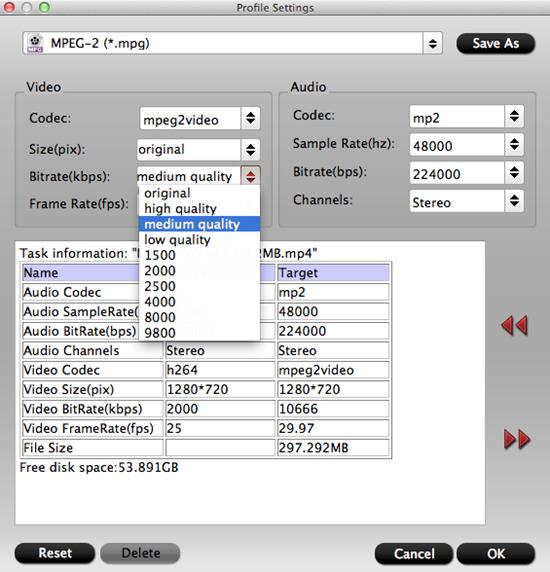
From this article below, you can learn the best way to import Samsung NX500 H.265 to Adobe Premiere Pro CC/CS6/CS5/CS4 on Mac by converting Samsung NX500 H.265 to H.264 for editing in Adobe Premiere.
Samsung NX1 has the ability to support both 4K and UHD video recording. The built-in H.265/HEVC Codec, the most advanced compression technology available, brings efficiency to the storage of video clips by compressing high quality video to half the size and the bit rate of H.264 footage without any compromise on quality. Can Adobe Premiere Pro support H.265 codec currently? The answer is no. Searching through the Adobe forum, you would find lots of threads that related to H.265 and Premiere issue.If you are a NX500 owner and wondering a best “H.265 to Adobe Premiere” workflow, go through the page.
Hot Search: | Blu-ray to H.265 MP4 | Video to H.265 MP4 | H.265 4K Video to Ultra HDTV | H.265/HEVC with VLC on Mac
Actually, the H.265 standard simply has not yet been adopted by Apple, Adobe or any of the other of the software industry leaders. The main reason is that NX500's recording H.265 codec are not native codec for Adobe Premiere. To edit the H.265 footage from Samsung NX500 in Premiere Pro CC/CS6/CS5/CS4, a quick fix is to transcode H.265 to Premiere Pro editing-friendly format like MPEG-2, WMV. To achieve the goal, a professional H.265/HEVC converter is needed indeed.
Pavtube Customer Review - “ I use Pavtube iMedia Converter for Mac to convert videos for editing in Adobe Premiere because we film using the new Samsung NX500 camera, the files are 4K resolution and the compress file is using H.265. I check forums because nothing worked direct into Adobe Premiere, so Pavtube is pretty well recommended in those forums to solved that problem, convert samsung NX500 4K H.265 videos to something in 4K that AP can understand.”
After read this review, you may know the iMedia Converter for Mac is a best choice for NX500 owner. With it, you can convert Samsung NX500 H.265 to Premiere most compatible MPEG-2 format without quality loss and this is an ideal Video Converter Ultimate for fully supporting H.265/HEVC codec. The conversion is easy to handle and only with a few simple clicks, you can finish the conversion without facing any glitches. It also offers the optimal profiles for Avid Media Composer, FCP, iMovie and more. Download the program to start the H.265 to MPEG-2 conversion task. Here is the review.
Note: For Windows user, please get the Windows version - Pavtube Video Converter Ultimate. Download the program and you can edit NX500 H.265 video in Adobe Premiere smoothly as you wish.
Download the best Mac H.265 HEVC Video Converter:
Other Download:
- Pavtube old official address: http://www.pavtube.cn/imedia-converter-mac/
- Cnet Download: http://download.cnet.com/Pavtube-iMedia-Converter/3000-2194_4-76177788.html
How to Rewrap Samsung NX500 H.265/HEVC videos for editing in Adobe Premiere via MPEG-2 codec?
Step 1: Add NX500 H.265 video files - Launch the NX500 Movie Converter and click the “Add video” button to browse your computer hard disc and load the NX1/NX500 H.265 video files you want to convert to the software.
Note: Also you can rip a DVD or Blu-ray video to H.265/HEVC video with this all-in-one H.265 Encoder and Decoder.
Step 2: Output Adobe Premiere native editing format.
From the "Format" drop-down list, go to select "Adobe Premiere Pro/Sony V..." >"MPEG-2" as the most suitable output format for Adobe Premiere.
Step 3: Adjust output video file size.
The Samsung NX500 record footage with 1080p, but you may find that the output MPEG-2 is not such high in resolution, therefore, you can type the output file size as "1920*1080" from the "Profile Settings" window to maintain the original HD video quality.
 Note: You can easily get a clip or clips from a feature documentary for editing in addition to movies.
Step 4: Click “Convert” button to start encoding NX500 4K H.265 to MPG for importing to Adobe Premiere.
Conclusion: When the conversion task is finished, click “Open” button to get the exported files and then import the converted NX500 footage into Adobe Premiere to do further editing without hassle.
Read More:
Note: You can easily get a clip or clips from a feature documentary for editing in addition to movies.
Step 4: Click “Convert” button to start encoding NX500 4K H.265 to MPG for importing to Adobe Premiere.
Conclusion: When the conversion task is finished, click “Open” button to get the exported files and then import the converted NX500 footage into Adobe Premiere to do further editing without hassle.
Read More:
WMV has been such a popular video format and perhaps you have lots of homemade or downloaded video files in WMV fomat. Want to burn them to DVD so that you can watch them on your TV or home DVD player? Can DVD players play WMV files? Many of us have been asking the above same question and may also encounter WMV won't play on DVD player troubleshooting:
Q: “Does a .wmv play on a dvd player? I have created a movie on Windows movie maker and now I want to play it on TV using the dvd player. Can it play it or do I have to convert it. If I have to convert it then what format. Also will .avi work if I do the same thing?”
Consider it done! In this article, you will learn how to successfully play all kinds of WMV files on any DVD player.
Hot Search: Blu-ray to HD WMV | HEVC Videos to WMV | WMV to H.265 | WMV Players for Mac |
Symptoms in Playing WMV on DVD Player
A: For WMV DVD disc owners, many of us may encounter cannot play WMV burnt DVD disc on any DVD player.
B: For Windows users, we can easily burn WMV to DVD with Windows DVD Maker or Windows Media Center. The weakness is that the burnt WMV DVD disc cannot play on most DVD players connected to the TV or other devices or on the portable DVD player.
C: For Mac users, in most cases, we cannot even import and burn WMV files to DVD on Mac let alone to play WMV on DVD player.
In order to solve can't play WMV on DVD player, you first need to know which video format does your DVD player can play and then convert your WMV to DVD player supported format so as to successfully burn WMV to DVD disc for easy playback on DVD player. With extraordinary features, Pavtube Video Converter Ultimate is a must-have video converter to convert various HD and SD videos like wmv video for playing on any iOS, Android and Windows devices, including the DVD players (Sony, Philips, Toshiba, Panasonic, Samsung and LG etc.). Here is review.
Note: The equivalent Mac version is iMedia Converter for Mac. Now you can use it to convert videos like A-B-C for plaing on DVD Player.
Free Download WMV to DVD Burner:

 Other Download:
- Pavtube old official address: http://www.pavtube.cn/blu-ray-video-converter-ultimate/
- Cnet Download: http://download.cnet.com/Pavtube-Video-Converter-Ultimate/3000-2194_4-75938564.html
Convert and Transfer WMV files to DVD Player on Windows/Mac
Below is the step by step guide on how to convert WMV files to DVD player supported video format on Windows, the Mac OS X El Capitan is the same way. Just make sure you've downloaded the right version.
Step 1: Add source WMV file
Launch the excellent WMV to Surafce Converter. And then click "Add Video" import your source materials in .wmv format. Besides WMV, you can also load FLV, MKV, AVI, VOB, TiVo, MPG, MOV, etc. files to the program. Batch conversion is supported so that you can add multiple files.
Other Download:
- Pavtube old official address: http://www.pavtube.cn/blu-ray-video-converter-ultimate/
- Cnet Download: http://download.cnet.com/Pavtube-Video-Converter-Ultimate/3000-2194_4-75938564.html
Convert and Transfer WMV files to DVD Player on Windows/Mac
Below is the step by step guide on how to convert WMV files to DVD player supported video format on Windows, the Mac OS X El Capitan is the same way. Just make sure you've downloaded the right version.
Step 1: Add source WMV file
Launch the excellent WMV to Surafce Converter. And then click "Add Video" import your source materials in .wmv format. Besides WMV, you can also load FLV, MKV, AVI, VOB, TiVo, MPG, MOV, etc. files to the program. Batch conversion is supported so that you can add multiple files.
 Step 2: Choose a DVD Player Supported profile.
Click "Format" bar and move mouse to "Windows" column, you can easily find the profile of "follow “HD Video > H.264 HD Video (*.avi)" as the best profile for DVD Player.The output videos could fit on your device perfectly. And choose the destination folder to save the converted videos.
Step 2: Choose a DVD Player Supported profile.
Click "Format" bar and move mouse to "Windows" column, you can easily find the profile of "follow “HD Video > H.264 HD Video (*.avi)" as the best profile for DVD Player.The output videos could fit on your device perfectly. And choose the destination folder to save the converted videos.
 Step 3: Make personal settings optionally and additionally
If you like, you can click "Settings" to change the video encoder, resolution, frame rate, etc. as you wish.
Step 4: Start converting WMV video to DVD Player
Step 3: Make personal settings optionally and additionally
If you like, you can click "Settings" to change the video encoder, resolution, frame rate, etc. as you wish.
Step 4: Start converting WMV video to DVD Player
After above settings, you can start the WMV to MP4 Conversion to fit the DVD Player so as to play back videos in portable and wireless way. You can view the duration and remaining time of the conversion process, and choose whether to shut down computer and open output folder when conversion completed.
Once the process completes, download and transfer media to DVD Players using the USB cable and enjoy it in travel.
P.S. Pavtube Video Converter Ultimate also enables or add external subtitle, crop and trim videos, merge multiple videos, adjust parameters by clicking the "Edit" button and take snapshot.
Read More:
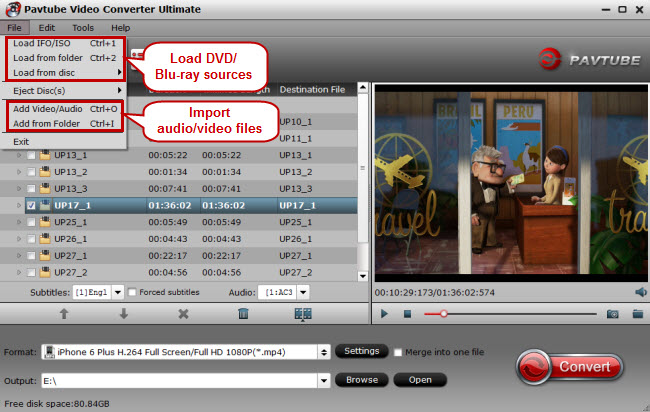
The Xbox 360 is the second video game console produced by Microsoft and the successor to the Xbox. As the fans of Xbox 360, you may have a bunch of VOB files stored in your PC either decrypted from commercial DVDs. Have you ever came across the problem that you could not play back some VOB files with your Xbox 360? Well, if it did happen to you, this guide may help you to solve that kind of problem easily. Read >> Xbox 360 Column. When you try to play VOB files on Xbox 360, you'll find it's very difficult to do the job. In fact, VOB, which is usually used for storing DVD-Video media, is not supported by Xbox 360. The Xbox 360 supports videos in Windows Media Video (WMV) format (including high-definition and PlaysForSure videos), as well as H.264 and MPEG-4 media. So, If you really want to watch single VOB files on Xbox, you have to convert VOB to Xbox 360 compatible video formats first. Hot Search: MKV to Xbox 360 | Xbox 360 Play BD DVD | WMC to Xbox 360 | YouTube Videos on Xbox | iTunes to Xbox 360 In order to successfully play various videos, music and movies on Xbox 360(like DVD, ISO image file, DVD Folder, H.265/HEVC, WMV, Tivo, MP4, MPG, VOB, MOV, FLV, NUT, H.264, NSV, MKV etc. videos and AC3, AAC, WMA, WAV, MP3, M4A, AIFF, FLAC, M4B, M4R, MP2, MPA etc. audio files.), a widely used solution is to convert them to Xbox 360 recognized formats. Here, we strongly recommend Pavtube Xbox 360 Video Converter Ultimate to help you convert all video and audio files (include DVD VOB Files) to Xbox 360 and play HD videos on Xbox 360 without worrying about the media incompatibility problem anymore. It will save you all the trouble. If you want to change the video format from VOB to MP4 for convenient playback on Quicktime, Xbox 360, Zune, PS3 and more devices. This is a very easy-to-use video to Xbox 360 converting program which comes with flawless video quality and quick conversion speed. You can reach the Mac version here: iMedia Converter for Mac. Now follow this article; you will learn how to accomplish this easily within a few clicks. Free download VOB to Xbox Converter: Other Download:- Pavtube old official address: http://www.pavtube.cn/blu-ray-video-converter-ultimate/- Cnet Download: http://download.cnet.com/Pavtube-Video-Converter-Ultimate/3000-2194_4-75938564.html Tutorials on Converting VOB files to Xbox 360 friendly format1st - Load VOB files to this VOB to Xbox 360 Converter. Download the Pavtube Video Converter Ultimate on your computer, install and run the program, add videos.You can choose to import videos or the entire folder by clicking the top left two icons.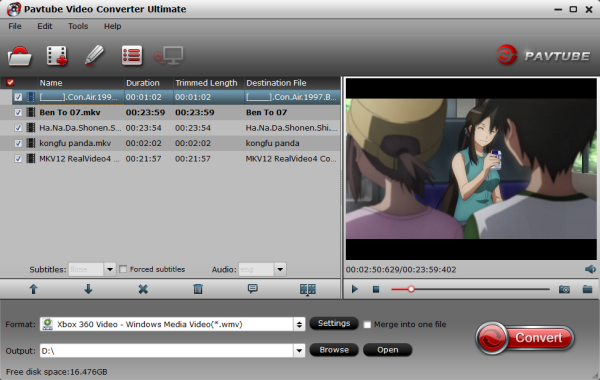 2nd - Choose a proper format for Xbox 360. Click "Format" drop-down list and choose " Zune/Xbox 360 Device >> Xbox 360 Video - Windows Media Video(*.wmv)" as the compatible MP4 preset with best video quality.
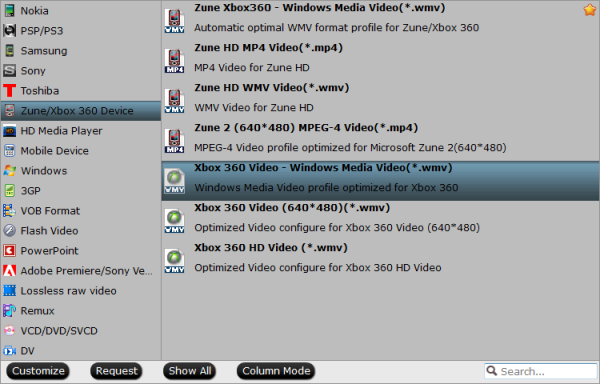 3rd - Customize video specs for Xbox 360 (Optional). For people who want to further customizing output video size and quality, you can click “Settings” on the bottom to enter Profile Settings Window, and customize video size, frame rate, bitrate, codec and sample rate(Hz). In general, the higher bit rate, the bigger output file size.
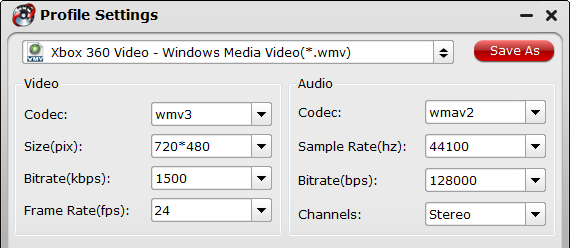 4th -Start VOB to Xbox 360 Conversion.You can hit the big red "Convert" to start converting VOB to MP4 with best video settings for Xbox 360. After the conversion, click "Open output folder" in the conversion window, or "Open" in main interface to quick locate the converted video. Stream converted VOB files to Xbox 360 on Windows and Mac After the conversion is done, simply click "Open Folder" button to get the converted videos instantly. It's time to steam the converted VOB file to your Xbox to enjoy it.For Windows users: there are four ways to share the converted files to Xbox 360: Windows Media Player, Windows Media Center, Windows Home Server and Zune Software. Pluck just Windows Media Player 12 as an example. (Note: this method only applies to Windows Media Player 12 (Windows 7) or 11 (Windows Vista))Click the "Stream" menu of Windows Media Player and then select "Turn on media streaming";Click "Turn on media streaming" in the pop-up dialog;Name your media library and click "OK". Warning - In this way, you can get MKV, AVI, M2TS, MPG, WMV, M4V, Tivo etc specifically DVD VOB files playable on Xbox 360 without problems. We hope this short article will bring some new multimedia life to your Xbox 360 console. Read More:
Many of the movies you buy on DVD or Blu-ray now include a digital copy version of the film, which is known as Digital Copy. As you see, with the ability to run desktop software, a USB port, and an integrated Kickstand, Surface 3 is the perfect productivity device for school, home, and on the go. Read Major differences between Surface 3 and Surface Pro 3. And in this page, we focus on the tips and tricks for removing DRM from Blu-ray and DVD digital copy movie on Surface 3.If you want to make digital copies coming with BD or DVD movies free for playback with the Surface 3, just read on to get clues that you want.
Hot Search: Vudu movies to Surface | DVD to Surface | iTunes to Surface | AVI to Surface
Digital Copy extends the enjoyment of your DVD or Blu-ray purchase. The neat part is that you can have a backup copy of your purchased movies, and bring them along with your Microsoft Surface 3, iPad, iPhone or iPod. But if you own an tablet like the Microsoft Surface 3, the digital copy feature does not make much sense to you- as the digital copy movies transferred from DVD or Blu-ray are protected by DRM and thus unavailable to Microsoft Surface 3.
If you'd like to watch Digital Copy movies on Microsoft Surface 3 or put Digital Copies on other tablets, a professional DRM remover and converter – Digital Copy DRM Converter is recommended for you bypass/crack DRM and convert digital copy movies to Microsoft Surface 3 free MP4 videos.

 Step 1: Download and install Pavtube ChewTune.
When converting protected Digital Copy WMV or M4V files, please make sure you videos play well in Windows Media Player or iTunes (Windows Media Player or iTunes is required for the conversion). Otherwise, the conversion may fail.
Step 2: Click "Add" button to import your Digital Copy movies or just drag and drop the movies to the software. Batch conversion is supported so that you can add multiple files to convert at a time.
Step 1: Download and install Pavtube ChewTune.
When converting protected Digital Copy WMV or M4V files, please make sure you videos play well in Windows Media Player or iTunes (Windows Media Player or iTunes is required for the conversion). Otherwise, the conversion may fail.
Step 2: Click "Add" button to import your Digital Copy movies or just drag and drop the movies to the software. Batch conversion is supported so that you can add multiple files to convert at a time.
 Step 3: Click "Format" bar and move mouse to "Windows" column, you can easily find the profile of "Microsoft Surface Windows RT/Pro H.264 Video (*.mp4)". The output videos could fit on Surface 3 tablet perfectly. If you like, you can click "Settings" to change the video encoder, resolution, frame rate, etc. as you wish. Learn>> Surface Supported Formats.
 Step 4: Click the big "Convert" button to begin encoding your Digital Copy to Surface RT playable videos.
Once the encoding task completes, you can transfer the result videos to your SD card for your Surface. There now you know how to get Digital Copy movies onto your Microsoft Surface RT tablet so you can watch them on that gorgeous screen!
This workaround works with Windows 10, Windows 8, Windows 8.1 as well, of course.
Read More:
Step 4: Click the big "Convert" button to begin encoding your Digital Copy to Surface RT playable videos.
Once the encoding task completes, you can transfer the result videos to your SD card for your Surface. There now you know how to get Digital Copy movies onto your Microsoft Surface RT tablet so you can watch them on that gorgeous screen!
This workaround works with Windows 10, Windows 8, Windows 8.1 as well, of course.
Read More:
Issues in Playing WTV Files to PS3:Q 1: " My PS3 can't read wtv file. The PS3 shows that thoses files are not supported. However, I can read them with an application on my iTouch, so the file is good.What could I try? Any good suggestion?" Q 2: "I discovered that my windows 7 Media center can record tv shows with a tv tuner attached. Pretty cool. However the file size for a half hour show is about 3 gigs. The PS3 see's .wtv files and can kinda play them but stutters really bad. The computer it's on is wireless and the PS3 is wireless to the router so I'm not sure if the stuttering is because of all the wirelessness or what. Is there an easy way to watch what I record or convert the files or something?" Tips for Sony users: Blu-ray to PS3 | DVD to PS3 | HD Movies to PS4 | Youtube to PS4 | iTunes to PS4As we know, PS3 can play H.264, MPEG-4, AVI, WMV video files from USB drive. Thus, for viewing WTV files on PS3, there is still a workable way to change WTV format to Any HD Videos by converting WTV to MP4, AVI, WMV, MKV, VOB, MOV, 3GP, MPEG, MPEG-1, MPEG-2, FLV, etc with this Top WTV Video Converter. It provides you with a "several simple clicks" solution to let you convert WTV files to HD Video files in very high video quality. And the process will just take you a few minutes, for this app can convert files with ultrafast conversion speed. Here is review. How to Convert WTV to MP4 for easier playback on PS3Note: I will tell you how to convert MTV on Windows (Windows 10 included) below. The guide on converting WTV files on Mac is almost the same. Make sure you’ve got the right version. For Mac users, iMedia Converter for Mac is a helpful app to encode videos for further usage. Other Download:
- Pavtube old official address: http://www.pavtube.cn/blu-ray-video-converter-ultimate/- Cnet Download: http://download.cnet.com/Pavtube-Video-Converter-Ultimate/3000-2194_4-75938564.htmlStep 1. Load WTV VideosRun the WTV Converter. Launch it; click "Add Video" and load your WTV files. Or directly drag and drip your WTV video source to the program. It supports batch conversion so you can import multiple files at a time.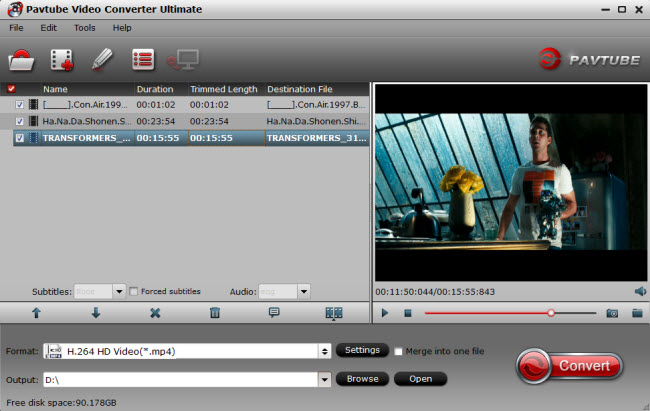 Step 2. Choose output formatClick on "Format" drop-down list, you could easily choose the video format you need from its various categories, and the supported formats include AVI, WMV, MOV, MP4, MKV, MPEG, MPG, FLV, 3GP, DVD, VOB, etc. Here, you can choose the pull down menu of "Format" to choose "PSP/PS3 > PS3 Video(720P) MPEG-4(*.mp4)" as the output format for PS3. Learn>> PS3 supported formats.
 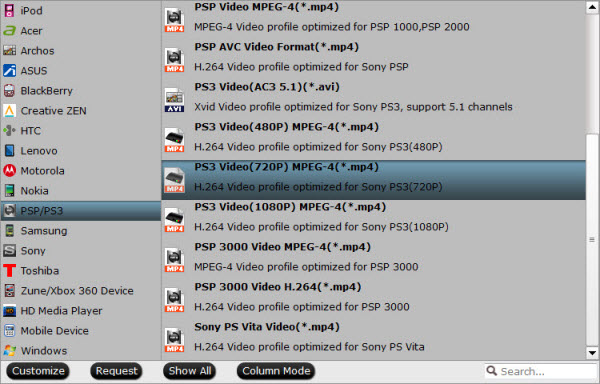 Tips: A: It can also encode WTV to iTunes, iPad, iPod, Galaxy Tab, etc media player or devices compatible format. B: When ripping Blu-ray or converting 1080p movies, use "PS3 Video(1080P) MPEG-4(*.mp4)" to maintain best quality.C: To keep Dolby Digital 5.1 audio, choose "PS3 Video(AC3 5.1)(*.avi)" format. Step 3. Customer Video SettingsClick "Settings" button; you can adjust video and audio settings, including codec, aspect ratio, bit rate, frame rate, sample rate, and audio channel. Step 4. Start WTV to PS3 conversionAfter everything is done, click the "Convert" button to kick off the WTV to MP4 conversion. For your convenience, you can let it run in the background, so you can simultaneously do other jobs with no distractions.When the conversion is done, you can click the Open button to get the output videos for playing, sharing, uploading easily. (Learn how to set up Windows PC as a DLNA Media Server for PS3 streaming.) More Features of this best WTV Converter for PS3:1. Settings- You can adjust video/audio parameters such as bitrate, sample rate, frame rate, codec, channels, etc after clicking on "Settings" icon.2.Edit- The recorded TV shows and movies tend to have commercials, you can use the video converter’s Trim feature to get rid of these. Hope the article can help you! And you will have no problems on playing WTV Videos on PS3 and other portable devices at anywhere, Thanks for your reading. Read More: