Saturday, November 9, 2013

How to Convert 4K XAVC S videos and Burn 4K XAVC S videos on Mac OS X

In this article, you will know 4K XAVC S video format, and know how to use the best 4K XAVC S Converter for Mac to transcode 4K XAVC S videos to Mac support format and burn 4K XAVC S to DVD for sharing, storing or managing on Mac.  


What's the 4K XAVC S video format?
 
Sony is today announcing Long GOP (4K 4:2:0 and HD 4:2:2) as choice of high-efficiency codec to serve more widely the requirements of the content production market. In addition, to serve the consumer market, “XAVC S” employing MP4 wrapping format is also introduced as its expansion of XAVC. This expansion will encourage growth of 4K content in the consumer market. It is based around the familiar h.264, which should ensure wide compatibility once applications support the XAVC S format.

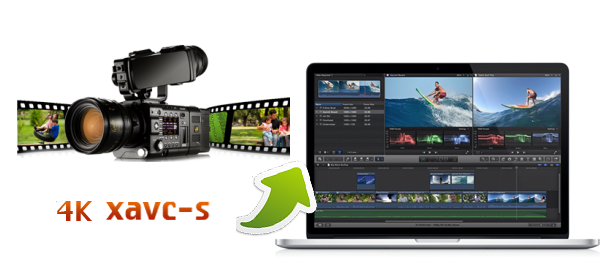
If you recorded many exciting high-definition 4K XAVC S videos, to share the exciting footages with your friends, you need to deal with these 4K XAVC S footage on Mac. But the 4K video may have good compatibility with your Mac system. Especially edit 4K XAVC S video in FCP, Avid, iMovie, Premiere Pro, FCE, play 4K XAVC S with QuickTime player on Mac and burn 4K XAVC S to DVD on Mac. Now, I would like to share the easy 4K XAVC S to Mac solution. Now please follow the easy steps below to encode 4K XAVC S recording to Mac best supported codec, and burn 4K XAVC S to DVD on Mac.

Part 1:  How to transcode 4K XAVC S video on Mac via Mac XAVC S Converter? 

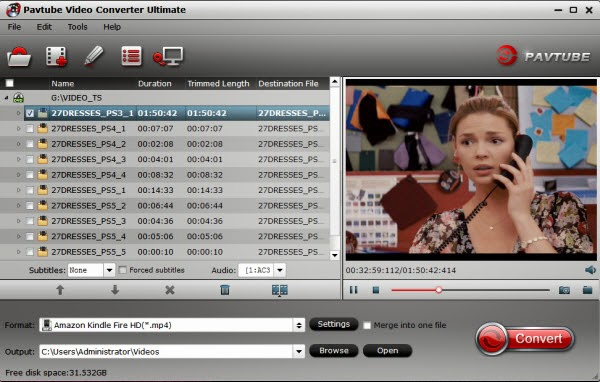
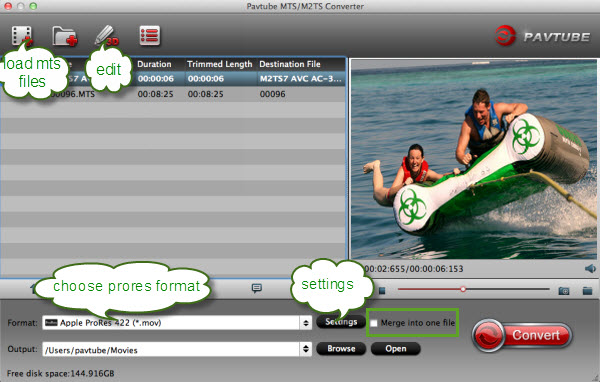
1. Download Pavtube HD Video Converter for Mac as the best Mac XAVC S Video Encoder Install and run this converter. Click "Add" or "Add from folder" and import the 4K XAVC S video into this software.


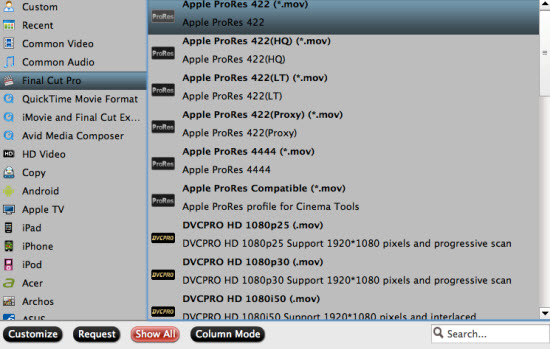
Step 2: Choose output format

Click on "Format" bar and locate the appropriate output profile. To import 4K XAVC S files to Mac, you need to convert to Mac supported formats.

Final Cut Pro 7/X

Move mouse cursor to "Final Cut Pro > Apple ProRes 422 (*.mov)" to set a FCP 7/X best codec.


Apple ProRes 422 – Higher quality than Apple ProRes 422 (LT)

Apple ProRes 422 (HQ) – Keep original video quality for editing in FCP

Apple ProRes 422 (LT) – Get a smaller file sizes than Apple ProRes 422

Apple ProRes 422 (Proxy) – SD levels – 480i/p and 576i/p. Used in offline workflows.

Apple ProRes 4444 – Edit and finish 4:4:4 material
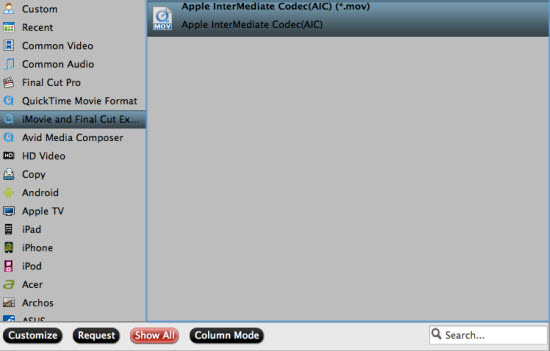
Final Cut Express and iMovie

Choose FCE and iMovie friendly format- "iMovie and Final Cut Express > Apple Intermediate Codec (AIC) (*.mov)


Avid Media Composer 5.5/6

In order to take advantage of the plugin AMA, you have to make sure that you still keep the structure of the file folder recorded by your camera. If not, here you can set Avid DNxHD (*.mov) for natively editing in Avid MC.


Follow Common Video"> "MOV-QuickTime (*.mov)", you can get the best format for playbakck with QuickTime Player.


Step 3: Just hit the Convert button on the bottom right to kick off 4K to Mac Conversion.

After conversion, locate and select the file you want to import, then click Import for further editing in Final Cut Pro 7/X, Final Cut Express/iMovie, Avid Media Composer, etc or playing with QuickTime on Mac.


This 4K XAVC S Converter can help you convert 4K XAVC S videos for natively editing and smoothly playback on Mac. Video and audio quality and synchronization are perfectly guaranteed.

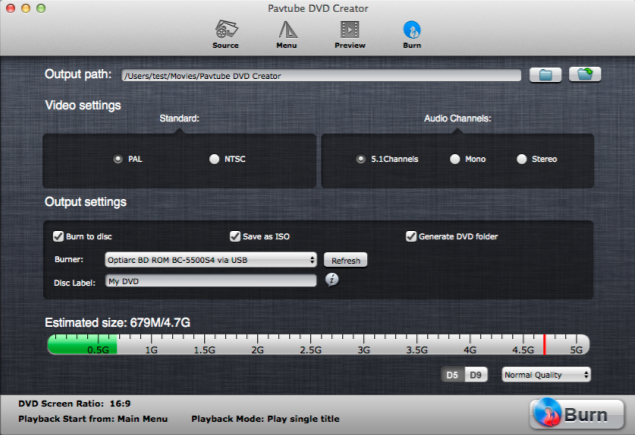
Part II. Burn 4K XAVC S videos on Mac OS X

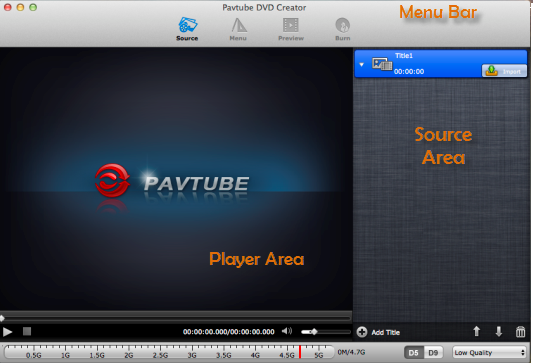
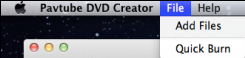
1.Please download and install Pavtube DVD Creator for Mac, import 4K XAVC S files to the software.


2.Click the import button to load your 4K footages, you can click Add title button to add more titles.

3.Switch to Menu pane. Double-click a DVD menu beneath the Menu Template to apply it to your DVD. You can customize the background video/image, background music, text, title thumbnail and more for your DVD menu.


4.Click the Burn button to start burning 4K XAVC S movie to DVD on Mac. You can choose to burn 4K XAVC S to DVD disc, or save as ISO file, or Generate videos to DVD Folder.

Monday, November 4, 2013

Enable Kindle Fire HDX, Kindle Fire HD to play MPG/MPEG video files

Follow this simple tutorial to learn how to convert and play MPG/MPEG video files on Kindle Fire HDX, Kindle Fire HD without format limitations. 


The Kindle Fire HDX sports a high resolution screen, a very fast processor, and generally excellent media abilities, but one thing it lacks for both Kindle Fire HDX and Kindle Fire HD is support for widely used MPG/MPEG format. Thus, if you wanna watch MPG/MPEG movies on your Kindle Fire HDX, Kindle Fire HD, first you need to encode the videos to Kindle playable format like MP4 and then transfer them to your phone for playback. 

In order to successfully play MPG/MPEG and more video files on Kindle Fire HDX, Kindle Fire HD, you can just getPavtube Video Converter Ultimate , an ideal tool to convert almost any video to Fire HD/Fire HDX highly compatible video files with fast speed. 

Supporting multithreading and batch conversion, this Kindle Video Converter works perfectly on converting standard video formats and HD video formats to all regular video formats like MP4, MOV, MKV, FLV, AVI, WMV, MPG, ASF, etc. with smart video editing features. The audio/video synchronization is very good, the size of the subtitles too. The time it takes to convert in this software is almost half that in other. The equivalent Mac version is Pavtube Video Converter Ultimate on MAC. Just download the right version and follow the below guide.

This two programs are 20% off  at Pavtube Thanksgiving Giveaway

Convert MPG/MPEG to Play on Kindle Fire HDX,Kindle Fire HD smoothly 

The below guide uses Video Converter Windows screenshots. The way to encode MPG/MPEG files to your Kindle Fire HDX,Kindle Fire HD on Mac is almost the same. Just make sure you get the right version.

Step 1: Download, install and launch the excellent MPG/MPEG to Kindle Fire HDX,Kindle Fire HD Converter. 

Click "Add Video" or "Add from folder" to import your source materials in .mkv format. Besides MPG/MPEG, you can also load FLV, MKV, MPG/MPEG, WMV, VOB, TiVo, MPG, MOV, etc. files to the program. Batch conversion is supported so that you can add multiple files.


Step 2: Choose the output video format and output folder. 

Click "Format" bar and move mouse to "Android" column, you can easily find the profile of Amazon Kindle Fire HDX,Kindle Fire HD H.264(*.mp4). The output videos could fit on your device perfectly. And choose the destination folder to save the converted videos. If you like, you can click "Settings" to change the video encoder, resolution, frame rate, etc. as you wish.


Step 3: After above settings, you can start the MPG/MPEG to MP4 Conversion for Kindle Fire HDX,Kindle Fire HD.

Once the process completes, download and transfer the converted MP4 videos to your Kindle Fire HDX,Kindle Fire HD via USB cable. Then you are free to enjoy and play MPG/MPEG videos on Kindle Fire HDX,Kindle Fire HD 7"/8.9" as you like.

P.S. If you have no idea about Kindle Fire HDX,Kindle Fire HD file transfer, you cancheck out my old post Synchronizing Your Content files (Videos, Pictures, Music) to Kindle Fire HDX,Kindle Fire HD to learn more.

If your movie isn't already in one of the supported formats or it's still on a DVD or a Blu-ray, you can get the 20% OFF Blu-ray Video Converter Ultimate (or the 20% OFF iMedia Converter Mac) which can help you rip Blu-ray/DVD, and convert various formats of 720p/1080p HDX videos in MKV, MPG/MPEG, TiVo, VOB, MPG, MTS, etc. to your Kindle Fire HDX,Kindle Fire HD 7"/8.9, the original Kindle Fire and other Android os tablets for smoothly playing.

See Also:

Ripping Blu-ray for Kindle Fire HDX 8.9
Converting DVD to Kindle Fire HD
Syncing iTunes with Kindle Fire HDX 7
Download Digital Copy to Kindle Fire HDX 7/8.9
Get Kindle Fire HDX 7 to Play all 1080p/720p MKV

Friday, November 1, 2013

How do I Convert mov files to DVD for playing on Mac

Summary: This article will show you how to successfully burn/write mov clips to DVD for playing with DVD players/Xbox 360/Playstation 3 on Mac OS X.

Running on Mac OSX 10.8.5. Trying to burn .MOV file to DVD and playback on 3 different DVD players/Xbox 360/Playstation3. Should be an easy task, however, I cannot get any of the aforementioned players to read the disk. I burned the .MOV to several different brands of DVD-R and DVD+R disks...no success. Each player cannot read the disk. Each disk time the correct file structure (Audio TS and Video TS directories) is made but the disk cannot be played from any device other than a laptop (plays on both Windows and Mac laptops). I have not been able to burn a DVD that will play back on anything other than a laptop - please advise. Thanks.
 

If you have recorded some mov footages, it is a great idea to burn them to DVD for sharing with your deal friends. However, it is not so easy to burn MOV files into DVD for the H.264 codec. Before burning, you need to choose one program burn.mov files to DVD that will play on DVD players/Xbox 360/Playstation3. Here I want to throw this guide for him to show the easy way to burn/make/convert MOV clips to DVD for playback and backup. If you have the same problem, you can take this article as reference.

How to burn/make MOV videos to DVD on Mac?

Free tools:

iDVD for Mac Users

Note: The good thing is that It is free, but sometimes it may not work or not meet your need, so don’t expect too much from it.

Professional and Perfect tools – DVD Creator for Mac:

Here a useful tool or software- Pavtube DVD Creator for Mac is recommended to you. Now Pavtube has released its Mac version. The DVD maker for Mac can help you burn any kind of video (MXF, MKV, AVI, MP4, WMV, MOV, TiVo, etc) to playable DVD with customized Menu and soundtrack . With its simple wizard-style user interface and powerful editing features, DVD authoring and burning can’t be easier.

Choosing DVD menu template/style, menu text, display aspect ratio and background for the DVD menu and setting chapter mark and playback mode, a DVD with your favourite style will present in front of your eyes!

Cant wait to have a try? Below is how MOV to DVD Burner works

1.
Free download this Mac MOV to DVD burnner. You can see the main interface. Connect your DVD Writer and insert a blank DVD.


2. Load your mov files into the DVD creator for Mac. Transfer and copy the footage onto your computer.


  • a. Drag and drop source files to source area (details in Source Screen)
  • b. Select “add Files” from the drop-down list of Quick Start menu

Each file is recognized as a chapter after being imported to DVD Creator. Press on “Add title” button to add more titles. And you can do some arrangement for titles or chapters.

3. You can Edit movie clip and Customize your DVD menu

Pavtube DVD Creator for mac will enables you to edit your videos with trim, crop, watermark, effect settings, audio replacing settings features if necessary before burnning.

Tip: Swich to “Audio” Tab from Edit, and add audio to target video file so that you can replace the original audio track with favorite melody. Check the box of “Enable” and click “Browse” button and select the audio or video file you’d like to add. You may check “Loop” to make the audio repeat in order to fit the full length of the video.


This MOV-to-DVD Creator also allows you to design and create your own DVD menu or add background picture as well as music to make your DVD more personalized. To use a preset menu template and simply double-click on the template.

4. Preview Created DVD-Video. It’s great that you can preview the created DVD before burning to make sure everything is going well, and then you can choose to burn a DVD disc, a DVD folder, or a DVD ISO.


5. Start burning.

Click the “Burn” button to start burning mov files to DVD on Mac – video to a writable DVD (or ISO image) that will plays on standard DVD player after burning. Now you have finished the burning process and get the created DVD for watching on DVD players/Xbox 360/Playstation 3.

With this professional MOV to DVD Maker, you will find it pretty easy to convert mov files to DVD for you to enjoy a quality time watching movies with your family at home.

Tips:

1. Learn how to burn Sony Handycam AVCHD MTS file to DVD and write Sony XAVC footage to DVD.

2. Good news for Blu-ray/DVD fans! A way to save your money for more products: Have a look at some money-saving bundled products with special offer to get what you like. For example:


Sunday, October 27, 2013

Sony HDR-CX700/HDRX520 .MTS and iMovie/FCP X Compatibility Solutions

If you have issues with importing Sony HDR-CX700/HDR-X520 AVCHD to iMovie and FCP X, just follow this article to solve. Here I will outline how to convert Sony AVCHD MTS footage to iMovie/FCP compatible format for editing on Mac. 

I'm an University professor. Having shot some mts video files from my Sony HDR-CX700 and HDR-X520 about home movies including many trips to other countries. Using iMovie or FCP X the file format is AVCHD/H.264 (avc1) which caused me numerous errors (video, sound and images) in FCP Studio 7. I also wanted a software that would enable me to use directly the files copied to my computer. Which software can convert video taken with my Sony HDR-CX700/HDR-X520 for working with my mac? Is there any step-by-step work flow for this? 

In this case, I googled to search the solutions. After a search on the web,  I get this MTS/M2TS Converter for Mac from Pavtube. After a free trial, I found it satisfactory to transform mts files (Sony video cameras). 

I have successfully convert Sony HDR-CX700/HDR-X520 AVCHD to best codec for editing on Mac. This software is top MTS converter for Mac that can transcode AVCHD files to Apple InterMediate Codec (AIC) for iMovie, Apple ProRes 422 codec for FCP X, etc. These output formats are specially presetted, so the conversion quality is guaranteed, I can get lossless video conversion with this tool.

Here I will share the easy steps that you can follow to transcode Sony HDR-CX700/HDRX-520 AVCHD MTS to MOV for using in FCP and iMovie.

1. Install and run the best Sony MTS Converter for Mac, it's an professional AVCHD to FCP/iMovie Converter which can convert Sony  HDR-CX700/HDRX-520 AVCHD files to different formats on Mac (including OS X Mavericks 10.9). Click "Add Video" to load the .mts files from Sony HDR-CX700/HDRX-520 Camcorder to the Mac Converter.


2. Click "format" bar to choose output format:

Choose "Final Cut Pro -> Apple ProRes 422 (*.mov)" as the best output codec for importing MTS files to Final Cut Pro (X) editing.


Choose "iMovie and Final Cut Express > Apple Intermediate Codec(AIC) (*.mov)" as the best video format for editing AVCHD files to iMovie.


Step 4. You can click “settings” to customize the output parameters, adjust the resolution, bitrate as you want. (Optional)

Tips:

You can also click "Subtitles" option, add srt, ass, ssa suntitle you want.

Step 5. Click convert button to start converting Sony HDR-CX700/HDR-X520 AVCHD MTS to Prores/AIC mov for FCP and iMovie further editing.

After the Mac MTS to Prores/AIC MOV conversion, you can import the converted footages to FCP, iMovie for editing smoothly on Mac.

Learn more: 

Fast Way for importing Sony FS700 mts footage in Avid MC
Importing Sony Alpha a7S XAVC-S files to Premiere Pro and After Effects 
Transcode AVCHD MTS, M2TS, M2TS, TS to FCP X on Mac

Friday, October 18, 2013

Make Sony PMW-EX1 XDCAM compatible with Mac (FCP, iMovie) and Youtube

Facing issues with editing and uploading Sony PMW-EX1 XDCAM EX footage on Mac in FCP, iMovie? Fortunately, here is an easy workflow for this. Let's find it out here.
I'm a Production Coordinator (primarily tv commercials, clients include Audi, Samsung, Fisher-Price, Nickelodeon and more). I have some xdcam media from Sony EX1 about documentary following people in their workplace and I required converting footage from my Sony XDCAM for editing and uploading on my website? I have used MPEG Streamclip, but is there any better software?

If you are a XDCAM user, you may face the incompatibity of XDCAM and your editing programs like FCP, iMovie and uploading websites. I exactly looked up the file format in google, and took to me to a website that told me that my EX1 shoot videos in XDCAM file format, it suggest me to convert Sony XDCAM videos to best compatible format for Mac OS. Only by converting can I avoid video playback, editing and uploading problems. And under comments, I was recommend to use a decent XDCAM Video Converter on Mac platform - Pavtube iMedia Converter for Mac, to help me get it done.

Good News! Pavtube Release a New Site - multipelife.com with Product Migration and Name Change.

To thanks for your continued support all along our previous site and the new www.multipelife.com, we are holding a 'New Site Special' with fantastic discounts up to 40% off. You can get 20% off BDMagic, 30% off ByteCopy, 40% off DVDAid and 20% off Video Converter Ultimate on Windows/Mac platform:

https://www.facebook.com/pavtubefans/app_209569249055691

Read more: http://bestvideosolution.blogspot.com/2014/05/pavtube-new-official-website.html

The reviews from people on websites, the price, how easy it is, i mean WOW, click, convert. Now I have bought this XDCAM video to Mac Converter to convert my Sony XDCAM videos into a editing format on Mac and then upload on Youtube. It work well as it says. I'm 100% satisfied with Pavtube, and I'm no pro but I don't think any changes need to be made. I will share a step by step guide as below:

Convert Sony XDCAM EX1 MP4 videos on Mac for editing and shareing

1. Install Sony XDCAM Converter for Mac. Run it and transfer EX1 XDCAM video to hard drive, and then click "Add Video" or "Add from folder" to add the XDCAM files you need into the program.


2. Click format column and choose the output format.

You can choose Final Cut Pro -> Apple ProRes 422 (*.mov), this codec is optimized for FCP editing;


You can also choose iMovie and Final Cut Express -> Apple InterMediate Codec(AIC) (*.mov), it's for iMovie editing;

For sharing on website like YouTube, you can choose MP4 format for output.

3: Click settings button to adjust the output video’s parameters, such as bitrate, resolution, etc.(Optional)


4. You can edit the Sony XDCAM EX1 XDCAM MP4 videos in this program before converting to other formats on Mac OS. Trim, crop, add watermark or adjust effect as you want.

5. Start converting Sony EX1 XDCAM MP4 video on Mac.

This best Mac Sony XDCAM Converter will convert EX1 recorded XDCAM videos on Mac at top speed, you can choose rich formats for output on Mac, and now I can easily and successfully use EX1 recorded XDCAM footages to edit in FCP, iMovie, etc on Mac or sharing on Youtube. It really do a great favor for me, if you have the same problems, you can take a try now! Good luck!

Read more:

Effortlessly import Sony PMW-500 XDCAM to Premiere Pro CS5
Convert and Transfer Sony XDCAM footage to QuickTime MOV on Mac
XDCAM EX to FCP-Transform Sony XDCAM EX MP4 to FCP 6/7 with highest quality

Sunday, October 13, 2013

How to play Amazon Instant Video on Samsung Galaxy Tab 3

In the following article you can learn about how to legally get rid of DRM copy protection from Amazon WMV to freely play on Samsung Galaxy Tab 3 anywhere you like.

Global digital media and digital convergence technology leader Samsung Electronics in Seoul, South Korea released the Samsung GALAXY Tab 3 Series Tablet, they will join the previously released Samsung GALAXY Tab 3 Series 7 inch tablet together to provide consumers with richer choices.

Samsung GALAXY Tab 3 provides consumers watch, listen, creativity and close friends to share unforgettable moments with family and friends and especially the content of a variety of ways. Whether at home, or on the way to work, the Samsung GALAXY Tab 3 is the perfect choice to capture moments of life.


Now you want to put some Amazon Instant Videos to Galaxy Tab 3? Wait a minute. The Amazon Instant videos, though mainly .wmv format, are not supported by Galaxy Tab 3. The problem is, those WMV videos you downloaded from Amazon are protected (by DRM), and can't be played on any Android tablet except for the Amazon Kindle Fire. To get the Amazon WMV playable on Galaxy Tab 3, you'll have to remove the DRM protection first.

To transfer Amazon WMV movies to Galaxy Tab 3, you need a powerful Amazon WMV video DRM removal or a WMV video Recorder for Galaxy Tab 3.  Pavtube ChewTune is exactly the ideal tool that makes it possible to watch Amazon DRM-protected WMV videos on Galaxy Tab 3.

  (Click here for Mac OS X 10.5)

Read before try

1. Make sure that your computer is authorized for source videos, that is to say you can play the Amazon WMV video using Windows Media Player.

2. During the installation your computer will pop up a Windows Security dialogue box saying “Windows can’t verify the publisher of this drive software”. Ignore it and choose “Install this driver software anyway” to continue installing Pavtube ChewTune.

3. At the end of installing, the setup wizard will install Audio Driver onto your computer automatically through windows command line. This will take a few minutes. Don’t skip or abort, it is essential for running ChewTune correctly.

4. It would take as long as the source movie length for the whole Amazon Instant video to Galaxy Tab 3 conversion process since Pavtube ChewTune records source DRM videos in 1:1 video and audio quality.

Remove DRM protection off Amazon video and convert WMV to Galaxy Tab 3 

Step 1: Load Amazon WMV video files to Pavtube ChewTune.

Install and launch the Pavtube WMV to Galaxy Tab 3 Converter, then click the add button to load the WMV video files to the program.


Step 2: Choose H.264 codec format for the Galaxy Tab 3 playing. 
Click "Format" and select an output format for the Galaxy Tab 3. Here I choose " Samsung -> “Samsung Galaxy Tab 3 Video(*.mp4)". 


Step 3: Optimize the settings for Amazon video to Galaxy Tab 3 conversion. 

If you find the default settings may not satisfy your need, can click the "Settings" button to change the settings by yourself.

Step 4: Convert Amazon video to Galaxy Tab 3 video format.


Having finished the settings? OK, just click the convert button and start to convert Amazon video to Samsung Galaxy Tab 3 format with ease.

When the conversion task is finished, you can click "Open" button to get the final output files for your Samsung Galaxy Tab 3 and transfer the converted videos to Samsung Galaxy Tab 3.

Tips: MKV, MOV, TS, MPG, Tivo, FLV, F4V and some AVI videos are not accepted formats and you have to convert them to Galaxy Tab 3 optimized H.264 .mp4 videos before downloading them to the device.

Related articles

Wednesday, October 9, 2013

Rip/Copy Blu-ray Blu-ray ISO contents to Samsung Galaxy Tab 3 10.1/8.0

Summary: Do you have a Samsung Galaxy Tab 10.1, Tab 3 8.0? This guide shows you the fastest way to rip and convert Blu-ray ISO to Samsung Galaxy Tab 3 supported video formats with ease so that you can watch Blu-ray ISO contens on Galaxy Tab 3 10.1,Tab 3 8.0 freely.


Samsung has added two new Android tablets to its Galaxy Tab 3 range, introducing new 8-inch and 10.1-inch models to complement its existing 7-inch device. Galaxy Tab 3 10.1 has a 10.1-inch, 1280 x 800 TFT screen that would be more at home on. And Tab 3 8.0 puts as many pixels in a far smaller display. It’s a decent display, with solid viewing angles and color reproduction, but it’s bested by many others in its class.

For video, Galaxy Tab 3 10.1, Tab 3 8.0 is great for watching MP4, H.264, DivX, Xvid, and WMV movie files at up to 1080p resolution. For audio you get MP3, AAC, FLAC, OGG, WAV, and WMA support. However, it doesn't have a built-in drive for the playback of Blu-ray ISO videos. If you want to watch Blu-ray ISO files on Galaxy Tab 3 10.1, Tab 3 8.0, you will need a tool to convert Blu- ray to Galaxy Tab 3 playable video files first.

Here, Pavtube BDMagic (Mac users: BDMagic for Mac) is highly recommended to help easily remove commercial Blu-ray protection from BD ISO and output MP4 videos for freely playback.


System requirements:

Windows


Operating System: Windows XP/2003/Vista/Windows 7/Windows 8
DirectX Version: 9.0 or above
Memory: 64MB at least
Processor: 500MHz Intel or 500MHz AMD CPU
Hard Disc Space: 512MB or above
Optical Drive: DVD drive(BD drive is required for ripping Blu-ray disc)

Mac

1G Hz or above Intel processor.
Mac OS X Leopard (10.5), Snow Leopard (10.6), Lion (10.7), Mountain Lion (10.8), Mavericks (10.9)
512 MB physical RAM (memory) or more.
1024*768 or higher resolution display.
Optical Drive: DVD drive(BD drive is required for ripping Blu-ray disc)

Follow this guide to quick learn:

How to convert Blu-ray ISO to Galaxy Tab 3 (10.1/8.0)?

Step 1: Load Blu-ray ISO movie to the Blu-ray ISO to Galaxy Tab 3 Converter.

Insert your Blu-ray ISO to disc drive, and click “IFO/ISO” icon to add your Blu-ray ISO files into Pavtube BDMagic.


Step 2: Select video format.

Samsung Galaxy Tab 3 supported video formats: H.263, H.264, MPEG4, WMV, DivX.
Here we select MP4 with H.264 codec for Galaxy Tab 3. Click the Format drop-down list, and select “Samsung Galaxy Tab 3 Video(*.mp4)” from Samsung category.

Tips: If you have special requirements on target video, click “Settings” to customize video size, bitrate, frame rate and sample rate.

Step 4. Ripping Blu-ray to MP4 for Galaxy Tab 3 (10.1, 8.0).

Click the red “Convert” button to start ripping Blu-ray to H.264/MPEG-4 MP4 for Galaxy Tab 3 10.1, Tab 3 8.0. When it finishes, click the “Open Output Folder” icon to quick locate the converted video.

Once get the converted videos, just copy and dump them to Galaxy Tab 3 via USB. Then you are ready to play Blu-ray ISO on Galaxy Tab 3 10.1, Tab 3 8.0 freely.

Related Articles