Friday, November 28, 2014

Watch DVD movies on iPad Mini, iPad Mini 2 or iPad Mini 3 with Highest Quality

Do you ever imagine that you can watch DVD on iPad Mini, Mini 2 or Mini 3? This article shows how to rip DVDs to iPad Mini accepted format for playback easily.

Apple has eventually gone where many of the consumers, techies, and media’s have long rumored about. Or, maybe from the day when the original iPad came out, this topic had been argued like thousands of times inside the company, among the decision makers. iPad Mini, just 1.8 inch smaller, brings Apple a fresher tablet experience. iPad Mini has 1024X768, iPad Mini 2 and 3 both have 2048x1536p resolution, twice of the first-gen mini iPad. So it is amazing to play DVD movies on the compact and lightweight iPad Mini/2/3.

watch DVD on iPad Mini, Mini 2 or Mini 3

Accepting limited video formats like MP4, MOV, M4V only, iPad Mini series tablets, however, cannot support playing DVD videos and movies directly. In spite of this fact, there are always ways to break through this difficulty.

Convert DVD to iPad Mini - Play DVD Movie on iPad Mini, iPad Mini 2 or iPad Mini 3

Even the playback of DVD disc on computer will consume lots of CPU source, so do not expect Apple will install a DVD drive on iPad one day. However, you can still enjoy classic or hot DVD movies on iPad Mini, iPad Mini 2 or iPad Mini 3 on the go without mobile DVD drive.

Here Pavtube DVDAid- the best DVD to iPad Mini converting software designed with specialized profiles to support DVD to iPad Mini, iPad Mini 2 or iPad Mini 3 conversion effortlessly. In about a dozen minutes, you can backup DVD Pirates of the Caribbean, Transformers 4, Rise of the Planet of the Apes, The Amazing Spider-Man 2, X-Men: Days of Future Past, Captain America: The Winter Soldier or other pop DVD movies to computer hard disk, and then sync to iPad Mini series tablets. And you will find that it is so convenience to play and watch converted DVD movie upon your iPad Mini. (Here is the review)
Go to get it and freely enjoy your favorite DVD movies on iPad Mini, iPad Mini 2 or iPad Mini 3

1. Load DVD (ISO/IFO image file) to Pavtube DVD to iPad Mini Ripper.

Click “Import DVD” button on the top left to load the DVD from DVD-ROM, you can also “Load ISO/IFO” or “Load from folder”. It will only take few seconds for ripping and importing DVD and you will be kept informed of timely state with a progress dialogue box.

When it has been imported successfully, you can preview the whole movie and select the subtitle and audio you want.

DVD to iPad Mini Ripper

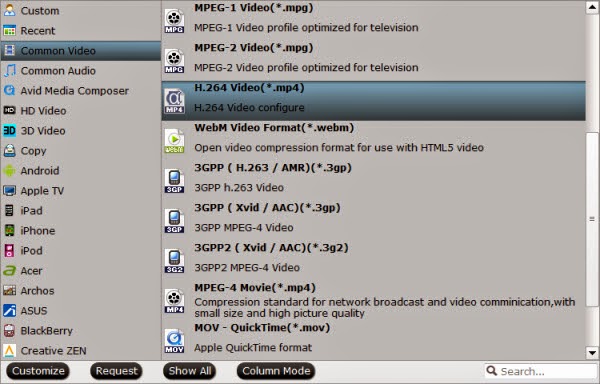
2. Choose iPad Mini, iPad Mini 2 or iPad Mini 3 friendly format.

Click “Format” menu to find the “iPad” option in the dropdown list, choose “iPad Mini HD Video (*.mp4)” for output. It is the most compatible format, which is especially made for iPad Mini, and also fit for your iPad Mini 2 or iPad Mini 3.

iPad Mini, iPad Mini 2, iPad Mini 3 video format

Besides, click “Settings” button on the interface, you will be able to check and adjust the video and audio parameters like bitrate, size, channels, etc. Just do it when you need.

3. Convert DVD movies to iPad Mini MP4.

You can “Browse” your computer to choose a new folder for output file before conversion. When everything is ready, click “Convert” button to start converting DVDs to MP4 for iPad Mini series tablets, then “Open” button will show you the location of output files.

Pavtube DVDAid More Features:
  • Edit the videos before conversion, such as trim, crop, add subtitles, video effect, etc.
  • Convert DVD to many other mobile devices and editing software like iPad Air, iPad Air 2, ATV 3, Nexus 6, Nexus 6 Galaxy Tab S, Galaxy Note 4, Sony Vegas and more.
  • Add srt, ass, ssa subtitles to your movies.
  • Backup DVD main movie to VOB format with original quality.
Now you can sync converted files to you iPad Mini via iTunes and watch DVD movies on iPad Mini, iPad Mini 2 or iPad Mini 3 anytime and anywhere. Hope it will help you.

Learn more:

Tuesday, November 25, 2014

Best Quality Profile Settings for Playing DVD on Surface Pro 3

Wanna play DVD movies on Surface Pro 3? Here gives you the shortcut to rip DVD to Surface Pro 3 without the limits of any DVD protection with faster speed and outstanding quality.

12 inches, 2160 x 1440 pixel-free resolution, 3:2 aspect ratio, Surface Pro 3 exceeds our expectations about tablet display and makes itself an ideal device to watch movies. However, every bean has its black. As other tablet PCs, Surface Pro 3 does not support direct playback of DVDs. That seems a little pity. Here I will give you a relatively easy solution for ripping DVD to Surface Pro 3 tablet.

Playing DVD on Surface Pro 3

Why You Need to Rip DVD Video to Microsoft Surface Pro 3

  • Surface Pro 3 doesn't have a built-in DVD-ROM or DVD player 
  • Many DVDs are protected

To play DVD on Surface Pro 3, you can get a powerful DVD player to play DVD files in either DVD folder, VOB or other formats. If you don't want to change the default media player on your Surface Pro 3, here is another solution: to convert DVD movie to Surface Pro 3 compatible and playable video first, so that you can play it with any different media player.
To bring more convenience to all Surface Pro 3 users, I will make a brief share with all of you.

Preparations for DVD to Surface Pro 3 Backup:

1. DVD disc ready for backup
2. DVD ripper for Surface Pro 3 (for this case, I recommend you Pavtube DVDAid)

Overall, Pavtube DVDAid (also available for Mac users with the Mac versionassists you to remove DVD protections and convert commercial DVD movies yet DVD ISO/IFO files to Microsoft Surface Pro 3 highly supported MP4 video files with high output video quality and fast ripping speed. Just get it and follow the simple tutorial below to copy DVD movies to Surface Pro 3 for playing in just a few clicks! 

How to Rip and Put DVD movies to Surface Pro 3

Step 1. Insert your DVD disc into computer's DVD-Rom and then launch the DVD to Surface Pro 3 Converter. Click DVD disc button to load the DVD movies. You can also import ISO files, IFO files or DVD folder (DVD folders files name appear like "Video_TS") for conversion.

DVD to Surface Pro 3 Converter

Step 2. Choose output profile via clicking the Format bar. Select "Windows > Microsoft Surface Windows RT/Pro H.264 Video (*.mp4)". The output videos could also fit on Surface Pro 3 perfectly.

Surface Pro 3 Video Format

Tip: If you think the video size and image quality are not suitable for your tablet, you can first choose any one of the provided types, then change the settings.

Please remember the file size is based more on bitrate than resolution which means bitrate higher results in bigger file size, and lower visible quality loss. And some of the settings can be tweaked to improve the video quality but it's a balance between quality and size. 

Step 3. When everything is OK, just press "Convert" button to start ripping DVD to Surface Pro 3 .mp4 videos.
Now transfer converted files to Surface Pro 3 and play precious DVD movies with Surface Pro 3 on gorgeous screen in case you have some long journeys and want to watch them in the airport waiting on your flight!

Saturday, November 22, 2014

Play DRM-protected iTunes movies on Nabi 2, Nook HD/HD+ and Coby Kyro tablets

This article will show you how to convert protected iTunes M4V video to Nabi 2, Nook HD/HD+ and Coby Kyro tablets for you kids with Pavtube DRM Media Converter.

Nabi 2, Nook HD/HD+ and Coby Kyro tablets are all full-featured Android tablets designed especially for Kids that lets Kids watch their favorite movies and TV shows. If you have purchased some movies from iTunes store, you must can't wait to transfer those iTunes videos to them so that your kids can enjoy them anywhere they likes.
convert protected iTunes M4V video to Nabi 2, Nook HD/HD+ and Coby Kyro tablets

Even though these kids tablets lack of applications for importing and playing iTunes audio and video files, it can’t hinder us from obtaining media sources in some other way. As long as you have an iTunes Media Converter software at hand, all problems could be readily solved.

The reason is that iTunes video is DRM protected and in M4V format, and removing DRM protection and resetting the file format could enable Nabi 2, Nook HD/HD+ and Coby Kyro tablets to accept media files from iTunes library successfully.

Here Pavtube DRM protection removal- ChewTune is highly recommended to help you get the work done. It is an efficiant combination of iTunes M4V DRM protection removal, video recorder and converter which is able to record and convert both purchased and rented iTunes M4V vidoes to plain MP4 format for playback on kids tablets with all DRM protections striped.

Simply follow the steps below to sync your iTunes movies to Nabi 2, Nook HD/HD+ and Coby Kyro tablets.

Get the program in bundle package: Video Converter Ultimate($65) + ChewTune($29) = Only $74.9, Save $19.1 which can save you more money, then you can enjoy any movies on Kids tablets freely with your kids.


How to convert and recoed iTunes videos to play on Nabi 2, Nook HD/HD+ and Coby Kyro tablets?

Step 1: Download the iTunes to Kids tablet converter

Note:

1. Allow the audio driver installed during the Pavtube ChewTune installation.

audio driver installed

2. Make sure to close iTunes when converting iTunes M4V movies.

Step 2: Add iTunes movies to the program.

Launch Pavtube DRM Media Converter and click "Add Video" or "Add from folder" button and browse files from your computer. Also you can directly drag and drop the source DRM video to ChewTune.

DRM Media Converter

Step 3: Choose output format.

Click “Format” bar and choose “Common Video” > “H.264 Video (*.mp4)” as the output format for playing on your Nabi 2, Nook HD/HD+ and Coby Kyro tablets.

Nabi 2, Nook HD/HD+ and Coby Kyro tablets Video Format

Tip:

If you like, you can click “Setting” option to adjust profile parameters, such as video bitrate, frame rate, audio channels, etc to get a specific video for yourself.

Kids tablet video settings

Step 4: Start the conversion.

After finishing all the settings, you can click the “Convert” button to begin converting iTunes video files to MP4.

It would take as long as the source movie length for the whole DRM video to Kids tablet conversion process since Pavtube ChewTune records DRM videos in 1:1 video and audio quality.

How to transfer the output videos to Nabi 2, Nook HD/HD+ and Coby Kyro tablets?

Connect your kids tablets to computer, copy the file over to the MOVIE folder located in the LLN folder on memeory card. Once completed, just open the build-in video player app on Nabi 2, Nook HD/HD+ and Coby Kyro tablets, and tap the movie to play it.

More related:

Thursday, November 20, 2014

Take extra $9.9 to pay Pavtube DVDAid for Mac

With another Thanksgiving looming around the corner, people can't wait mulling over how to spend the festival with families. In such a cold weather, nothing could be cozier than curling up on the sofa to enjoy Thanksgiving DVD movies with your family members.

Pavtube DVDAid for Mac only costs another $9.9

According to Pavtube Thanksgiving plan, at this promotion page, buy one converting tool, you just need to pay extra $9.9 to get Pavtube DVDAid for Mac- a professional DVD ripping and editing tool. Just contact dvdwindupport@pavtube.com or dvdmacsupport@pavtube.com and get your perferable combination!

How do Pavtube DVDAid for Mac work for you?

Pavtube DVDAid for Mac is an all-in-one DVD converting ripping and editing program that supports converting DVD disc, DVD folder and DVD ISO/IFO files to Apple ProRes/AIC/DNxHD/DVCPRO, MOV, MPG, AVI, MP4, etc. for NLEs like iMovie, FCP X, FCE, Avid Studio, etc. and upload the edited video to YouTube, Vimeo (well support Mac OS X Yosemite and Mavericks). And it's capable of outputting videos in any video formats for playing on Apple iOS, Android, Windows smartphone/tablet, HD media players, Game Consoles, HDD, video projector, 3D TV, Media Server, TV, BlackBerry, PSP, PS3, PS4, Xbox One, etc. with highest video/audio quality.

Besides, it offers the efficient way to copy disc with 1:1 DVD structure and save to computer hard drive without quality loss. What's more, it is a professional video editing software to assist users with trimming, cropping, splitting, merging, attaching subtitles...to create your own videos.

Give it a try, and you will find more powerful features! Buy one converter, you only need $9.9 to get another. So amazing! Isn't it? More  Discount DVDAid can be found at Pavtube Facebook. Have a wonderful Thanksgiving Day!

Read More:

Monday, November 17, 2014

Rip 3D Blu-rays to Plex Server for playback with 5.1 channel on TV via Raspberry Pi

Are you busy to search for the best way to backup 3D blu-ray movies to Plex Server? This guide introduces the 3D Blu-ray to Plex ripping workflow for watching on TV through Raspberry Pi.

3D effect is destined to give audiences a fantastic and lifelike visual experience. Since 3D Blu-ray come into being, the owners are enabled to watch 3D movies at home instead of going to cinema. Now I’ve already been playing with converting 3D Blu-rays – which I own – to h.264 top bottom mp4 files that I can play from my Plex server. I have a Raspberry Pi running the RasPlex distro that connects my tv to the server. I would like to play the full quality 1080p 5.1 files as well as the 3D movies there. I could not find a way to do it with handbrake and makeMKV.
Rip 3D Blu-rays to Plex Server

Backing up 3D Blu-ray movies will be a nice choice as Plex Server can give you a robust storage solution. Here offers a brief instruction to reach the goal.

After widely Internet search for ripping 3D blu rays for playback on my passive 3d tv, I found Pavtube BDMagic for Mac which was recommended on a forum and I tried out the trial. It works perfectly by giving us the ability to store our purchased physical 2D/3D Blu-ray and standard DVD discs to 3D Side-by-Side, Top-Bottom, or Anaglyph video for playback on 3D TV or 3D players.
Well I started ripping my 3D blu ray collection so I’ve successfully ripped Avatar, The Avengers and Jurassic Park and several other 2D blu ray discs such as Zombieland, The Guardian and The Amazing Spiderman, saving time looking for them from the cardboard. If you are working on Windows PC, please get Pavtube BDMagic.


Here is the step-by-step guide on ripping, converting 3D Blu-ray to Plex Server. 

Step 1: Load Blu-ray movies Insert your Blu-ray disc into your BD drive, run the Blu-ray Ripper for Plex and click disc icon to load Blu-ray movies. 
Blu-ray Ripper for Plex 

Step 2: Choose output format Click the "Format" option, and select "3D Video > MP4 Top-Bottom 3D Video (*.mp4)" for playback.
MP4 Top-Bottom 3D Video 

Tip: To keep 5.1 audio when ripping 3D Blu-ray, click “Settings” to go to “Profile Settings” screen and adjust “Channels” under “Audio” option. Set channels to “5.1 Channels” and click “OK”. And then you’ll get 5.1 surround sound after conversion.

Step 3: Start 3D Blu-ray to Plex Server ripping 

Click the "Convert" button under the preview window, and the Blu-ray ripper will start the conversion from 3D Blu-ray movies to Top-Bottom 3D MP4 for Plex Server. 

After conversion, you can store 3D Blu-ray movies on Plex Server and stream through my Raspberry Pi onto my 3D TV. I also stream them from my plex server using the plex apps on my mobile devices. The server transcodes them from playback on those devices.

In addditon, copying Blu-ray/DVD to WD My Cloudrip DVD to a Laptop with Projector, and enable 2D/3D Blu-Ray and DVD Playback in XBMC are not so difficult as you think.  

Saturday, November 15, 2014

HDTV can’t recognize the ISO files on the USB storage?

If you are looking for a converter to rip your ISO to to USB for HDTV playback, the tutorials here will teach you how to convert BD/DVD ISO to HDTV supported format.

I am trying to figure out what is the best format to watch HDTV on a 42 inch LCD screen that is connected to a WD TV Live Hub via HDMI cable. I've watched most of the formats supported, but have yet to see some iso files from my USB flash drive, it seems that my HDTV can’t recognize the ISO files. I am looking for any suggestions as to the best. What the best/easiest/fastest software is to use? 

watch iso on tv

Here, in my own opinion, you need to convert your Blu-ray/DVD ISO files to HDTV supported format fist. If you want to convert ISO videos for easily sharing or playing on HDTV, then you are definitely in the right place here! In this article, you are going to learn how to do iso to HDTV conversion with fast ripping speed and lossless video quality.

To accomplish the task, what you need is an intuitive tool that can convert Blu-ray/DVD ISO files to a format that your HDTV can recognize. Haven't got a clue? Here Pavtube BDMagic or BDMagic for Mac is highly recommended to help you do that Blu-ray/DVD ISO to H.264 Video conversion for HDTV.


Now don't hesitate to try the program and check out the guide below on how to convert Blu-ray/DVD ISO image files to HDTV videos on Win/Mac step by step.

Step 1: Add ISO files to the ISO to HDTV Ripper

You can click the “Load ISO/IFO” button to import Blu-ray/DVD ISO files. Or drag and drop the ISO files directly to the app.

ISO to HDTV Ripper

Step 2: Select H.264 MP4 as the output format

Click “Output Format” option to reveal the format drop-down list. In the “Format” > “Common Video” column, find "H.264 Video(*.mp4)" and choose it as the output format since it is a HDTV supported format.


PS: Except output MP4, Pavtube BDMagic also support output universal video and audio formats like H.264 MKV/MP4/AVI/MPEG-2 for playing on HDTV, etc.

And you can click settings button to adjust the output parameters before converting ISO movie to HDTV. Adjust the resolution, bitrate as you want, you can also keep it as default, which is presetted.

MP4 settings

Step 3: Start to convert Blu-ray/DVD ISO to HDTV

After everything is done, hit the “Convert” button to convert ISO to H.264 MP4 for HDTV. And all the tasks will be done at fast speed and high quality. The conversion speed often depends on the original video size and your PC configuration.

When you conversion finished, you just need to transfer converted movie to USB storage and play your ISO video on HDTV with best mp4 format. Bingo! You made it! Have a nice time!

Tuesday, November 11, 2014

Top Best 3 DVD to Music Rippers Review- Convert DVD to MP3/AAC/AC3 Audios

This article gives the introduction of best 3 DVD to music rippers for converting audio from a DVD to MP3/AAC/AC3 for playing with music players.

Are you a DVD collector? Ever thought of ripping a certain dialog from your favorite DVD movie? Or rip music from your choice DVD so you can save to iPod, iPhone or upload to YouTube, MySpace? In fact you need nothing but a DVD to music ripper. Yes, this article is talking about best 3 DVD to music rippers and review on them right away.
Top Best 3 DVD to Music Rippers
Top 1. Pavtube DVDAid

Price: $35

Pavtube DVDAid

To DVD music to MP3/AAC/AC3 audio files, Pavtube DVDAid can do the job for you. Numerous popular audio formats from Blu-ray, WMA, WAV, M4A, AAC, AC3 and OGG are supported. It offers easy and effective solutions to extracts audio files from DVD; you can even choose which segments to extract. Furthermore, you can preview the video with the built-in player and even take a snapshot of a certain scene. Extracted audio still maintains its high quality. 

Pros: Easy to use; Editing features; Support dealing latest DVD disc, DVD folder and DVD ISO/IFO files
Cons: No support for outputting Apple Lossless Audio Codec
OS: Windows XP/2003/Vista/Windows 7/Windows 8/Windows 8.1/Windows 

Top 2. Tipard DVD Ripper Platinum

Price: 1 year: $39; lifetime: $59
Tipard DVD Ripper Platinum

Tipard DVD Ripper Platinum features super-high output quality, ultrafast conversion speed and pretty high compatibility in terms of converting any DVD (Disc/Folder/IFO) to popular video/audio formats, like MP4, WMV, AVI, MOV, MKV, M4V, MPG, MTV, SWF, MP3, FLAC, WMA, etc. Its all-round capability also benefits 3D video zealots, as it provides best solution to convert DVD to 3D videos for high-end HD TVs as well.

Pros:Output various Audios; Versatile Editions; Rip DVD to popular 3D format; Works with DVD discs, folderes, and ISOs as input
Cons:Cannot output/store as DVD folder or ISO; Need much time to access the right title you want to convert
OS: Windows XP (SP2 or later), Windows Vista/7/8

Top 3. Xilisoft DVD Audio Ripper

Price: $29.95
Xilisoft DVD Audio Ripper

Xilisoft DVD Audio Ripper extracts audio files from DVD; you can even choose which segments to extract. Furthermore, you can preview the video with the built-in player and even take a snapshot of a certain scene. Extracted audio still maintains its high quality.

Pros:Specify Exact Target File Size;Rip Audio From a Segment in Video; Customizable Lyrics
Cons:Support only DVD-Video, DVD folder, IFO File; Few output format; cannot trim a segment of one title to audio; 3 times slower
OS: Windows XP (SP2 or later), Windows Vista, Windows 7

Conclusion

As you can see, Pavtube DVDAid is your best choice to copy audio from a DVD and convert DVD music to MP3/AAC/AC3 file for different music players with intact quality due to its comprehensive features, fastest conversion speed and quality service. The windows version is Windows 10 compatible and the mac version: DVDAid for Mac can also support the lateast Mac OS X 10.10 Yosemite. 

Besides, it can rip DVDs to popular video formats, AVI, MOV, WMV, MP4, FLV etc, for playback on PC, Mac and mobiles or uploading to video-sharing website. Bettter still, it makes perfect copy of your DVD discs with original structue to protect DVDs from being scratched.

More tips: 

Friday, November 7, 2014

Rip DVD to MP4 for using a Laptop with a Projector with Ease

This article mainly introduces the best DVD Ripper to help you make it easy to rip copy protected DVD to MP4 for using a Laptop with a Projector. 

I'm a DVD lover, and I have some DVD videos for a church program. Now I want to put them to my portable laptop for watching. As the laptop doesn't have a built-in DVD player and could not read the file, I need to convert the 11 lessons DVD to videos that could be loaded into the laptop using a thumb drive or with my attached projector. 
Rip DVD to Laptop with Projector

Looking fo ways to copy and rip the files from DVD to laptop with a projector for watching without the disc being inserted as above? Consider it done now! In this article, you'll learn how to rip DVD movies to a Laptop with a Projector easily and quickly.

By simply searching on the net, it is easy to find various DVD Converter. Here with this versatile DVD ripping tool- Pavtube DVDAid, you can easily remove all kinds of DVD copy-protections and after you convert DVD to MP4, the output quality is still as vivid as original. And a lot of videos formats are supported to output, so you are able to watch them on your smartphones or Android tablets, as well as to upload them to YouTube or Facebook for sharing with friends. (If you wanna a Mac version, please go to Pavtube DVDAid for mac.) 

Download and installed the software and experience all the functions now. I will share my guide to rip DVD to MP4 for using a Laptop with a Projector.

Step 1. Launch the best DVD Ripper and load DVD discs.
DVD to MP4 Ripper 

Step 2. Click "Format" to find "Common Video" catalogue, select "H.264 Video(*.mp4)". Or choose "HD Video > H.264 HD Video(*.mp4)" to get HD quality.
best format for playing on Laptop 

Step 3. Click "Convert" to start backing up DVD to MP4, when completed, click "Open" to find the generated files. 

Obviously, with this easy to use DVD converter software, to convert DVDs into other video formats becomes an easy task.
After conversion, get your computer playing the transcoded mp4 videos, show the monitor on screen and the projector will display your DVD with high quality. Have fun!

Tips:

Some projectors include speakers, but the quality is not as good as that from your professional surround sound 5.1 speakers or external speakers. You just need to plug external speakers to the port for headphones. 

More features of DVDAid:
  • Directly Copy will help to backup the 100% intact DVD main movie and output an VOB files with multiple audio and subtitle tracks for DVD.
  • Full Disc Copy can 1:1 backup the entire DVD with original structure and chapter markers.
  • Convert DVD to many other devices like iPhone 6/6 Plus, iPad Air 2, iPad Mini 3, Samsung Galaxy Note Edge/Galaxy Note 4, Galaxy Tab S, Amazon Kindle Fire, Surface Pro 3, etc.
What's more, you can stream DVD via Plex, remux Blu-ray for HiMedia 900B and play BD/DVD on XBMC in an easy and fast way.

Thursday, November 6, 2014

Greatest Halloween Promotion- Get 50% OFF wonderful Halloween gifts

This Halloween Pavtube offers 50% off on ALL BD/DVD movie backup tools and video converters, enjoy your most joyful Halloween ever! Expire on Nov 10th~
 
Hey guys! How is everything going? Did you have an exciting time at Halloween? LOL~

2014 Halloween has just past away, but the holiday mood still exists. Many people might watch Halloween horror movies later, and some others might have been gifted a Halloween themed Blu-ray or DVD disc. What's more, there's no doubt you would not miss the opportunities to take wonderful video clips to record beautiful and happy memories at the Halloween party.


At this moment, nothing would be better than a promo offer for Halloween from Pavtube- 50% off on ALL BD/DVD movie backup tools and video converters befor Nov 10th, 2014. Sound so great? Let's see how these featured products works and hope enjoy your most joyful Halloween ever this year!

2014 Top Halloween Promotional Items Review: Blu-ray/DVD/Video backing up and converting Tools

1. Pavtube DVDAid (50% OFF)

Pavtube DVDAid outstands among the similar DVD ripping software in market for some highlight features such as the capacity to rip any DVDs like (TV Series, general family movies, music DVD and DVD MV), edit DVDs with DIY features, make 1:1 backup of DVDs, huge numbers of output formats, super fast ripping speed, etc. No wonder it is widely thought to be an ideal program for all Windows users(including the latest Windows 10 users) to backup, edit and convert DVDs on PC.

2. Pavtube DVDAid for Mac(50% OFF)

Well, at the time of Halloween season, why not bring the Halloween mood by ripping DVDs(including newly released DVD movies) to your mobile devices like iPad Air 2, iPad Mini 3, iPhone 6/6 Plus, Galaxy Note 4, Galaxy Note Edge, Nexus 6, Nexus 9, Kindle Fire HDX, Surface Pro 3, or some HD Media Players for playing? Or do you want to store your horror DVD movies onto Wi-Drive and 12T LaCie Thunderbolt Drive? Or even upload DVD(TV series) to YouTube or Vimeo? It's a piece of cake to realize all these goals by using this professional Mac DVD ripping & backup tool- DVDAid for Mac to do DVD conversion on Mac (OS X 10.10 Yosemite supported) in a few clicks without quality loss.

3. Pavtube BDMagic (50% OFF)

If you are fond of spooky effect, have you thought of ripping hair-raising sounds from a special Halloween thriller Blu-ray and play them by a PMP or cell phone hidden in a place hardly found? Or prefer enriching your watchlist with some Halloween Blu-ray movie on BenQ W1070 3D Home Theater Projector and 3D TV with horror atmosphere at this festival? Pavtube BDMagic will be a helpful tool to deal with those protected horrible Blu-ray and DVD videos and rip them to any video formats in 2D for enjoying on your iPhone, iPod, iPad or to or 3D AVI/MKV/MP4/MOV/WMV for playing on 3D devices and share them with your friends anytime anywhere you want.

4. Pavtube BDMagic for Mac (50% OFF)

Feel frustrated after made every effort to find an easy way to copy your Halloween themed moives in Blu-ray, DVD on Mac? Luckily, all your work pays off and BDMagic for Mac would be all-in-one combination to do all the jobs in few clicks. In addition to backing up 2D/3D Blu-ray and standard DVD with original structure, it can also convert them for watching on iPhone 5S/5C/6/6 Plus, iPad Mini (2/3), iPad Air(2), Nexus 4/5/6/7/9/10, Galaxy Tab S, Galaxy Note 3/4/Edge at this spooky holiday with fast speed and wonderful quality.

5. Pavtube ByteCopy (50% OFF)

What the discounted Pavtube ByteCopy can do for you?
  • Rip/Convert the latest Blu-ray/DVD (Halloween movies, Disney movies, family movies, etc) for playback on iOS/Android/Windows devices and HD Media Players;
  • Copy any Blu-ray and DVDs to MKV/MP4/MOV with multiple audio and subtitle tracks as well as chapter markers preserved;
  • Backup the intact Blu-ray main movie in original m2ts format with super fast speed;
  • Make copy of the entire disc with only one-click.
6. Pavtube ByteCopy for Mac (50% OFF)

How to edit with Halloween Blu-ray/DVD with FCP/iMovie, enjoy on VLC with multi-track, upload to YouTube or stream via Plex, NAS, e-library or other media server? All-around ByteCopy for Mac offers effective horror multi-track BD/DVD ripping solution. Whether you are going to backup/copy/edit/convert your Blu-ray/DVD, it will be your best aid.

7. Pavtube Video Converter Ultimate (50% OFF)

With the videos recorded at Halloween, we could review and re-experience the happy hours of these holidays in the future and share such happiness with workmates, friends, classmates, etc. by uploading these videos to online video sharing sites. Pavtube Video Converter Ultimate is an extremely all-in-one powerful app to realize. It is able to convert, edit, enhance, capture any Halloween Blu-ray, DVD and recorded Video files for playing anywhere and anytime you like.

8. Pavtube iMedia Converter for Mac (50% OFF)

Grab your camcorders or cellphone and take down every bit of your Halloween knack, then upload them to your blog or video sharing sites to elicit amazement. You can do it this way by using iMedia Converter for Mac. Whether you are going to download the horror movies 2014 list in 4K UHD, a 1080P HD or other movies or music Blu-ray/DVDs, the all-in-one Blu-ray/DVD/Video coverting tool has the ability to rip Blu-ray/DVD and convert video to AVI, MP4, WMV, MKV, MOV, FLV, RMVB and many other formats for good playback on portable devices and fast spread over the internet.

Hurry up now! Get greatest discounts on these must-have tools and get your wonderful Halloween gifts with half price! Last 5 days Only! Just liven up this wicked festival! Enjoy your happy Halloween season!

Please visit https://www.facebook.com/pavtubefans/app_198826126804423 for more sales promotion information.

Tuesday, November 4, 2014

Convert and Import YouTube video to Windows Movie Maker

Wondering how to make YouTube videos awesome by editing YouTube videos in Windows Movie Maker? Here is an effective solution to help you out. 

YouTube is a great service; it has revolutionized how many of us consume our media. Find some awesome MV (music video) of your favorite artists on Youtube and want to download & edit them in your editing program like Windows Movie Maker for sharing with your friends?

editing YouTube videos in Windows Movie Maker

However, many Windows users may not DIY Youtube FLV Video with Movie Maker smoothly. Because Movie Maker doesn't support FLV format, which means you can't directly import Youtube flv to Windows Movie Maker, then how to solve it?

The following article will introduce an effective way- how to download YouTube videos for Windows Movie Maker, convert YouTube videos (FLV) to WMV/AVI format for Windows Movie Maker and put YouTube videos into Windows Movie Maker. 

Part 1. How to download videos from YouTube?

Step 1: Download, install and launch Pavtube YouTube converter 

Once you run this . With [/URL">YouTube Video Downloader Sniffer on, the app will capture the URL of current playing video for you, and pop up a viewlog for you to determine either download or ignore the video. With Sniffer off, you could add URL manually.

Step 2: Add URL and select output format 

Click "Add URL" and then copy and paste the URL of the YouTube videos. By the way, if you want to keep the original FLV files as well as the converted files, you can tick “Keep FLV source file”. 


YouTube Video Downloader

Step 3. Click on “Convert to” format bar and select the format as you wish.

Once all settings are completed, just click “OK” to start, and the converter will show you the downloading and converting info in details. After conversion finished, you can click “Open” to find the downloaded raw FLV files as well as converted files. 

Part 2. How to convert YouTube videos to AVI/WMV for Windows Movie Maker?

Pavtube Video Converter Ultimate is proven to be an excellent YouTube video converter which can convert downloaded YouTube videos to the most compatible format for Windows Movie Maker AVI or WMV with ease. Thereafter, you can edit the video downloaded from YouTube on your terrific Windows Movie Maker without hassle. In addition to YouTube video, this converter also allows you to convert all your video and audio files in various regular formats AVI, MKV, WMV, MPG, VOB, TiVo, MOV, MTS, etc.
This YouTube converter is also equipped with rich editing features, so you can customize your videos just as you want. 
    
Below is the getting started guide for this program. 

Step 1. Add YouTube Video

After downloading and running the program, load YouTube videos to it by clicking Add button or simply drag & drops. You can add many files and convert them at one time.

YouTube Video Converter

Step2. Select output format 


Hit the "Format" bar and select "HD Video > WMV HD(*.wmv)" as the output video format. AVI is also the choice for editing in Windows Movie Maker. 

Windows Movie Maker Video Format

Tip: Adjust the video and audio parameters, including the Bitrate of Video&Audio, Video Size, Sample Rate, Frame Rate, Audio Channels, etc., by clicking the Settings button on the main interface for getting the best quality. 

Step3. Start converting YouTube FLV video to Windows Movie Maker 

Tap "Convert" button to start YouTube FLV video to Windows Movie Maker. You can check the conversion process in the Window. After conversion, click "Open" to get your converted video files, it is easy for you to import the transcoded YouTube FLV video videos to Windows Movie Maker for further editing. 

Tip: With this highly rated YouTube Video to WMM Converter, you can also convert YouTube to Sony Vegas, Adobe Premiere Pro, Pinnacle Studio and more.

Part 3. Edit YouTube Videos with Windows Movie Maker 

Now you can begin to put converted files into your Windows Movie Maker. Click on "File" and choose "Import into collections". A window will appear. In the window, navigate to the video clip you downloaded and converted from YouTube just now. Then double click on the file. You'll see the icon for the file in your Windows Movie Maker "Collections".

Edit YouTube Videos with Windows Movie Maker

About Windows Movie Maker:

Windows Movie Maker is a totally free program that comes with Windows XP Home Edition, Windows XP Media Center Edition, Windows XP Professional, and Windows Vista (also called Windows DVD Maker). 

Windows Movie Maker accepted video files:

Video files: .asf, .avi, .wmv
Movie files: MPEG1, .mpeg, .mpg, .mlv, .mp2
Audio files: .wav, .snd, .au, .aif, .aifc, .aiff
Windows media files: .asf, .wm, .wma, .wmv
MP3 format audio: .mp3

In addition, you can also edit Sony XDCAMAVCHD video and XAVC S video on Mac. 

Related articles

Saturday, November 1, 2014

Convert all movies to MKV for playing on Android with MKV Player

Want to find an easy solution to rip Blu-ray to MKV for playing on Android devices with MKV player? In this article you will get the best ripping tool and use the top media player to realize.

Playing all Blu-ray movies on Android devices

Have collected many Blu-ray discs and want to transfer these fantastic movies to your Android device, such as Samsung phone, Nexus device or Xperia tablet for playback? As Blu-ray carried with more copyright protection including region code, AACS, BD+, etc. All of these will put limitation to play Blu-ray on Android at will.

rip Blu-ray to MKV for playing on Android

Why need convert all Blu-ray movies to MKV format? 

MKV is a common video file defined by Matroska Media, a new multimedia package format. The feature of MKV is that it could hold many types of encoded video, audio and subtitles stream. (Read Main advantages of using MKV format)

To get high quality video when enjoying Blu-ray movies on Android devices, a nice choice is to convert all Blu-rays to MKV and install a MKV player to watch on Android. Then this article focuses on the best and easiest way to realize this magic dream.

Part I: Ripping Blu-ray movies to MKV

First and for the most, you need to choose a professional app as your assistant for Blu-ray to MKV ripping. Fortunately, you don't have to be an expert to convert Blu-ray to MKV. Just get Pavtube BDMagic, and you can turn incompatible Blu-ray movies to MKV format in a few clicks with super high speed and keep the output files in good quality simultaneously. If you know well about the video parameters, you can make changes to them if you want. No manual settings are required. Then, let's begin the conversion process.

Tip: If you the movie you wanna convert are Blu-ray, you need a Blu-ray drive.

Step 1. Run the Pavtube BDMagic (Fro Mac: BDMagic for Mac), insert Blu-ray discs and load them by clicking "Load files".

After completing movie content loading, this BD/DVD ripper software will analyze your disc and display all the available segments. The app will also automatically choose the recommend title to rip.

Ripping Blu-ray movies to MKV

Step 2. Select output format

Click on the drop down list of “Format”, and then follow “HD Video”> "MKV HD Video (*.mkv)".

MKV video format

Step 3. Adjust video and audio parameters

Pavtube Blu-ray to MKV Converter allows users customizing the output file quality by clicking “Settings” button to adjust video and audio parameters including codec, aspect ratio, bit rate, frame rate, sample rate, and audio channel.

Step 4. Convert Blu-ray to MKV

Just click Convert Button to do Blu-ray Converting, and you can do other things before the conversion is completed. The output video will be kept with high quality.

After that, get converted mkv videos via "Open" botton.

Part II: Installing MKV player for Android

Now start installing a top MKV player for easy and smooth playback converted mkv on Android devices. When comes to MKV players, here are some recommendations for you:

MX Player is one of the most popular video players on Android right now, it has a nicer interface and a few more configuration options, but requires a manual codec download to play certain videos (particularly those with DTS audio).

By far the simplest video player we tried was the VLC beta for Android. It played everything we threw at it with no codec installations required, and we were up and running with our videos in seconds. It was a tiny bit slower and buggier than other options, but it is in beta.

mVideoPlayer is a popular alternative with a beautiful, media center-like interface. Its big downside, however, is that it only supports formats that your phone natively supports. But again, if you're converting your videos before syncing them anyways, it's worth a look.

There are a ton of other options for you. But of everything we tested, we think the above players are most likely to fit just about anyone's needs, you can check them out to see what's right for you. (What's more, you can convert MKV videos to be played on Apple TV 3, Surface 2 and to be steamed over DLNA.)

Now just enjoy all your Blu-ray movies on Android using MKV player with high quality. Have fun!