Friday, June 27, 2014

Upload music DVD files to play on your Mobile Phone

Looking for the best way to back-up your music DVD for playing on your mobile phones? Get the best DVD Ripper to rip and convert your DVD with original quality.

Apart from the basic functions of calling and SMS, a mobile phone is also a pretty good multimedia player, which enables you to play games, enjoy videos/music and browse images, etc., so long as the media is accepted by the specific phone.


As a DVD collection fan, you may have many classic music DVDs, then what if to play DVD on your mobile phone, such as Nokia, HTC, etc?

Do not worry, that's where this article originated from.

As we all know, DVDs are usually hard to be backed up due to region code and disc encryption protection, you’d better to use a DVD copying program to remove the disc protection and copy source disc with same structure preserved. I have done google search and the resulting ratings sites rated Pavtube DVDAid highly. Most important thing is I like its ability to rip and encode for many popular devices.
Main features:

1. High Speed
2. Audio Quality
3. Friendly User Interface
4. Ability to converts different types of DVD formats
5. Advanced functions to convert DVD to video formats

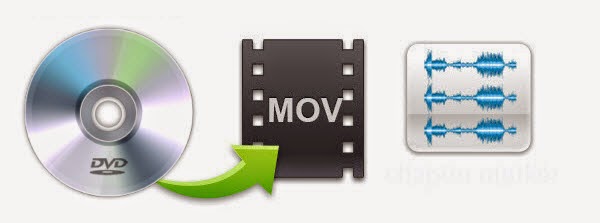
How to Rip my DVD to MP4 for free playing on Mobile Phone?

Step 1. Launch the highly recommended DVD to mobile Ripper. Click the "DVD" icon to load DVD movie from ROM, "ISO/IFO" icon to import movie from DVD ISO or ISO. When importing DVD movie you need to keep your PC/Mac networked so as to access keys for hacking DVD copy-protections.


Not a DVD enthusiasts? Want to copy 1080p Blu-ray to your mobile phone for seeing it? Well, I think the best Blu-ray to Mobile Ripper is what you need.

Step 2. Optional - You can click on the dropdown list of "Subtitles" to select subtitles of desired language so that you can view DVD films on your phone with proper subtitles, same steps you can do with Audio track selection. Make sure you select the main movie before setting subtitles.

Step 3. From the drop-down list of "Format", you will see many presets sorted of different device models and programs. Move your cursor over the left column to locate your device model/manufacturer, or you can try the small search box on the bottom right corner and select the exact output formats for your mobile phone.


Step 4. Optional - If you think the video size this not suitable for your Phone, you can first choose any one of the provided type, then change the settings, see the following picture:

Please remember the file size is based more on bitrate than resolution which means bitrate higher results in big file size, and lower visible quality loss.

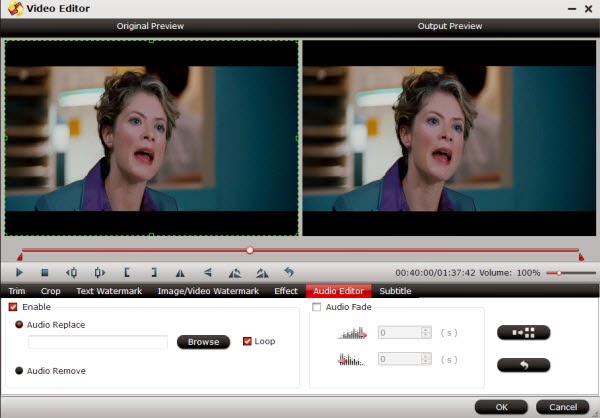
Step 5. Optional - You can click Edit to enter the video editing window. Video editing functions like Trim, Crop, Rotate, Add Watermarks and more are provided, enabling you to polish your videos up in clicks.

Tip: If you want to replace/remove original audio of your music DVD, or set audio fade in/out effects, pls turn to Audio Editor and do settings.


Step 5.
Click the big "Convert" button to let the software do the DVD to MP4 conversion. After the ripping, you can click "Open" to locate the converted MP4 video files and just transfer them to your put them to your mobile, and then you can enjoy your favorite music DVD movies on the mobile phone wherever you go.

Additional Tips:

1. If you want to convert all kinds of videos (including MKV, AVI, Tivo, VOB, FLV, MPG, DVD, Blu-ray, ISO, IFO, etc.), a software can be completely solved, it is Pavtube Video Converter Ultimate.

2. I used another Pavtube program called ByteCopy to backup my DVDs without quality loss. Meanwhile, several audio tracks and subtitles are preserved so I can switch language when watching movies.

Thursday, June 26, 2014

Backup your Blu-ray disc without worry about scratched by your kids

WIth the high qualiy Blu-ray discs in hand, it is necessary to keep an eye on how to protect your favorite Blu-ray disc from scratched by your kids. This article mainly tells you how to backup your Blu-ray movie without worry about this issue

When I bought blu-rays, sometimes my kids have damaged them by accident. And I used to hate whenever my BD discs got scratches which would affect the playing of the flick.


In this case, it will be a wise decision to backup your Blu-ray disc as first for future watching conveniently. Looking for third-party software to copy Blu-rays without sacrificing the picture quality?

For mac users, here Pavtube BDMagic for Mac is the best tool to remove the Blu-ray/DVD copyright protection of the disc and convert to whatever videos you want. With it, you can enjoy your favorite Blu-ray/DVD movies at any time without worry about scratched by your kids. And it will provide you two ways to backup of the Blu-ray discs, just choose the one you like most.

First of all, free download Mac version (Pavtube BDMagic is for Windows users) and run the software to learn how to copy Blu-ray disc in 2 ways.

Step 1. Import Blu-ray discs to Pavtube BDMagic for Mac.

Run the best Mac Blu-ray backup software, click "Load files" icon to load the Blu-ray discs. After successful 100% load, click the select main title you are able to preview the whole movie in the preview window, which works just like a media player.

Note: When loading discs, please make sure your computer is networked and Blu-ray disc drive is installed properly.


Step 2. Two ways for copying Blu-ray disc to avoid scratched by kids.

Method 1. Full disc copy: 1:1 backup the entire disc with original structure and chapter marks

If you want to copy a 3D/2D Blu-ray discs in output files for further playback, or keep the original structure of disc for further creating ISO files or DVD discs, that is what exactly "Full disc copy" can do for you.

Click "Copy the entire disc" icon on the interface and you are brought to conversion progress immediately. After conversion, go to "Open output folder" you will get a generated folder combined with two folders: "BDMV" and "CERTIFICATE". All the M2TS files are located in BDMV folder.


Tip:
Here BDMagic for Mac ($49) + DVD Creator for Mac($35) = Only $49.9, Save $28.1 is preferable for users who want to backup/burn Blu-ray disc. And this bundled product will give you a special price and save more money! Try it right now if you are interested.

Method 2. Directly Copy: 100% backup the intact main movie of Blu-ray discs

If you just want to copy the main movie for playback without the menu and promotional clips etc, "Directly Copy", which will takes less time for conversion and occupies less space than Full disc copy, is right for you.

Click "Format" menu and go to "Copy" option, choose "Directly Copy" for output format.


Then click "Convert" button to start conversion. Once finished, you will get a converted file in M2TS format for Blu-ray disc.

Every time when the conversion is finished, "Open" button on the main interface will help you to locate the generated files.

Above all, you can choose any way of them to copy your Blu-ray disc without quality loss and then share them with your family or friends. And now you will not worry about the problem that you Blu-ray disc will be scratched by your kids!

More related: 

Convert DVD to Digital Copy in Windows/Mac
Tips and Tricks for Selecting a Blu-ray to MKV Ripper

Tuesday, June 17, 2014

Rip and Copy DVD to Multi-track MOV for watching on iOS devices

This article tells how to convert DVD to MOV with several languages (audio tracks), so we can watch them on iDevices smoothly.

If you are a DVD lover, you may have collected many DVD movies in hand. One question is, when you want to play DVD movie on your IOS devices with the option of switching audio tracks to get different languages, you will be frustrated by numerous DVD protections and limitations.


Don't worry, this DVD to multi-track MOV tutorial will help you out to backup DVD to MOV keeping all your wanted audio tracks. So you can watch them on iPad, iPhone, iPod touch smoothly.

To accomplish all the tasks, Pavtube ByteCopy is really recommended. This ByteCopy works as the pro version of normal DVD ripping tools, which is capable of rolling off DVD protection and transcode your movie to multi-track MOV format with best quality.

Mac version is available here: Pavtube ByteCopy for Mac; well support Mac Mavericks!

Download a trial before purchase, and follow the guides below:

How to copy DVD to MOV with multi-track for playback on iOS devices?

Step 1. Launch ByteCopy and load disc

Click the "Load file(s)" icon to import DVD disc (need an external DVD drive), DVD ISO image files and DVD folder.


Step 2. Choose Multi-track MOV

Click the "Format" drop-down list and choose "Multi-track Video>Multi-track MOV(*.mov)" for IOS devevices.


Step 3. Adjust settings (Optional)

Click "Format" to adjust video settings like video size, bitrate, frame rate, etc.

Switch to "Audio" tab, you can free choose wanted audio tracks and set the audio channel.


Step 4. Start conversion.

Back to main interface and click the big "Convert" to start converting DVD to multi-track MOV for playback on iPad, iPod, iPhone. After conversion, click "Open output folder" to quick locate the converted video.

Transfer and watch Multi-track MOV videos on iDevices

1. Get a multi-track player installed on iDevices

Search words like "multitrack player" on App Store and you can find plenty of players that support multi-track mov. I use VLC Media Player for IOS so just show how it works in this guide:

Find VLC for IOS in AppStore and install it to your IOS devices.


2. Transfer your multi-track MOV videos to iDevices via iTunes.

Connect your iDevices to your Mac via USB cable, switch to App tab, find VLC icon, click "Add" to add converted multi-track MP4 into this app.


3. Play multi-track MOV movie with desired audio track with VLC on iDevices.

Open VLC app on your iPad or iPhone, find the transferred MP4 video and you are able to select any audio track when you watching the movie on iDevices.(Also read how to play DVD in VLC on Mac with selected audios/subtitles)


Money saving bundles:

ByteCopy($42) + Video Converter Ultimate($65) = Only $79.9, Save $27.1
ByteCopy($42) + DVD Creater($35) = Only $44.9, Save $32.1
ByteCopy($42) + Vidpie($29) = Only $54.9, Save $16.1
ByteCopy($42) + MXF MultiMixer($45) = Only $69.9, Save $16.1

Related articles:

Transcode BD/DVD to Lossless multi-track MKV for streaming to TV/Projector via STB
Move Disney DVDs to kid's tablet with multi-track for more enjoyment
How to convert BD/DVD to Multi-track MP4 for Galaxy Tab 3

Sunday, June 15, 2014

Up to 50% OFF Promotional items as 2014 Father's Day Gift at Pavtube

Now it’s time to celebrate that all-important guy in your life—dad. Dad is notoriously the toughest family member to shop for. If you've waited until now to pick up this year's Father's Day Gift, then you're going to need a great idea — fast.

Luckily, to celebrate Father's Day with you, Pavtube Studio launch a huge Coupon Code as the 2014 Father's Day Special Offer. Up to 50% off for your beloved dad! Backup your dad's favorite Blu-ray/DVD movie to iOS/Android gadgets, HD TV, home theatre or game console. Even better you can make a father's day video for your beloved dad on your own! It’s more precious than just picking up something on store casually! 


Her are Pavtube Great Deals and Specials at Father's Day 2014 weekend

1. 50% OFF Pavtube DVDAid (Win/Mac) as Father's Day Gift 2014

With this professional DVD ripping tool, playing DVD movies on DVD player at home has never been a problem for you. And you can now freely enjoy your favorite DVD movies on the road without worrying about the issues they jump on the most crucial scenes and are prone to scratches.

2. 30% OFF Pavtube Video Converter Ultimate/iMedia Converter for Mac as Father's Day Gift 2014

An all-in-one solution to fast convert Blu-ray/DVD and various videos to virtually any video/audio format for watching on any Android/iOS/Windows devices. Save a 100% intact BD M2TS/ DVD VOB movie without extras.Backup 3D Blu-ray movies to 3D video for watching on 3D devices with pleasant quality. 

3. 20% OFF Pavtube ByteCopy (Win/Mac) as Father's Day Gift 2014

An easy to use Blu-ray and DVD movie ripping program is capable of ripping 3D Blu-ray discs, 2D Blu-ray Discs and standard DVDs to required video formats. Most important, it can lossless BD/DVD to MKV backup with multiple audio/subtitle tracks and convert BD/DVD to Multi-track MP4, MOV, AVI for watching on Plex, Roku 3, WDTV Live, Popcorn and more HD media players.

Like our Facbook page to get it Now! Expires on June 21, 2014. Never miss it!


More money saving bundles can be found here: 


Friday, June 13, 2014

Watch 1080p/720 HD Videos and DRM Videos on Galaxy S5 with best quality

Have no idea to transfer 1080p/720 HD Videos and DRM Videos to Samsung Galaxy S5 in best video quality. Read the article to learn how.

Watching all kinds of Movies on Galaxy S5 Would be Nice


Samsung announced the Galaxy S5 Android smartphone at Mobile World Congress 2014 in Barcelona, Spain. The Galaxy S5, follow-up (naturally) to 2013's Galaxy S4, the screen measures in at 5.1 inches and 1920 x 1080 resolution, with an IR blaster and USB 3.0 rounding out the inputs. It's running Android 4.4.2 on a 2.5 Ghz quad-core processor with 2 GB of RAM and 16/32 GB of storage (plus microSD). With all these specs, Galaxy S5 can provides users an unmatchable HD movie enjoyment.


So, what video files play on Galaxy S5? What video codecs does the Galaxy S5 support?

From Samsung official website, I know MP4, M4V, 3GP, 3G2, WMV, ASF, AVI, FLV, MKV, WEBM, H.263, H.264(AVC), MPEG4, VC-1, WMV7, WMV8, VP8 video format and codec can be natively supported by Samsung Galaxy S5. For other HD files in XviD, DivX, M2TS, MTS, MOV, VOB, MKV(DTS encoded), etc codec or formats, or DRM video like iTunes, Amazon or Google Play videos, Galaxy S5 will not open and read.

Part I: Watch 1080p/720p HD Videos on Galaxy S5

In some time, you may also need a video converter on Galaxy S5 to convert videos to compatible formats for further usage, which is best video converter for Galaxy S5?

Here, Pavtube Galaxy S5 Video Converter Ultimate is your best choice. It has easy quick interface, and great final file quality.

(For Mac users: Get iMedia Converter for Mac and here are mac tips for transferring MKV, AVI, VOB, Tivo, MPG files to Galaxy S5 easily)

Please follow the easy steps below to convert 1080p/720p in MKV, VOB, Tivo, MPG, MTS, FLV/F4V to MP4 format for Galaxy S5.

Fistly download and install the right vertion.

Step 1. Import source videos to the Video to Galaxy S5 Converter.

Install and run the best Video Converter for Galaxy S5 on your computer. Add videos in the following two ways:

1. Click “Add video” button to choose video files from your hard drive for converting.

2. Directly drag the videos to the Galaxy S5 Video Converter


Tips: To save your time, you can add multiple video files for converting at a time since batch conversion is well supported.

Note: when load tivo file to Pavtube Video Converter, The program will ask you to enter you Media Access Key, Do as the program requires, and then click ok to continue.


Step 2. Choose presets for Galaxy S5.

Click the “Format” list to choose “Samsung > Samsung Galaxy S III Video (*.mp4)" as the best profile for Galaxy S5. Or you can key in “galaxy” in the little search box to get it.


Step 3. Edit video and customize specs before conversion. (Optional)

You can edit these videos before conversion by clicking the pencil-like icon on the top. Some of the source video such as MXF/MTS/MKV could be interlaced which is not good for playback; in this case you can check “Deinterlacing” in Effect tab to get perfect progressive HD MP4 videos. Trim, crop, edit audio and add srt/ass/ssa subtitles are all supported in this edit window.

Back to main interface, you can click Settings to free customize video size, bitrate(quality), frame rate, sample rate and other specs.

Step 4. Start converting all Videos for Galaxy S5.

Click the red “Convert” to start converting 1080p/720p video to Galaxy S5 MP4.

Wait for a few moments, and you can click “Open output folder” to locate the converted video quickly.

Part II. Transfer DRM content to Galaxy S5 tablet for playing

As iTunes, Amazon or Google Play videos are no good due to the DRM protection which will lock you for playback directly, so you need to consider how to remove the DRM protection from these videos to unprotected mp4 files so as to play on Galaxy S5 easily.

Her Pavtube Vidpie is perfect tool to legally remove DRM protection from purchased iTunes movies, Amazon Instant Videos, and digital copies.

Good news for you, with Pavtue new site multipelife.com released, Pavtube have lanched new Special Offer Page, in which you can get Video Converter Ultimate($65) + Vidpie($29) with Only $74.9, which means you can save $19.1 in this way!

Is it so easy? Now you can transfer converted videos to your Galaxy S5 for entertainment.

See more money-saving bundles:

ByteCopy($42) + Video Converter Ultimate($65) = Only $79.9, Save $27.1
ByteCopy($42) + Vidpie($29) = Only $54.9, Save $16.1
Video Converter Ultimate($65) + DVD Creater($35) = Only $64.9, Save $35.1
BDMagic($49) + Vidpie($29) = Only $49.9, Save $28.1
DVDAid($35) + Vidpie($29) = Only $49.9, Save $14.1

Related Articles:

Make Blu-ray ISO playable on Samsung Galaxy S5
Convert The Wolf of Wall Street (2013) DVD ISO/IFO to Galaxy S5
How to transfer Toy Story 2 Blu-ray Movie to Play on Samsung Galaxy S5

Wednesday, June 11, 2014

How to Transfer a Video From the Internet to a Flash Drive

Is it possible to transfer a Video From the Internet  and save the video to your computer's flash drive to play or share with your friends later with a USB port? This guide will be the right answer.

Flash drives are common storage devices, ranging in capacity from small to very large. Flash drives provide mobile storage for documents, music and video files. They also make great backup storage devices. Files downloaded from the Internet, such as videos, can be transferred to a flash drive, but the process may vary depending on the website the video is transferred from.


Using Firefox and Video Download Helper

Step 1

Start Firefox and click “Tools,” then “Add-ons” on the menu bar. If the menu bar does not appear at the top of the browser window, press "Alt" to display it, then click Tools. In some versions of Firefox, there may be a Firefox tab in the upper left corner with an Add-ons drop-down menu. Alternatively, you can access the Add-ons page by typing "about:addons" in the address bar and then pressing "Enter."

Step 2

Enter the name Video Download Helper into the search box.

Step 3

Click the "Install" button next to the Video Download Helper link on the search results to display its download page. Wait for Firefox to download the plugin to your computer and prompt you to install the add-on.

Step 4

Click “Install Now” when prompted, then click “Restart” to close Firefox and restart it.

Step 5

Navigate to the webpage featuring the video you want to download and wait for the browser to begin loading the clip in the player. After a few seconds, a balloon icon displays in the status bar at the bottom of the browser.

Step 6

Click the balloon icon to launch the Video Download Helper add-on and begin downloading the video to your computer. By default, the Video Download Helper downloads and saves videos to a folder named "Video Download Helper" in the My Video library. You can change the default download folder by clicking the "Options" button for the Video Download Helper add-on on the Add-On page in Firefox.

Using Internet Explorer and FlashCatch

Step 1

Launch Internet Explorer and navigate to the FlashCatch website (link in Resources.) Download the FlashCatch Internet Explorer plugin and save it to a folder on your computer. Close Internet Explorer.

Step 2

Click Start, then “Computer.” After Windows Explorer opens, browse to the folder where you saved the FlashCatch plugin. Double-click the setup file to launch the setup wizard, and follow the on-screen instructions to install FlashCatch. Restart the computer if prompted.

Step 3

Restart Internet Explorer and navigate to a webpage that has a streaming video you want to save. After the video starts to load in the browser player, a FlashCatch pop-up window appears.

Step 4

Click the “Download” button in the FlashCatch pop-up window. Select a folder in which to save the downloaded video, then click the “Save” button.

Downloading Videos Without a Plugin

Step 1

Navigate to the SaveVid website (link in Resources.)

Step 2

Open a second tab or window in your browser, then open a webpage that streams a video you want to download.

Step 3

Click in the “Address Bar" or "URL" field. Double-click inside the Address Bar or URL field to highlight the entire URL address for the webpage that streams the video. Press "Ctrl-C" to copy the URL address to the Windows Clipboard.

Step 4

Click the tab or window displaying the SaveVid website. Click the text box labeled "URL," then press “Ctrl-V” to paste the video webpage URL address in to the field.

Step 5

Click the “Download” button on the SaveVid webpage to launch a thumbnail image and description of the video to download.

Step 6

Click the "Run" or "Run This Time" button in your browser if prompted to update the browser's Java plugin and reload the page.

Step 7

Click the "Download" button again. Select a folder in which to save the video and click "Save." Your browser downloads the video and saves it in the selected folder.

Transferring your Video to a USB Flash Drive
Step 1

Connect your flash drive to an unused USB port on the computer. Wait for Windows to display the AutoPlay window.

Step 2

Click "Open Device to View Files" to open a new Windows Explorer window displaying the contents of the USB flash drive.

Step 3

Press "Ctrl-N" to open a second Windows Explorer window, then browse to the folder where you saved the downloaded video. Double-click the folder name to open it and display the downloaded video.

Step 4

Click the filename for the video, then press "Ctrl-C." Click the Windows Explorer windows displaying the files and folders on the flash drive and press "Ctrl-V" to copy the video from the computer to the USB flash drive.

Tips

If you don’t want to store the downloaded video on both the computer and USB flash drive, cut and paste the file instead, using "Ctrl-X" to delete the video from its Windows Explorer location, then "Ctrl-V" to paste it into the USB flash drive.

Warnings

Downloading or copying copyrighted music or videos is illegal. Download and share videos only if you have permission.

References

Flash Video Resources: Downloader - Firefox Extension Now Available
FlashCatch: Frequently Asked Questions
SaveVid.com: FAQ

Resources

FlashCatch: Free Download
SaveVid.com: Download Online Videos

Monday, June 9, 2014

Convert FIFA World Cup Games TiVo to MP4/MPEG for NAS Sharing

Looking for a quick way to convert 2014 World Cup Tivo video files? Let's learn how to backup them with MP4/MPEG format on you NAS device for watching.

As 2014 Brazil FIFA World Cup is sneaking in, and this grand 2014 World Cup will last roughly 1 month and we football lovers will spend a passionate summer thanks to the splendid football matches it brings. Even though most of us could not head to the scene, we can stay in front of the HD TV, and watch the favorite teams to goal. We can use the sports collections of TiVo to get the events and web content, and even record with TiVo Premiere.

If you plan to record the first half of the game between Brazil and croatia for the World Cup, you may like to put the first half to the Network Attached Storage (NAS) so as to continue recording the second half. How to deal with it?


Through a google search on the internet, I find Pavtube Tivo Video Converter Ultimate. I used 30 day trial option to test out the software to make sure it worked – other software packages did not have this trial feature and Pavtube was the first that I managed to get working so I went with them. I tried out other software product but found Pavtube is the easiest to work with to finish Tivo to NAS conversion. It really does bulk conversions (whole sub-directories at a time), and has lots of different output formats (almost too many to choose from without know what was what). The Mac version is iMedia Converter for Mac.

Now I'm able to stream FIFA World Cup Tivo files to all my NAS devices for viewing. It is great!

Full guide: Copy/Convert 2014 FIFA World Cup Tivo files on NAS device

Part 1: Transfer TV shows from TiVo to PC

To transfer TV shows on any PC, you need to download TiVo Desktop software. When your TiVo is connected to your home network, TiVo Desktop provides you with a list of available shows for transferring to your PC.

You can play TiVo video files using Windows Media Player.

Hints: TiVoToGo Transfers system requirements: TiVo Series2 DVR, TiVo software version 7.1 or later, TiVo Series2 box must be connected to your home network using a wired or wireless USB network adapter.

Part 2: Guide to Converting 2014 World Cup TiVo to MP4/MPEG for NAS device

Step 1. Import source files

Click "Add Video" icon to load video, or you can drag and drop World Cup VIDEO to the software directly.


Note: If you want to import Tivo video, you should import the Media Access Key first.


Step 2. Select output format.

Many video formats in the Format dropdown list, you can choose the one you need. Here, you can choose "H.264 Video(*.mp4)" from "Common Video" Option.


Tip: If you want to copy your Tivo files to hard drive with MPEG format, click the Format option and find the "Directly Copy"and the program will convert World Cup TiVo videos to MPEG fleetly.


Step 3. Video Editing (optional)

Powerful edit function including Trim, Crop, Add subtitles, etc will give you great experience for conversion. For example, you can use Trim to cut off the adverts/intro/credits that you don’t want to retain in output videos.


Step 4. Start conversion.

Click "Convert" button to start World Cup TiVo to H.264 MP4 conversion conversion. Click "Open" button you can find the generated files. And with the help of CUDA Acceleration and full use of cores, you will have a fast speed.

After conversion, use the wired or wireless network and transfer the output videos to NAS. It is very easy to watch 2014 FIFA World Cup video on NAS devices.

Money-saving Trip:

ByteCopy($42) + Video Converter Ultimate($65) = Only $79.9, Save $27.1
Video Converter Ultimate($65) + Vidpie($29) = Only $74.9, Save $19.1
Video Converter Ultimate($65) + DVD Creater($35) = Only $64.9, Save $35.1

Related articles:

How to stream movies to Sony PS4 from USB Flash Drive on Mac
How to get my DVD collections into Plex for streaming easily?
Stream and Play recorded 2014 FIFA World Cup Tivo files on HDTV with best quality

Friday, June 6, 2014

BD ISO to Galaxy S5 - Make Blu-ray ISO playable on Samsung Galaxy S5

This article is mainly talking about how to put and play Blu-ray ISO movies on Samsung Galaxy S5 by ripping BD ISO to Galaxy S5 supported format.

Samsung Galaxy S5, the great invention of Samsung is excellent from every side such as display, design, battery life, camera functionality, features and more. This is an upgrade version of S4 but packed with more powerful features compare to S4. The camera is perfect to get clear snaps and faster than Galaxy S4. The screen is brighter and bigger, and the battery size is also larger than Galaxy S4. All together Samsung Galaxy S5 is an evolution over S4.


With so perfect configuration, are you prepare to watch Blu-ray ISO movies on it? Here is a simple tutorial for you, guaranteed to get your Blu-ray ISO movies onto Galaxy S5 while keeping original high quality.

To enjoy Blu-ray ISO movies on your new Samsung Galaxy S5, you need to use a third party BD ISO to Galaxy S5 Converter to rip Blu-ray ISO to a format that is well compatible with your Galaxy device. Pavtube BD ISO Ripper is highly recommended to do this job. It features optimized format preset for Samsung Galaxy, and takes simple steps to finish Blu-ray ISO to Galaxy S5 video ripping. You load a Blu-ray ISO disc into the program, choose a format as target for Samsung Galaxy S5, and click “Convert”to start, Pavtube software will take care of the rest.
Step 1: Install the best Blu-ray ISO to Galaxy S5 Converter

First of all, you need download and install a free copy of the best Blu-ray ISO Ripper to Galaxy S5 on your computer. It is a 100% clear software and allows you to access all the functions. To convert Blu-ray ISO movies to Samsung Galaxy S5 with best settings, you can adjust the video and audio parameters.

Note: This guide uses Pavtube Blu-ray ISO Ripper for Windows screenshots. The way to rip Blu-ray ISO movies to Samsung Galaxy S5 on Mac (Mountain Lion & Mavericks) is almost the same. Just make sure you get the right version according to your computer operating system.

(Get Blu-ray ISO to Galaxy S5 Ripper for Mac)

Step 2: Load Blu-ray ISO movies

Run the best Blu-ray to Samsung Galaxy S5 Converter; click the "Load disc" icon to browse to your Blu-ray disc driver and import source Blu-ray, or Blu-ray Folder, ISO/IFO files. Don't forget to pick up one audio and subtitle track for display.


Step 3: Select output format for Samsung Galaxy S5

You need set format for Blu-ray ISO to Galaxy S5 conversion. Just click “ Format” and find “Samsung” category and select "Samsung Galaxy S III Video (*.mp4)".


Step 4: Set customized settings

The Blu-ray ISO to Galaxy S5 Converter allows users to customize profile presetsby clicking “Setting” button. You can adjust audio and video parameters tooptimize the output file quality, including video and audio codec, bitrate, framerate, display resolution, audio channel, etc. To get 1080p resolution playbackon Galaxy S5, we recommend you to set output size at “1920*1080”.


Step 5: Rip Blu-ray ISO to Galaxy S5

Hit the big “Convert” button to start ripping Blu-ray ISO movies to Galaxy S5compatible file format. When the BD ripping task completes, click the “Open”button to get the final output files and transfer to your Galaxy S5. Now you areready to watch Blu-ray ISO movies on Samsung Galaxy S5 with 1080p resolution smoothly.

Samsung Galaxy S5 Related Articles:

Convert and transfer DVD ISO/IFO movies to Galaxy S5 for watching
Mac Tips: Transfer MKV, AVI, VOB, Tivo, MPG files to Galaxy S5 easily
Make Blu ray disc and ISO file playable on Galaxy S5

Tuesday, June 3, 2014

The main reasons for purchasing DVD copying & ripping software

One may never know his plain needs to the full until being illustrated with the real benefits or the necessity. For Android and iOS mobile users, one of the most dangerous things is watching online videos, not only because they are planted with ads, but also for the possibility that there are some extra compulsory charging and potential threats to PCs.

Accordingly, to play movies offline and sort out DVD collection, some people may be seeking for the best DVD rippers to rip DVD on Windows 8.1, Windows 8, Windows 7, XP, etc. The process of transferring content from a DVD to your computer’s hard drive is called "coping" or “ripping”. And DVD coping & ripping software allows you to rip and copy your hard disks for personal use with ease. But many people may be curious on the exact advantages of them. Why do people purchase DVD coping & ripping software? Here are three main reasons that will answer you.

For security purpose:

Bad things sometimes happen even we are very careful. May be stolen by theft or be scratched by objects or just can not find where it is. Sometimes, you lend them to friends and during this process, may be some of them been lost. DVD rippers provide a means of protection for your movie library. These applications make high-quality copies of your DVD movies onto hard disk in minutes.

For portability purpose:

Another purpose for purchasing DVD copy software is that it makes movie portable. DVD Rippers have the ability to convert your DVD movies into a format that’s supported on a number of devices. Then it will be possible to watch your DVD movies on devices such as tablets, smartphones and other devices that don’t have an optical drive.

For simplicity:

DVDs are easy to use and easy to store. And blank DVDs are cheap. With small investment and little time engaged, your DVD collection can be safe for years.

See also:

Convert DVD to PS3 Compatible AVI Video with AC3 5.1 channel
2014 Top DVD Ripper Review - Ripping DVD on Windows 8.1 blue
Rip Copy Protected DVD to Hard Drive as AVI, MP4, FLV, WMV, MOV, etc.