Friday, April 18, 2014

How-To: Get TiVo shows onto your Android for on-the-go viewing

Description: In this How-To, I will whip up a guide to getting TV shows off of TiVo and onto an Android phone/tablet so that you can take favorite TV shows when away from home.

If you’re frequent traveler, a question may come up like this – How can I get my TiVo shows remotely with my Android tablet (phone)? Although TiVo released its offical Android app to allow TiVo customers to use Android device to access TiVo shows via Wi-Fi, but that is restricted to enjoying TV recordings at home. Currently there’s not yet a good solution for wirelessly play TiVo shows remotely, but here’s a way to transfer TiVo shows to your Android for on-to-go viewing, so that you can take favorite TV shows when away from home.

The process sounds easy – first transfers TV shows from TiVo to PC, and then convert the .tivo files to MP4 videos for Android.

Part 1: Transfer TV shows from TiVo to PC

It takes a while depending on length of TV program you are transferring. Make sure your TiVo and computer are in the same home network, and follow this guide to proceed TiVo file transfer:

  1. On your PC, launch TiVo Desktop for PC (click to download), the freeware that transfers shows from your networked TiVo box to your computer.
  2. Click “Pick Recordings to Transfer.” A window showing your TiVo box’s “Now Playing” or “My Shows” list appears.
  3. Highlight any title in the list to see more information about the show. Check the box next to the title of the show (or shows) you want to transfer.
  4. Click “Start Transfer.” Transfer times vary, but may take as long as the show’s duration to complete the transfer.


Part 2: Convert TiVo shows to Android friendly MP4 video

After transferring to computer the TV shows are saved as .tivo files. The .tivo format, however, is kind of protected MPEG-2 video. The Android based device, however, plays neither protected shows nor MPEG-2 video. That’s why you need to encode TiVo to MP4 video (720p or 1080p). See below how to convert TiVo shows to Android playable videos.

Download and install Pavtube Video Converter Ultimate to your PC. Launch it and press “Option” button. Switch to “TiVo” tab in Option window, and enter TiVo Media Access Key.

Tip: How to find your Media Access Key on TiVo: Go to “TiVo Central” menu >> “Messages and Set Up” “Account and System Information”, and your Media Access Key would be there.


Drag and drop TiVo shows to the main interface for converting.
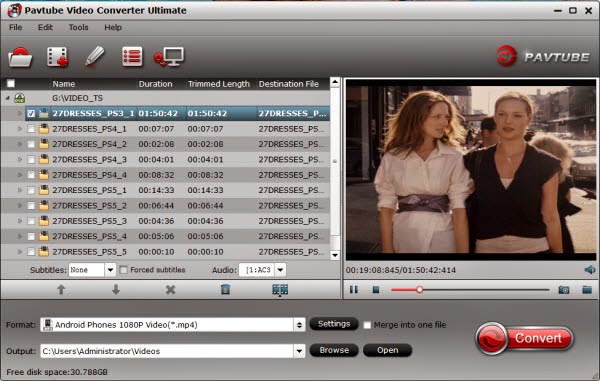

Click “Format” and select an output profile for your Android device. There are optimized presets for Samsung, Amazon Kindle, Google Nexus, Asus Transformer, Acer, Archos and more. Basically the Android >> Android Tablets 1080P Video(*.mp4) is an universal format for Android tablets and smartphones.
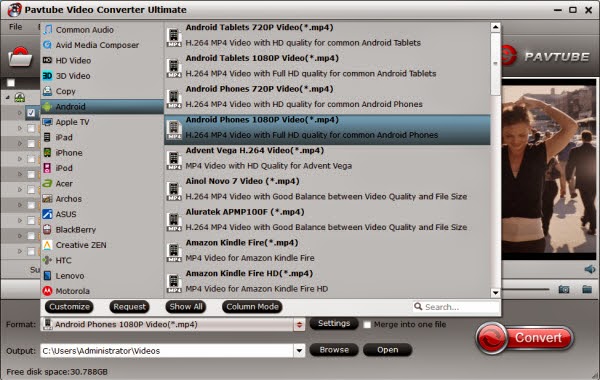


Optimize the settings – The default settings may not satisfy you, and you can click the settings button to change the settings by yourself. Keep in mind that the file size and conversion quality is based more on bitrate than resolution (bitrate higher results in big file size, and lower visible quality loss, and vice versa). According to my experience, for watching videos on an Android phone or tablet, 720p with 1500~3000kbps (depends on what device you use) is just all right.

If you’re happy with the output videos, just press the “Convert” button to begin encoding TiVo shows. Once the encoding task completes, you can transfer the converted videos to your Android tablet or phone for viewing on the move.

The Mac version is iMedia Converter for Mac.

Not an Android user? Converter also supports “common” video formats like MOV, M4V, MP4 and has presets for all the models of iPad, iPhone, iPod Touch and Apple TV, so you should be able to create files compatible with your iOS basd devices, as well as BlackBerry PlayBook, Windows RT/8 devices and HP TouchPad.

Read Related:

Convert/Play DVD ISO image files on Android Tablets
Convert 1080p/720p Videos and Movies on Android Tablet/Phones
Copy 2014 Disney Blu-ray movies to Android Tablet/Phone for watching
Wednesday, April 16, 2014

Recover Lost and Deleted data with Latest Data Recovery Software—iFonebox


Description: The newly released iFonebox could help Apple device users to recover data like Contacts, SMS Message, Call History, Photos, Notes, etc from iOS devices.

iFonebox, the newly released data recovery software. With the help of this software, Apple device users could recover data from iOS devices due to accidental deletion, dead for jailbreak failure or system update, lost or damage devices, etc. It allows recovering data Contacts, SMS Message, Call History, Photos, Notes and more not only from iTunes backup, but also scanning directly from almost all apple devices.


Supported iOS devices

iPhone 3GS/4/4s/5/5c/5s; iPad 1/2/3/4, iPad Air, iPad mini & iPad mini 2; iPod Touch

Ways of Recovery and Types of Recovery Data

From iTunes backup: Camera Roll, Photo Stream, Message attachment, Voice memos, Contacts, Messages, Call history, Calendar, Notes, Reminder, Safari bookmark
From iOS device: Contacts, Messages, Call History, Notes, Calendar, Reminders and Safari Bookmark

Other Attractive Features:

Preview from the scan result with organized, clear and original quality before recovery.

Selectively recover and save lost or deleted iPhone/iPad/ipod touch files.

Fully Support iOS 7.1 and latest version of iTunes.

Download the trial version of iFonebox for Windows right now to experience this brand-new iOS data recovery tool.


Tip: iFonebox for Mac would be come out in a few days! If you are a Mac user, do not miss this superb iOS data recovery tool!

Click here to get more information about iFonebox:
http://www.ifonebox.com/

From: http://1080p-video-tool.blogspot.com/2014/04/ifonebox-newly-release.html 

How to stream movies to Sony PS4 from USB Flash Drive on Mac?

Summary: Here is a useful tutorial which will tells you the easy way to get all kinds of movies (Blu-ray, DVD and Video) onto Sony PS4 from USB Flash Drive on Mac for playback smoothly.

Sony has released its PlayStation 4 console, the PS4 system opens the door to an incredible journey through immersive new gaming worlds and a deeply connected gaming community, plus it is also an enjoyable experience to play all kinds of movies on Sony PS4 via USB Flash Drive.

After received your PS4, you may want to get your favorite Blu-ray, DVD and other downloaded movies onto HDTV via PS4, however, Blu-rays and DVDs are usually hard to be backed up due to region code and disc encryption protection, and your precious BD/DVD discs will be damaged due to repeated use or in other words, in and out the PS4’s Blu-ray/DVD drive over and over again. Moreover,  other download movie files may not be supported by PS4.

Learn PS4 supported format:

Video:

MP4, H.264, H.263, DivX, XviD, WMV, MPEG-2 

Audio: 

MP3, AAC, M4A

In order to stream movie files (Blu-ray, DVD and Video) to PS4 for playback, you may have to convert them to PS4 playable format (e.g. H.264/MPEG-4).  iMedia Converter for Mac is such an all-in-one solution to rip Blu-ray/DVD movies, convert other video content to PS4 for watching on Mac.


Overall, it is a Mac Ultimate Converter for PS4 that integrates a blu-ray ripper, a DVD ripper, and a video converter together to rip Blu-ray discs, standard DVDs and convert all kinds of videos to universal video and audio file types with super fast conversion speed and excellent image and sound quality.

The Windows version is Pavtube Video Converter Ultimate.


Great News! To thanks for your continued support all along our previous site and the new www.multipelife.com, we are holding a 'New Site Special' with fantastic discounts up to 40% off, pay less to get more powerful Pavtube Blu-ray/DVD backup tools! 
Like us to get 20% off BDMagic(Blu-ray Ripper), 30% off ByteCopy, 40% off DVDAid(DVD Ripper) and 20% off Video Converter Ultimate on Windows/Mac platform:

https://www.facebook.com/pavtubefans/app_209569249055691

From: http://bestvideosolution.blogspot.com/2014/05/pavtube-new-official-website.html


Learn more special offer:

ByteCopy($42) + Video Converter Ultimate($65) = Only $79.9, Save $27.1
Video Converter Ultimate($65) + Vidpie($29) = Only $74.9, Save $19.1
Video Converter Ultimate($65) + DVD Creater($35) = Only $64.9, Save $35.1

The following guide shares with you how to stream movies to Sony PS4 from USB Flash Drive on Mac step-by-step. 

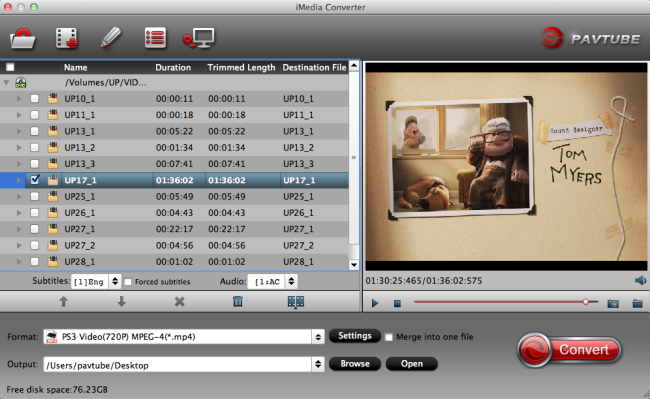
Step 1. Install and launch the Ultimate Converter for PS4, click "Add Video" to load video files like MTS/M2TS, MKV, VOB, MOV, TOD, TiVo, etc or click on "BD/DVD disc" icon to load movie from DVD and Blu-ray source(Disc, folder, ISO). 


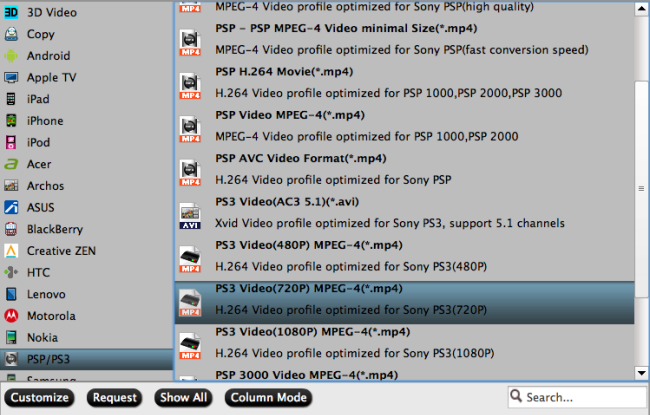
Step 2. Click on "Format" boarder to set output format.

Here the recommended format is "PSP/PS4 >> PS4 Video(*.720p) MPEG-4(*.mp4)" format, and you can also select other options.


Tips:

1. Click the Subtitle option and you choose the prefer language you want from the drop-down list. The PlayStation 4 (PS4) converter will hard burn the selected subtitle to PlayStation 4 (PS4) video, so that you can enjoy movies with hard-burned subtitles. Then click Audio to select the language like English, French to hear.

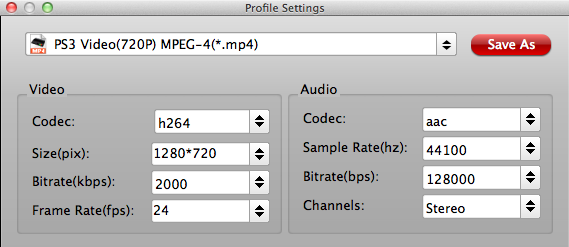
2. Click "Settings" to change the video encoder, resolution, frame rate, etc. as you wish. Keep in mind that bitrate higher results in big file size, and lower visible quality loss, and vice versa.


Step 3. Finally click on "Convert" button to start converting movies to MP4 for PS4 streaming and playing.

When the conversion finished, you can copy the converted movies to USB Flash Drive, and then you can follow the steps below to play movies:

Insert USB Flash Drive into USB port, turn PS4 on and then go to the main menu, select “Video” and find your USB Flash Drive, select “Display All” to see the video files that exists on your PS4, please choose the file that you want to transfer and press the triangle button, choose “Copy” and confirm the transferring, the movies are transferred to your PS4 hard drive, and then you can play movies on HDTV via PS4 from USB Flash Drive without problems.

We hope this short article will bring some new multimedia life to your PlayStation 4 (PS4) console.

See Also:

Friday, April 11, 2014

Rip/Backup Tom Hanks DVD to iPad Air MP4 via top DVD to iPad Air Converter

Description: If you want to backup Tom Hanks DVD onto iPad Air for watching, you will need to remove DVD protection and then convert DVD to MP4 format with the best DVD Ripper.

The all-new Apple tablet – iPad Air, with a 9.7″ inch backlit display with 2048 X 1536 pixels of resolution, is a good choice for playing movies. However, iPad Air doesn't have a built-in DVD-ROM or DVD player, which means you couldn't directly play DVD movies.


Hot Search: DVD to USB | DVD to Boxee Box | DVD to NAS | DVD to Windows 10 | DVD to Surface 

Fortunately, there is an easy and fast way to convert and put DVD movies onto iPad Air. For example, if you like Tom Hanks very much, now you can easily convert Tom Hanks DVD movies to iPad Air supported video formats like MP4 for smoothly playback with a DVD to iPad Air converter. 

Seeing so many reviews, having tried many softwares, free or paid, I find Pavtube DVDAid (Read DVD Ripper Review) is just such kind of easy-to-use program to help you do the conversion in a few clicks. Tried Handbrake – didn't like it – tried DVD Fab – couldn't get it to work. But Pavtube is easy to use and free water-marked version a great idea to check it worked. The Mac version is DVDAid for Mac


Other Download: 
- Pavtube old official address: http://www.pavtube.cn/dvd_ripper/ 
- Cnet Download: http://download.cnet.com/Pavtube-DVDAid/3000-7970_4-76158510.html 

All you need to do is: 

1. Import 
2. Choose preset 
3. Click and go! It's just as simple as that. 

Tip: 

If you have any requirements of keeping multiple audio tracks/subtitles, you are suggested to try this Blu-ray/DVD Converter Pro

Tutorials: How to transfer Tom Hanks DVD to most compatible MP4 preset for iPad Air 

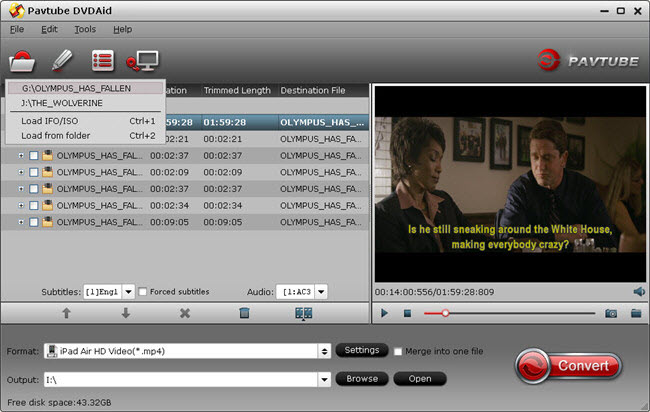
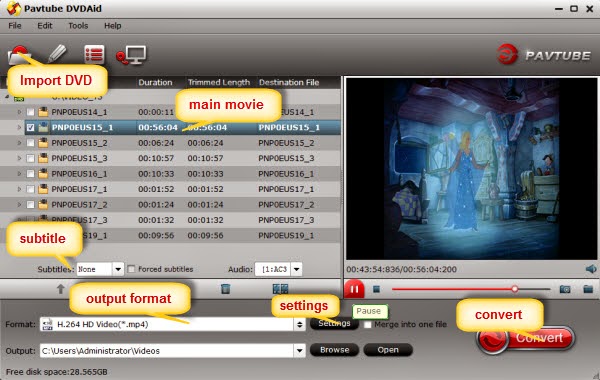
1. Run this Pavtube DVDAID; load disc. 

Click the top left icon, you can choose to import DVD from ROM, DVD folder or DVD ISO/IFO. It will check the main title by default; moreover, ISO files could also be recognized automatically so that you no longer need to run virtual drive to mount it. 


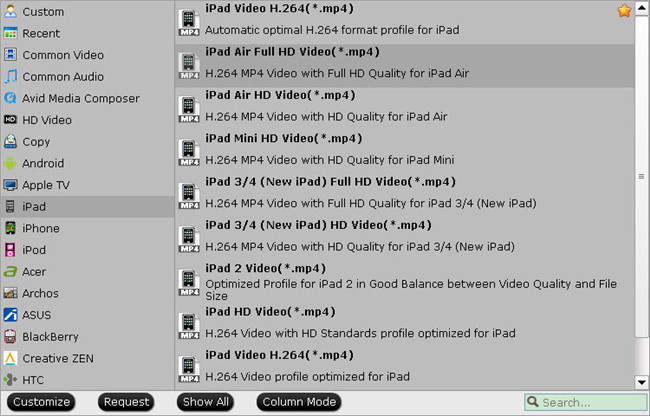
2. Choose format. 

Click "Format" drop-down list and choose "iPad>iPad Air Full HD Video(*.mp4)" as the compatible MP4 preset with best video quality. 

* Read Best Format for iPad Air 2 | iPad Air/iPad Mini 2 | iPad Mini 3 | iTunes 


3. Start Conversion. 

You can hit the big red "Convert" to start converting DVD to iPad Air MP4 with best video settings. After the conversion, click "Open output folder" in the conversion window, or "Open" in main interface to quick locate the converted video. 

After getting the converted movies files, you can transfer them to iPad Air via iTunes. 

1) Make sure you have install iTunes. If not, you can free download iTunes here at first. And launch the iTunes. 

2) Connect iPad Air to Mac/PC. 
3) Choose "File –> Add File to Library…" 
4) Drag the .mp4 file you want to the iPad Air icon for syncing 

So there you have it. Prette simple. Now, you can enjoy and view Tom Hanks DVD movies on iPad Air anytime everywhere for great digital fun. 

Additonal Tips: 

If your movie isn't already in one of the iPad Air supported formats or it's still on a DVD or a Blu-ray, you can get the Video Converter Ultimate (or the iMedia Converter Mac) which can help you convert Blu-ray/DVD/ISO/IFO and various formats of 720p/1080p HD videos in MKV, AVI, TiVo, VOB, MPG, MTS, etc. to your iPad Air/Air 2, iPad Mini/Mini 2/Mini 3 iPhone 6/6 Plus, iPad 3/4, iPod 5, Apple TV 3 and other iOS/Android/Windows tablets/phones for smoothly playing. 

See Also: 

Thursday, April 10, 2014

How to Rip/Stream Harry Potter-Complete DVD movies to Apple TV via iTunes

Summary: Have you ever imagine watch Harry Potter-Complete DVD Collection movie on the Apple TV? This article will guide you the best approach to Convert and Transfer your favourite DVD movie to Apple TV. 

Are you a "cord cutter"? One of the millions of people now ditching the old ways of home entertainment – broadcast TV and physical media – in favour of downloads and streaming services? Even if you are, you may have a sizeable collection of  DVD  movies, like Harry Potter-Complete DVD Collection, gathering dust in their cases and gobbling up valuable shelf space. Why not rip these movies to easily access them any time via an Apple TV? Here’s how.

As you know, DVD disc or even the decrypted Blu-ray rips can't be supported by Apple TV. The best solution is to rip and convert Blu-ray to iTunes compatible format then sync to ATV for playback without any limitation.

First of all, download and install Pavtube DVDAid ,which is the best tool to accomplish your goal by converting DVD to Apple TV for streaming.

Overall, the program is the top DVDAID to convert  DVD disc, DVD VIDEO_TS folder and DVD IFO/ISO file to a format playable by Apple TV and iTunes. I've found the quality to be excellent, and see no difference when compared to playing the discs themselves. The sound can be kept with the original Dolby Digital 5.1 surround sound. For ripping DVD to iTunes for ATV on Mac, please turn to DVDAID for Mac.

Convert Harry Potter-Complete DVD movies to Apple TV readable m4v file?

Step 1. Run the best DVDAID, click "Load file(s)" and load videos from DVD.


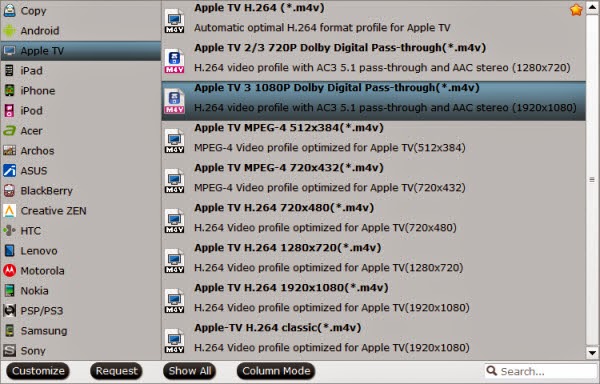
Step 2. Clicking the "Format" menu, to export a Apple TV 3 1080p video with ac3 5.1 pass-through for AV receiver decoding, you are suggested to choose "Apple TV >Apple TV 3 1080P Dolby Digital Pass-through(*.m4v)"


Step 3. If you like, modify profile settings such as video size, bitrate, frame rate, etc to get optimized video and audio playback.

Step 4. Return back to DVD Riper main interface, and hit the "Convert" button to start encoding music videos from DVD to m4v format.

Once it finishes, open output folder, locate the created m4v file and you can transfer to your iTunes for Apple TV for watching Harry Potter-Complete DVD movies with ease. There you have it!

More related:

  • How to Backup Blu-rayDVD to QNAP NAS for DLNA streaming
  • Copy and Play DVD Movies on MacBook Pro
  • Transcode BD/DVD to Lossless multi-track MKV for streaming to TV

  • Monday, April 7, 2014

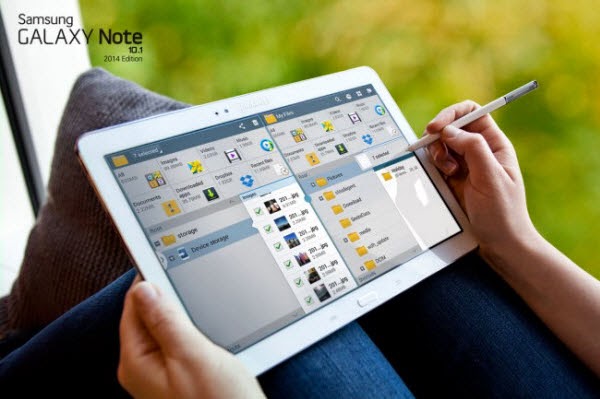
    Convert and Play Blu-ray movies on Samsung Galaxy Note 10.1 2014 Edition

    This article will provide you an easy, quick and reliable workflow for ripping Blu-ray movies to Samsung Galaxy Note 10.1 2014 Edition supported video format with perfect audio and video synchronization. 


    The latest iteration of Samsung’s Galaxy Note 10.1, aptly named the 2014 Edition, ships with the firm’s own 10.1-inch 2560 x 1600 display. It’s not display alone that Samsung hopes to sell its latest Note 10.1 on, the rest of the package is similarly specced to the max.


    To enjoy Blu-ray movies on your Samsung Galaxy Note 10.1 2014 Edition, you need to use a third party Blu-ray to Galaxy Converter to rip Blu-ray to a format that is well compatible with your  Galaxy Note 10.1 2014 Edition device. Pavtube BDMagic is highly recommended to do this job. It features optimized format preset for Galaxy Note, and takes simple steps to finish Blu-ray to  Galaxy Note 10.1 2014 Edition video ripping. The Mac version is Pavtube BDMagic for Mac.

    You load a Blu-ray disc into the program, choose a format as target for  Galaxy Note 10.1 2014 Edition, and click “Convert”to start, Pavtube software will take care of the rest.
    Convert and watch Blu-ray movies on Samsung Galaxy Note 10.1 2014 Edition

    Step 1. Load Blu-rays to this Blu-ray to Galaxy Ripper.

    Firstly you need to get a Blu-ray drive to make your PC/Mac recognize your Blu-ray discs; the built-in drive is only able to play DVDs.

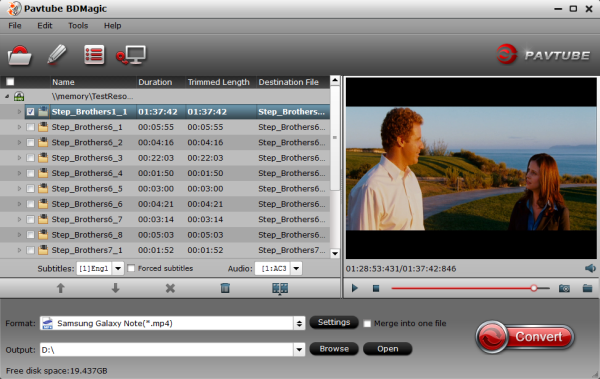
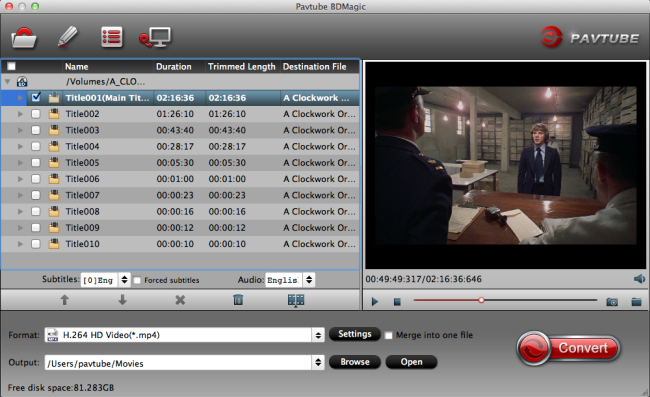
    After that, let's launch BDMagic, click the top left icon to import disc.


    It will detect and show all the Blu-rays that connected, click the disc name to import them directly. And no worries if you only have Blu-ray ISO files, Pavtube will recognize the ISO files directly so that you don't need to run virtual drive to extract videos from ISO image file firstly.

    Step 2. Choose video format.

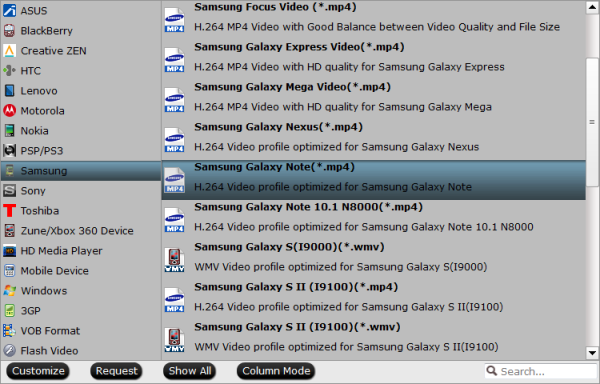
    For Samsung Galaxy Note 10.1 2014 Edition, the most compatible video format is MP4. Now click the drop-down list besides "Format", choose "Samsung > Samsung Galaxy Note(*.mp4)". Another way to quick locate these presets is to submit "Galaxy" in the search box.


    Step 3. Edit video before conversion. (Optional)

    Click the pencil-like icon on the top to edit videos before conversion. You can trim, crop, edit audio, add subtitles here.


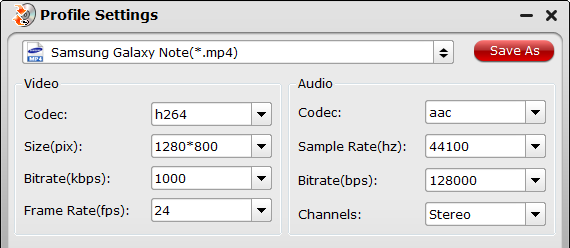
    After editing video, let's back to the main interface. Have you noticed the red "Settings" besides Format drop list? Click it, you can customize video size, bitrate, frame rate, sample rate(Hz) at your needs.


    Step 4. Start conversion.

    Click the big red "Convert" to start converting Blu-ray to MP4 for playback on Samsung Galaxy Note 10.1 2014 Edition. Wait for moments, and quick locate the converted video by clicking "Open Output folder".

    Tips: Please keep the Internet connected during importing and converting, so that the whole process would be successfully managed.

    Files Transfer:

    Sync media files to your Note 10.1 2014 via kies

    Related guides:

    Enjoy DVD Movies with Samsung Galaxy Note 10.1 2014 Edition
    Get 1080p/720p MKV movies to play on Galaxy Note 10.1 2014 Edition
    Rip ISO/IFO image files from DVD to Galaxy Note 10.1 2014 Edition

    Thursday, April 3, 2014

    How to ingest and convert Blu-ray/DVD to Apple Aperture 3 for editing, playing on Mac

    Summary: In this article, you can get the info of covnerting Blu-ray/DVD movies to Apple Aperture 3 compatible codec for editing.

    "Is there any way I could adopt to import/load my Blu-ray and DVD movies to Aperture 3 to complete some video editings? If possible, what do I need and what are the steps?"


    The answer is no doubt Yes. As an ideal video editing tool, Apple Aperture 3 has full multi-media capabilities. That's right. Finally something that handles all those video files from your HD dSLR. Import, rate, scrub video, trim your clips. Add audio. Make a full-on OVIE within Aperture or export to Final Cut Pro. Insanely cool. Since Aperture can't accept loading your Blu-ray/DVDs, you only need to rip and convert Blu-ray/DVD movies to Aperture compatible videos on your Mac computer.

    To make Blu-ray/DVD friendly with Apple Aperture 3, it's a good choice to convert BD/DVD to Apple Aperture 3 best supported video formats, such as Apple Prores MOV, and then you can edit Blu-ray/DVD videos in Apple Aperture 3 smoothly. You can follow the easy steps below.

    Import and Edit Blu-ray/DVD in Apple Aperture 3 with the best Blu-ray Ripper for Mac

    Step 1: Load your disc.

    Get this Best Mac BDMagic installed here; you can order a license directly or download a trial version for free before purchase. This software does a good job in decrypting and transcoding Blu-rays/DVDs so that you can easily get the files you want, no matter audio/video only, or both. There is a disc icon on the top left which let you load from disc, folder or ISO/IFO respectively.
     
     
    Step 2. Choose your Output directory down which is marked as 2.

    For editing Blu-ray movies in Apple Aperture 3, the Prores is preferred. Click "Format" and choose "Final Cut Pro > Apple ProRes 422(*.mov)".


    PS: It has various profiles and formats so that you can rip blu-ray/dvd to various formats according to your needs.

    Step 3. set up frame rate, bitrate and other output settings.

    Click Settings, you can find file details including codec, size, bitrate and frame rate. You are able to fix them according to your needs. FYI: the higher bitrate you choose, the better video quality it outputs.


    Step 4. Now just press the big circular "Start Conversion" button to convert Blu-ray/DVD to Prores MOV for Apple Aperture 3 and let it do its magic.

    After converting, you can load your Blu-ray/DVD movies to Apple Aperture 3 for editing as you want, now you can have a try.

    More related:

    Blu-ray to iMovie Converter-Convert Blu-ray to iMovie/FCE on Mac
    FCP Not support .Blu-ray? Convert Blu-ray to edit in Final Cut Pro
    Editing Blu-ray/DVD movies in FCP X retaining surround sound track