Tuesday, December 30, 2014

Pavtube Updated to Encode MKV Video to H.265/HEVC MP4

The tutorial shows you how to convert MKV to H.265/HEVC MP4 for better visual effects in a more convenient way with a top H.265 encoder.

MKV is an open standard free container format that can store various video, audio, picture or subtitle tracks inside a single file. Nowadays we can effortlessly download various kinds of MKV files online for free.
Encode MKV Video to H.265/HEVC MP4

However, MKV is not a friendly format for playback on most mobile devices, to get better video experience, lot of Apple device users want to convert their downloaded mkv video files to H.265 MP4 format since H.265 has several big advantages over H.264, including better compression, delicate image and bandwidth saving. And in that case, what they need is a reliable MKV to H.265 converter to do the job.

Luckily, Pavtube Studio hits a milestone by completing a major kernel update on Pavtube Video Converter Ultimate, which succeeds in becoming one of the first video audio products in the world that support the breakthrough H.265/HEVC video codec.

New features:
  • Support MXF in XAVC video codec 
  • Add H.264 baseline/main/high output profiles 
  • Support H.265/HEVC decode 
  • Support H.265/HEVC encode 
  • Support latest Blu-ray movies 
With it, you are able to batch convert MKV to H.265/HEVC MP4 with smaller size and higher quality. Besides, it can also convert MKV to all other popular video/audio formats, including MOV, AVI, VOB, WMV, FLV, MPG, MP3, OGG, WMA, etc without quality loss. Plus, this program employs a built-in editor, so you can use it to create special video effects as needed.

How to convert MKV to H.265/HEVC MP4 on Windows

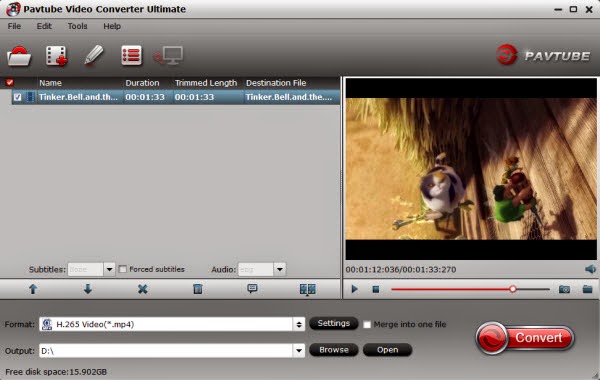
Step 1. Load source MKV files

Directly drag and drop source MKV files, or click "Add Video" button on the toolbar to load MKV files to the MKV to H.265 MP4 converter for converting. You could import multiple MKV files or one single file for converting as you like.


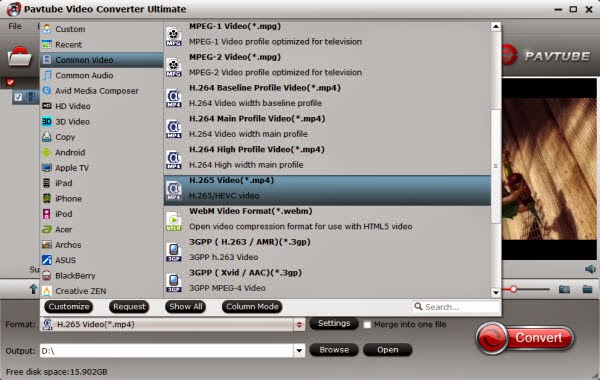
Step 2. Select output format

Click Format bar and select MP4 as the output format from Common Video list. If you prefer high definition video, you can choose "H.265 HD Video(*.mp4)" from the "HD Video" list.

Also you can convert your MKV to H.264 MP4 for streaming over DLNA and Chromecast or encode MKV to VOB for freely playback.


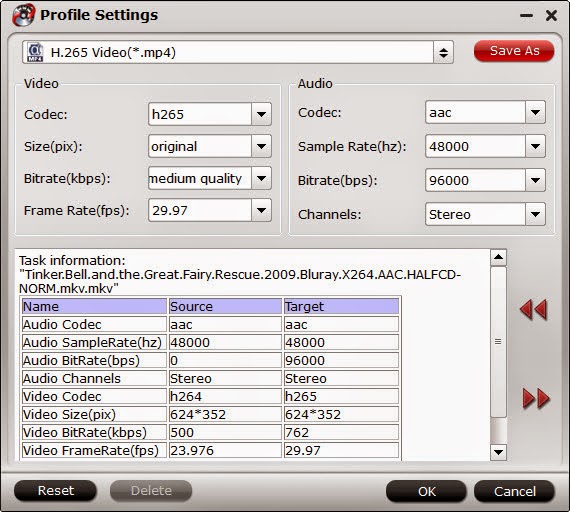
Tips: For more control, you can enter the "Settings" button to adjust the video and audio parameters like video codec, audio codec, bit rate, frame rate, sample rate, video size, etc.


Step 3. Start converting MKV to H.265/HEVC MP4

After all settings, click the convert button to get the MKV to H.265/HEVC MP4 video conversion started. Within a few minutes, you can get the converted MP4 video files for better use.

Note: H.265 can compressed your files into a much smaller file size while the quality is better than H.264. But since the compress is very hard, the progress is very slow. The time which converted to H.265(*.MP4) is way much longer than H.264(*.MP4).

What's more, many users may not understand the differences among the three upgraded H.264 Baseline/Main/High Profiles.

  • In a word, if your equipment is old and can’t play the video compressed by new codec, then baseline can help you solve this incompatible problem.
  • If you want to a much higher quality then high profile will be the best choice. 
  • The main profile has been eliminated gradually, but is still used for most HD TV or devices support much higher standard. 
Just have a try now!

Friday, December 26, 2014

Upgrade! Pavtube Supports H.265/HEVC, XAVC and Latest Blu-ray!


Pavtube has released the latest products of Windows Platforms, Support H.265/HEVC Encode & Decode, XAVC codec! Detailed information is in this article.

Marry Christmas 2014! On December 25, Pavtube Studio has announced this new update version. All Win versions have been updated to 4.8.2, which add XAVC, H.265/HEVC decode and encode, latest Blu-ray discs ripping features and work more powerful. What new features have they got?
  1. Support MXF in XAVC video codec
  2. Add H.264 baseline/main/high output profiles
  3. Support H.265/HEVC decode
  4. Support H.265/HEVC encode
  5. Support latest Blu-ray movies, like The Expendables 3, Le Chef, Sin City A Dame to Kill For, Sands of Iwo Jima, When The Game Stands Tall, Love in Venice, Mystery Road, Pink Floyd Endless rive,etc. are all supported.
Pavtube Upgrade 

Updated software


XAVC support: 


For the first outstanding feature, many powerful camcorders can shoot under this XAVC mode, like Sony, Panasonic, JVC and Canon all have many series HD Camcorder which can such job. Most XAVC codec will shot in MXF format, this may be good for importing quality ,but may be a big problem for their users. Although Sony has offered their XAVC plug-in to help customer to solve this problem, but many users still replay that they can’t do anything about their videos. How to tackle that? New Pavtube relevant Video converter software can handle this highest level video standard. XAVC can support 4K (4.96×2160 and 3840×2160), which just cater the trend of 4K.

Add H.265/HEVC Decode and Encode:


All Pavtube Video Converter Ultimate products have added the H.265/HEVC decode/encode. You may very family about H.264/MPEG-4, but may not know about this H.265/HEVC. Actually, those two codec are said to double the date compression at the same level of video quality. This H.265 can be said as the Intro Time of 4K Generation. This H.265/HEVC is considered not only play a remarkable role on improving the image quality but also can support 4K resolution to UHDTV, the highest level can up to 8192×4320 (8k). Like the hottest Samsung NX1 has already explore this brand new market. The 205-point phase-detection AF, 4K film resolution, H.265 compression coding, 15fps high-speed continuous shooting, etc., Samsung NX1 seems has already won the game. But with this fast update of the H.265 camera, the related peripheral support software seems not get enjoy strength. Many media player and NELs still stick on the H.264, so how to get your H.265/HEVC video into compatible while quality maintained? The brand new Pavtube relevant Video software will be the best solution to deal with the H.265/HEVC. No quality drop, fast conversion, smooth playback, all you need is in this new Pavtube. The Mac version is in full update, do please look forward to those brand new Pavtube relevant iMedia Converter for Mac!

Merry Christmas^^

About Pavtube Studio


Founded in 2007, Pavtube creates expert multimedia software applications that help consumers access, transfer and share their digital content across different devices that range from PC, Mac, NLE softwares, tablets, smartphones, to HD media players, game consoles, and home theatre systems. On the basis of computer OS, Pavtube products are divided into two categories – Windows solutions and Mac solutions, spanning across BD/DVD saving, video transcoding, camera/camcorder footage, and DVR recordings (e.g. TiVo) conversion. With creativity, expert knowledge as well as cutting-edge technology, Pavtube helps consumers throughout the world enjoy more in a digitally connected audio-visual world. See http://www.multipelife.com and http://www.pavtube.com for more information. More info can be found here.

Tuesday, December 23, 2014

How to convert any video to FLV with AAC audio for putting on site

Look for ways to convert any video to a FLV with H264 video and AAC audio and put/host on your site? Get an Ultimate Converter to do video to flv conversion with several simple clicks. 

FLV (Flash Video) is a file format used to deliver video over the Internet. If you have a web site, then you possibly plan to add a video to your site using flv format. How to create .flv file with AAC audio from your video?  You should do conversion first.


convert any video to FLV

To realize the conversion, I searched widely and I got some tech support for converting video to FLV with AAC without losing quality in a simplest way. At last, I found Pavtube Video Converter Ultimate is the ideal tool do the the actual work which can help you change all kinds of videos like MTS, MXF, MOV, AVI, MP4, Tivo to FLV video and AAC audio with fast speed for convenient sharing in excellent output video quality. (Read the review or get other free online video converters)

What's more, it provides flexible editing functions, like cutting off the unnecessary part, adding watermarks including text, image and video, adding special effect, inserting subtitles and so on. The mac version is here. Now just download it and follow the steps below to finish the conversion.

How to Transcode any video to FLV with AAC audio for putting on site

Step 1. Load video files

Run the program and click “Add video" button to import source files. You can also directly drag the video clips into the program for conversion. If need, you can check the “Merge into one file” box to join several video clips together.

video to flv converter

Step 2. Select output video format

Click Format bar to get the format list and select a proper export format. In "Flash Video" list, you can find "FLV  H.264 (*.flv)". Or you can convert your video to swf, f4v or mp4 for uploading.

flv video format

Optional: Customize the output video and edit videos

You can click "Edit" button to trim your favorite part from the video, crop video frame size, adjust visual effects, add watermarks, subtitles and more to personalize your videos.

Plus, click the Settings icon, you can adjust the video size, frame rate, bitrate, etc.

flv video settings

Step 3. Start Conversion

When all the settings are OK, you can click the "Convert" button on the main interface to start converting videos to FLV with AAC audio.

After the conversion, you will can easily you can get the web-friendly flv and share on your website.

To add flv to your website, there are two options, which you can consider: 

OPTION #1 - Host video on your site.

Pros:
- you can use any online flash player with any skin, interface, look & feel etc;
- quality of video is controlled by you only -- make it very good or bad, as you wish;
- video size is not limited, you can set any size you like;

Cons:
- it requires a high bandwidth;
- your hosting must be reliable to support requests from many visitors simultaneously;


OPTION #2 - Host video on YouTube.com, but insert the video player directly into your web page.

Pros:
- it doesn't require high bandwidth, it's almost FREE even if you have a lot of visitors;

Cons:
- flash player includes advertisements and logo of YouTube

Detailed steps is here. Just enjoy!

Saturday, December 20, 2014

Copy a DVD with both stereo and 5:1 audio to NAS for streaming

If you want to watch DVD movies on NAS device for streaming with keeping stereo and 5:1 audio, get this DVD to NAS Converter to lossless copy DVD to to MKV/MP4 with multi-track/stream.

NAS, with Network Attached Storage in full, is the extender for home sharing. NAS is often manufactured as a computer appliance - a specialized computer built from the ground up for storing and serving files.

Copy DVD to NAS

To make the most of NAS, you may want to manage your DVD discs on kinds of DLNA compatible devices, then is it possible to backup DVD on NAS for freely streaming, even keeping both stereo and 5:1 audio?

Absolutely Yes, all you need is to rip and compress DVD contents to MP4/MKV with multi-track/stream while maintaining good video quality for storage on NAS. To reach this goal, why don't you choose  Pavtube Bytecopy.

With it, you are you can 
easily backup your DVD with whole content digital folder to lossless MKV or MP4 files with multiple audio and subtitle tracks from original DVD and remove unwanted subs streams and audio tracks at will. For Mac users, you can get ByteCopy for Mac. Now follow below guide to learn how to.

How to Rip and transfer DVD movie to NAS with both stereo and 5:1 audio

Firstly, you should have download and installed the Multi-track DVD Converter. Now let's go.

Step 1. Launch it and load your DVD.

Also read how to convert BR ISO to MKV lossless.

Multi-track DVD Converter

Step 2. Go to "Format" to find "Multi-track Video" catalogue. Select "Loss/encoded Multi-track MKV(*.mkv)" or "Multi-track MP4(*.mp4)", which will provide lossless backup DVD to MKV/MP4 with multiple audio and subtitle tracks.

Multi-track mkv or mp4 format 

Tip: If you want to remove unwanted audio or subtitle stream from original DVD for output, just unselect the box in front of it and keep both stereo and 5:1 audio.

multi-track settings 

Step 3. Click "Convert" to start converting DVD to MKV/MP4. The Conversion can be completed within a short time, then click "Open" to find generated files.

Then you can connect your DLNA devices (PS3, Samsung TV, Galaxy Tab, etc) to the NAS for our home viewing with keeping both stereo and 5:1 audio.

What's more, what Bytecopy can do is more than it, let's go to below tips to find more.

1. You may be confused about the other two options under "Multi-track Video" catalogue: Multi-track MOV(*.mov) and Multi-track Interlaced DV PAL Video (*.avi). They are used to transcode DVD to .mov and .avi output files. The point is that they support saving encoded multiple audio tracks. So you could enjoy it on iOS devices or media players.

2. Directly Copy and Copy the entire disc provide you another two ways to lossless output with both stereo and 5:1 audio. Directly copy will save 100% intact VOB main movie from original DVD, and Copy the entire disc will allow to 1:1 copy DVD to Video_ts folder with all. subtitle and audio tracks preservation.

Wednesday, December 17, 2014

Rip 2D and 3D Blu-ray to SBS/Top-Bottom/Anaglyph 3D MOV

Want to copy 2D/3D Blu-ray to 3D MOV? This article gives details about how to convert Blu-ray to SBS/Top-Bottom/Anaglyph 3D MOV with the best Blu-ray to 3D MOV Ripper.

Since Blu-ray discs possess the feature of high quality images, people would like to spend more money for the visual feast. Then is there a way to watch your 2D/3D Blu-ray movie on iPad/iPhone/iPod, QuickTime or edit in FCP/iMovie/FCE with 3D effect? The most favorable way is to convert 2D and 3D Blu-ray videos to 3D MOV format.

Rip Blu-ray to SBS/Top-Bottom/Anaglyph 3D MOV

For those who are still looking for some software to rip 2D/3D BDs, here we highly recommend Pavtube BDMagic, which is a yet professional Blu-ray Ripping software. With it you can easily convert 2D/3D Blu-ray movies to SBS/Top-Bottom/Anaglyph 3D MOV format. Plus, the original Blu-ray in 1080p can be output just in the same definition, or compressed to 720p video; the choice is yours. (Read Top 5 3D Blu-ray Movie Converter Review) Download the tool and follow the full guide on ripping Blu-ray to 3D MOV below.

Step 1. Add 2D/3D Blu-ray source file to the program

Once installed the latest Blu-ray Converter (Mac version is BDMagic for Mac) onto your computer, launch it and click disc icon to load 2D and 3D Blu-ray files.

2D/3D Blu-ray Converter

Step 2. Set 3D format as output

Click "Format" bar and move mouse to "3D Video" column, you can choose either "MOV Side-by-Side 3D Video (*.mov)" or "MOV Anaglyph 3D Video (*.mov)" or "MOV Top-Bottom 3D Video (*.mov)" as output format for watching on iDevices and editing. (Read Differences Between Anaglyph 3D and Side-by-Side 3D)

3D MOV format

If you want to other 3D video format, you could choose it according to your specific need, like converting to 3D MP4 for Plex Server, ripping to 3D MKV or 3D AVI for 3D TV.

Tip: Customize 3D video effect by entering “Settings” tab to achieve the best video effect on 3D devices.

3D SBS MOV video settings

Step 3. Start 2D/3D Blu-ray to 3D MOV conversion

When everything is OK, just press the "Convert" button to start the conversion. You can follow the conversion process by the progress bar.

Once the conversion finished, you are able to get 3D MOV files via clicking "Open" button. Then it would be easy for you to watch or edit the converted Blu-ray on various MOV-compatible 3D applications at ease.

Friday, December 12, 2014

Make HD video films from ISO files using Sony DVD Architect

This guide aims to tech you how to get DVD Architect working perfectly with iso files on Mac without any issues. Check out the solution now. 

ISO is an archive file (you may also know it as dis image) of an optical disc. It covers all the data of files contained on the archived CD/DVD, or any other disc format. Now I have some HD-video films are created in .iso files from which I do burn BD disks using Nero software on PC computer because Sony's option in the DVD Architect software shuts down too often.
Make HD video films from ISO files using Sony DVD Architect

As I offer use Vegas Pro to change and modify whatever I want to make the video film as professional-like as possible, and with the DVD Architect software I can make chapters so that customize the 1.5 - 2 hours video films for visitors that won't like to sit the 1.5 to 2 hours, then how can I make HD video films from my ISO files using DVD Architect to avoid crash problem and save rendering time on my MacBookPro?

Via the internet looking for options to help me converting iso-files for Mac, I found Pavtube iMedia Converter for Mac to convert my last 13 iso video-films in one go into MPEG-TS format which is compatible with DVD Architect without high quality. Just download this program and follow this guide below to complete importing ISO clips to DVD Architect for further editing.

Rip ISO movies to use in DVD Architect on Mac with ease

1. Load ISO movies

First, drag the ISO files to the program or hit "Load IFO/ISO" button to import ISO files.

ISO to DVD Architect Ripper

2. Select output format

Click “Format” bar to select HD Video -> MPEG-TS HD Video(*.ts) as output format.

MPEG-TS HD Video Format

Tip:

Before conversion, you can click "Settings" button right besides “Format”and enter "Profile Settings" panel to adjust video size, bit rate, frame rate, sample rate and audio channels.

MPEG-TS HD Video Settings

3. Start ISO to MPEG-TS conversion and then add videos to DVD Architect

When all the settings are fine, click the Convert button to start converting your ISO movies to DVD Architect MPEG-TS files. Whne the conversion completes, locate the results videos ready to imported into DVD Architect for making chapters.

Additional Tip:

1. If you want to edit ISO clips in Final Cut Pro X or FCP 7/6, you just need to choose the "Final Cut Pro > Apple ProRes 422 (*.mov)" as output format in the second step; For iMovie, choose "iMovie -> Apple InterMediate Codec (AIC) (*.mov)" as output; For Adobe Premiere Pro or Vegas Pro, choose Adobe Premiere/Sony Vegas> MPEG-2(*.mpg) as output.

2. You can also get Blu-ray ISO to HTPCWD TV Live and 3D TV.

Wednesday, December 10, 2014

Get SD MKV multi-track from Blu-ray for enjoying with desired language

If you are wondering how to rip Blu-ray to SD MKV format with all subtitles and audio tracks keeping, this article shows you exactly how to make it work.

My problems are I can't seem to create a mkv of the full blu ray (BD) with all the sound tracks. Each time I do it I only get one audio sound track. One time Japanese. I would like to choose English French and Spanish. Sound tracks and subtitles. I also see a problem when down converting the BD from HD to SD. Again I can't seem to control the audio sound tracks that get copied. Is there a way to go from blu ray direct to SD MKV multi track?
rip Blu-ray to SD MKV format


To transfer Blu-ray for playing with multi-track format, the first step is to remove commercial Blu-ray discs and DVDs protection from film studio, and then do the conversion. To help him to solve the problem, I tested some softwares and did comparison.

Here we recommended this Pavtube ByteCopy for Mac which does a great job in quick decrypting the protected discs within a few clicks. Best of all, it can handle the latest Blu-ray and is capable of backup Blu-ray to lossless MKV preserving all the multiple audio and subtitle tracks as well as chapter markers on Mac. Also, I can convert my Blu-ray/DVD movie to any format playable or editable with it. In this way, I can freely change subtitles to get your desired language. The Windows version is Pavtube ByteCopy.
More money-saving Trip:

Download the right version and follow the steps below to rip Blu-ray to lossless MKV format on Mac.

Note: A Blu-ray drive is needed before ripping.

Step 1. Load Blu-ray movie.

Get ready to insert your Blu-ray disc to disc drive, click this "Load Disc" button to browser to disc drive and import the disc. Or you could load BD folder and BD ISO from computer hard drive to this best Blu-ray to MKV Converter for Mac.

Blu-ray to MKV Converter for Mac

Step 2. Choose suitable output format.

Pavtubr ByteCopy for Mac offers an special category for users who would like to keep multiple audio tracks and subtitles in saved Lossless MKV file.

To pass-through original TrueHD/Dolby Digital/DTS/PCM audio, just select Multi-track Video > Lossless/encoded Multi-track MKV(*.MKV) for output. In this way the original audio tracks are streamed without transcoding from source BD Disc to saved MKV file.

Also learn how to rip your Blu-ray to Multi-track MOVMulti-track MP4 and Multi-track AVI.

Lossless MKV

Step 3. Adjust profile presets (Optional).

You are allowed to customize profile presets as you like, you could remove unwanted audio track in Audio tab under Settings menu, and uncheck subtitles you do not need in Subtitles tab.

Multi-track settings

Step 4. Start ripping Blu-ray disc on Mac.

Save all your settings, and back to ByteCopy for Mac main interface, hit the "Convert" button to start converting. When the lossless backup completes, you would get a single large MKV file saved in output file destination.
Tip: If you have 3D Blu-ray discs, and want to get them playable, you can choose "MKV Top-Bottom 3D Video (*.mkv)", or "MKV Anaglyph 3D Video (*.mkv)" or "MKV Side-by-Side 3D Video (*.mkv)" which can retain the 3D effect.

Tuesday, December 9, 2014

How do I convert FLV files from YouTube to play on a PSP Easily?

In this article we show you how to convert FLV files from YouTube to the best Video Format MP4 for PSP for watching with the best quality offline in just a few steps.

YouTube has always been the best website for hunting funny things and sharing interesting findings, for it offers endless supply of excellent videos from an online community where all sorts of people can show off their creativity skills and talents, upload the record of great shows, movies and events. You have a Sony PSP and would like to watch your downloaded flv files from YouTube on PSP off the internet? But don't know how? Keep on reading.

convert FLV files from YouTube to play on a PSP

For sake of enjoying YouTube video on your PSP successfully by getting rid of incompatibility of video formats, you need to convert downloaded YouTube FLV video to PSP friendly format like MP4 first. As a YouTube to PSP converter, Pavtube Video Converter Ultimate offers the adequate format specifically for PSP which signifies that users can directly choose PSP as output format.


With it, you can convert YouTube FLV to PSP MP4 within four simple steps. Then watching YouTube video on this game console without limitation is quite a piece of cake. What's more, you can also convert your downloaded YouTube FLV to portable devices: iPad (iPad Mini 2 and iPad Air 2 included), iPhone (iPhone 6 and iPhone 6 Plus included), iPod, Android, etc. for enjoying whenever you want. The mac version is iMedia Converter for Mac.
How to convert downloaded YouTube FLV Video to PSP with Ease

Step 1: Import FLV files from YouTube to the best PSP Video Converter.

Launch the best PSP Video Converter. Click the button “Add Video” to add YouTube video files. If it is necessary, you can double click the each file to have a preview.

PSP Video Converter

Tip:
If you have several video files, and wanna combine video files for PSP, you just need to tick off the “Merge into one” box.

Step 2: Select an output format for PSP and set the output folder.

Click on the dropdown menu of “Format” and then move your pointer to “Common Video”, “H.264 Video(*.mp4)”, “MPEG-4 Movie(*.mp4)” are compatible format.

Or you can move your pointer to “PSP/PS3”, from the sublist, choose “PSP - PSP MPEG-4 Video Excellent Quailty(*.mp4)” or “PSP - PSP MPEG-4 Video minimal Size(*.mp4)" as you like. And then you can set the output folder for PSP.

PSP video format

Step 3: Click “Settings” icon to adjust audio and video parameters for PSP.

Click the “Settings” icon and you will go into a new interface named “Profile Settings”. You can adjust codec, bit rate, frame rate, sample rate and audio channel in the interface according to your needs and optimize the output file quality.

PSP video settings

Step 4: Start converting your YouTube flv videos to PSP MP4.

Click the “Convert” button; it will convert videos to MP4 for PSP immediately. Once the conversion is done, you will be able to get the output files for PSP via clicking on “Open” button effortlessly.

Afterwards, start to transfer the converted video file to Sony PSP

1. Import video into PSP memory card

Connect Memory Stick Duo card with computer, via PSP or card reader or memory stick adaptor as you like, and the card directory is as below:

Memory Stick Duo root

├PSP

├MP_ROOT
│ ├100MNV01( Put MP4 & THM here)
│ ├100ANV01
│ └101ANV01
├MUSIC
├ISO
├PICTURE
└VIDEO (If your firmware is 3.30 or newer, moving MP4 here is ok)

2. Play converted video on PSP

Once the video is transferred successfully, go to menu VIDEO > Memory Stick, you can find and play the video on PSP now. Great!

Tips:

If you wanna copy DVD/Blu-ray movies and videos from HD-camcorder to PSP, Video Converter Ultimate is also of great help. Why do you still hesitate? Download and begin the enjoyment now!

More than expected, this video converter also lets you import YouTube video to Windows Movie Maker, iOS devices and Android phones and tablets, etc.

Friday, December 5, 2014

Best software to convert BR ISO to MKV lossless?

This guide provides a simple way to complete backup Blu-ray ISO to lossless mkv format keeping multiple audio tracks, subtitle streams and chapter markers. 

Q1: Hey guys is this even possible? I convert my BDMV/certificate files to an ISO, can I do lossless complete 1:1 BR ISO rip to get an MKV file? while maintaining all audio/video integrity? Thanks!

Q2: Hello all, I have a 3D blu ray .iso. I want to convert the main (3D) movie to a SBS 3D .mkv without loss of quality. So can anyone help me which software is best please? Thank you in advance.


So a digital backup will help to save the storage space of BR ISO collection, and make it easier to access and carry with. As most Blu-ray include multiple audio and subtitle tracks so that people from different countries who speaking different languages can enjoy same movies in their native languages, so this is reason why people choose to "go from BR ISO direct to lossless MKV format" as above.
Best software to convert BR ISO to MKV lossless

Here recommend you Pavtube Bytecopy which can help you to backup BR ISO to mkv without any quality loss. It helps to convert to lossless mkv with all multiple audio and subtitle tracks, and chapter markers keeping. So you can enjoy your Blu-ray ISO on media players with freely choosing your desired language. Let me show you how to do it and you will find the workflow is so easy. (Read tips for selecting a Blu-ray to MKV Ripper)

More money-saving Trip:

ByteCopy($42) + Video Converter Ultimate($65) = Only $79.9, Save $27.1
ByteCopy($42) + DVD Creator($35) = Only $44.9, Save $32.1
ByteCopy($42) + ChewTune($29) = Only $54.9, Save $16.1

Firstly, you should have download and installed the software. (PS: If you wanna a Mac version, please go to Pavtube Bytecopy for Mac.)

Lossless Backup BR ISO to MKV lossless

1. Run the Pavtube ByteCopy. Press “Load IFO/ISO” icon to import Blu-ray ISO movie.

BR ISO to mkv lossless Ripper

2. Go to Format to find "Multi-track Video catalogue. Select "Loss/encoded Multi-track MKV(*.mkv) , which will provide lossless backup Blu-ray ISO to MKV with multiple audio and subtitle tracks.

Lossless MKV format

Tip: One special function that makes ByteCopy stands out is you can easily select you needed tracks, subtitles.

Multi-track settings

3. Click "Convert to start conversion. Conversion can be completed within a short time, then click "Open to find generated mkv files.

With a very easy operation, you get the lossless mkv files from Blu-ray ISO, which make you to enjoy movies with high quality wherever you want. However, what Bytecopy can do is more than it, let's go to below tips to find more.

If you have Blu-ray and DVD movies, here is the workflow to copy Blu-ray/DVD to lossless MKV format.

Tip 1: You may be confused about the other options under "Multi-track Video" catalogue. They are used to transcode BD/DVD to multi-track mp4, multi-track mov and multi-track avi output files. The point is that they support saving encoded multiple audio tracks.

Tip 2: Directly Copy will provide you another way to lossless output. It will provide you a 100% backup in original format without extracts. If you do not want to output mkv files or your player cannot play mkv files, directly copy is the best choice for you. It will save 100% intact .M2TS main movie from original BD disc, and allow all. subtitle and audio tracks preservation.

Tuesday, December 2, 2014

Transcoding MKV with DTS to AC3 to play on Google Chromecast

Here is a step by step guide to convert MKV with DTS-HD Master Audio to AC3 5.1 for playing on Google Chromecast on Windows and Mac.

Question:

I am trying to play an MKV file which is encoded with DTS on ChromeCast via DSVideo. DS Video informs me that it cannot manage DTS, and ChromeCast also does not support DTS. I own a ds214play. What I want to do is transcode DTS -> Dolby Digital AC3. I have installed a package I found on the Synology forums to enable DS Video to decode DTS. This works fine, however when I cast from DS Video to CC now, it shows a grey box with an exclamation mark. Any solutions?

In mention of DTS audio, we often refer to DTS Digital Surround, DTS-HD Master Audio, DTS Neural Surround, DTS Neo:X. All of the them are famous for high definition audio quality and widely used for in-movie sound on film, DVD, CD, HD DVD and Blu-ray Disc. However, DTS encoded audio or video files are incompatible with your chromecast as above.

In order to successfully play MKV with DTS audio on chromecast anywhere, a recommended solution is to convert DTS to supported format by chromecast and more popular audio format like AC3. The following will introduce a powerful DTS Converter as well as a step by step guide on how to convert MKV with DTS to AC3 to play on CC.

Preparation:

To perform DTS to AC3 conversion in simple steps while still keeping the original quality, Pavtube Video Converter Ultimate is what you need. It is simple to use and features fast conversion speed. With this excellent DTS to AC3 audio converter, you can convert movies, TV shows, and music video with unsupported formats to chromecast with the audio format you need, like 5.1 channels, stereo or mono depending your source audio.

Here is how to convert DTS to AC3 audio format for Chromecast

1. Import source media files

Download, install and run Pavtube Video Converter Ultimate. Click “Add video” button to load your source MKV with DTS files into the program. The DTS to AC3 Converter is multi-task based and supports batch conversion, this means you can load in multiple video files to convert at one time.
 
DTS to AC3 Converter

2. Select output format

The default Chromecast video formats are MP4 and WebM. It also supports MPEG-DASH, Smooth Streaming, and HTTP Live Streaming (HLS) video files.

From the Format bar, navigate to “Common Video” catalogue, here both MP4 and MKV are suitable for your Chromecast.  
Chromecast video format 

3. Set AC3 audio

Click “Settings” button, the “Profile Settings” windows pops up, on which you can set the Audio Codec to AC3 and Channels to 5.1 Channels. This ensures your output audios to be encoded with ac3 5.1. Otherwise, you can keep your channels as Stereo.

Apart from that, you are also allowed to reset audio bit rate and sample rate on this window.

AC3 5.1 audio settings

4. Start conversion

Click “Convert” button to start converting MKV DTS to Chromecast supported format with 5.1/Stereo Channels. As soon as the conversion finished, you can click “Open” button to get the generated files with ease.

Another good thing about Pavtube Video Converter Ultimate is, it offers a “Shut down computer after conversion” option, so if you don’t want to wait around in front of your computer for the entire conversion process, you can tick off it and go away to do other things.

If you are mac users, turn to iMedia Converter for Mac.

Now start streaming converted files using your Chromecast media player

1.Connect with your Mobile device

Download and open the Chromecast app on your Android or iOS smartphone or tablet using Google Play or the App store.

Note: You should ensure that your mobile device is connected to your Wi-Fi and not mobile network. Also, you must have the latest app installed and be on the same network as your Chromecast digital media player.

2. Connect with your Computer

  • Open the Chrome browser and the setup Chromecast.
  • Download the Chromecast app to your computer.

3. Connect with YouTube

  • Connect your Chromecast device to an available HDMI slot on your HDTV. 
  • When your Chromecast digital media player is securely connected to your TV you will see the Chromecast Home screen with your Wi-Fi name at the bottom of the screen. 
  • Now, download the YouTube app on your Android or Apple tablet or smartphone. 
  • Connect your Android or Apple device to the same Wi-Fi network as your Chromecast device.
  • Open the YouTube app on your Android or Apple device and click the Cast button  to start streaming videos.  
Related tips: