Showing posts with label Backup. Show all posts

Thursday, November 12, 2015

Upload DVD Movies to Synology DS416 for Watching at Anywhere

Synology, a worldwide leader in storage solutions, introduced significant enhancements to Synology's family of personal storage devices - Synology DS416. This is the successor to the DS414 with upgraded hardware. If you are planning to backing up DVD collection to personal cloud storage for sharing, Synology DS416 is a nice choice. Here, let’s focus on the way of backing up DVD to Synology DS416.


We all know that we rip DVD to Synology DS416 or other personal cloud storage not only for storing movies but for viewing these DVD movies on our multimedia players more conveniently, like watching DVD on TV, iPad, PS4 via cloud storage. So when we are about to rip DVD to Synology DS416, we need to remove the DVD encryption and change the original format to a wide compatible format, like MP4 which nearly can be accepted by all media players.

To reach the goal, you can use Pavtube ByteCopy to help you. It is capable of ripping any new released and region-locked DVD to Synology DS416 in MP4, AVI, MKV, etc for sharing. It also enables you to copy DVD movies into lossless mkv format with chapter markers, all subtitle/audio tracks preserved. 

If you are a Mac user, Mac verson is here. And you can get the lowest price at our Facebook.

Free download and install:
           

Other Download:
 - Pavtube old official address: http://www.pavtube.cn/bytecopy/
- Cnet Download: http://download.cnet.com/Pavtube-ByteCopy/3000-7970_4-76158512.html

How to rip DVD to Synology DS416?

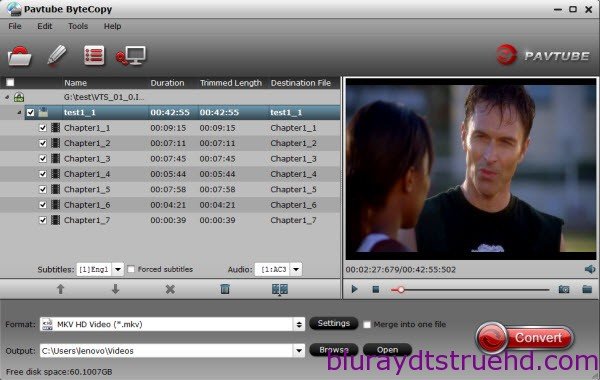
Step 1: Add DVD movies

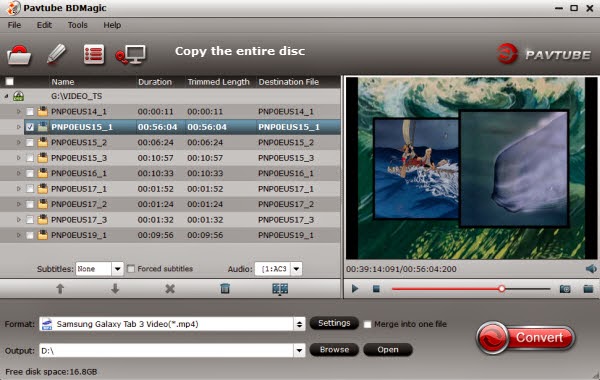
Insert your DVD disc into your DVD driver and run the best DVD to Synology DS416 Converter and click “BD/DVD disc” icon to load movie from DVD source. Set your wanted subtitles and audio track from the drop-down box of “Subtitles” and “Audio” tab.


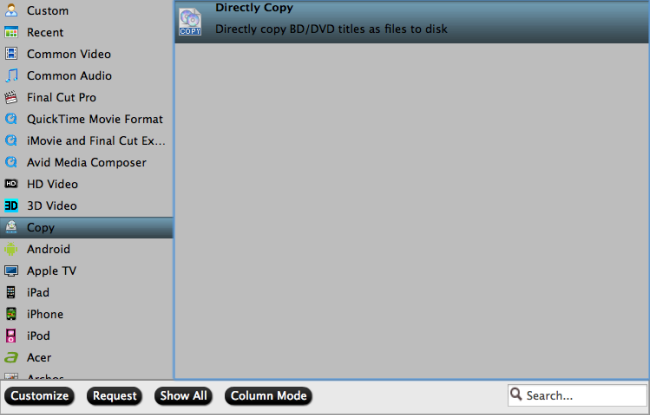
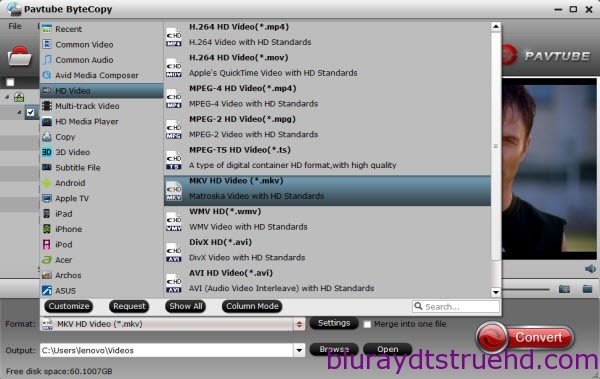
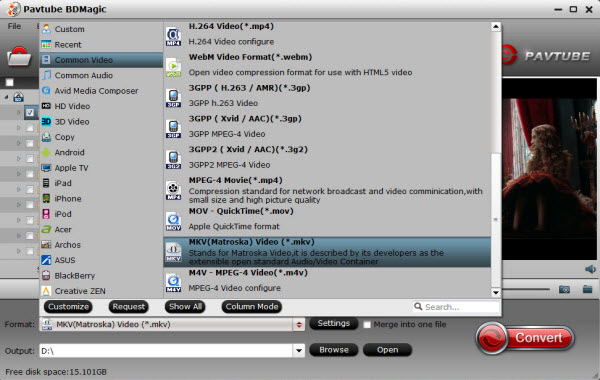
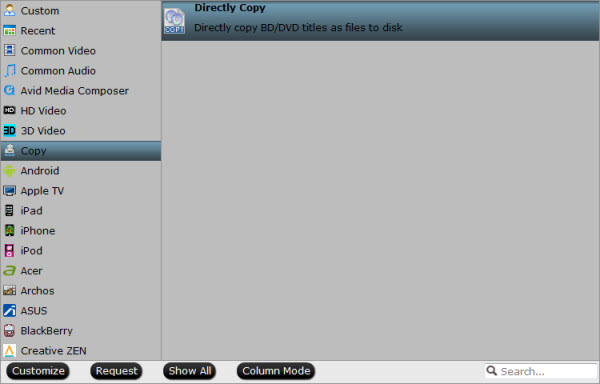
Step 2: Choose right output format

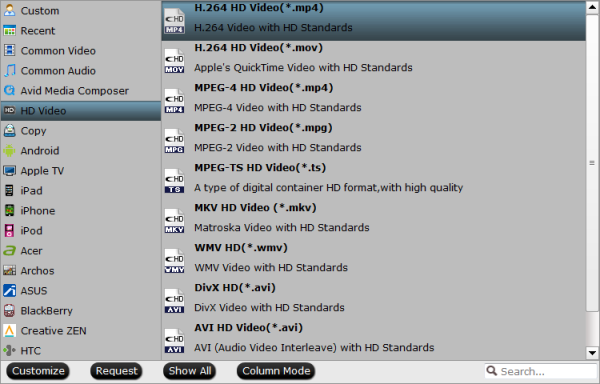
Click the “Format” option, and choose HD Video > MKV HD Video (*.mkv) as output format. If you want to keeping orginal multiple audio tracks, subtitles and chapter markers from DVD, “Multi-track Video > Lossless/encoded Multi-track MKV (*.mkv)” is recommended for you.


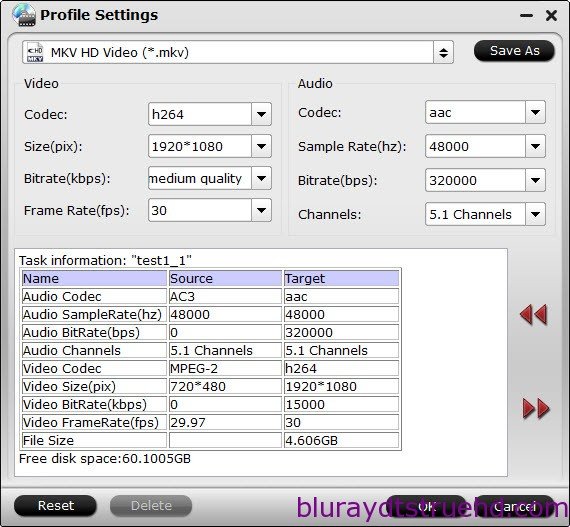
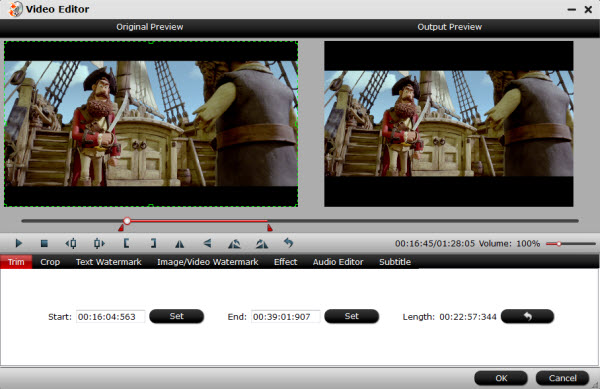
Tip: If you want to store more DVD movies on Synology DS416, you can adjust video bitrate to reduce the video size. Just click“Settings” to change the video parameters and you can preview the output video size at the below chart. Keep in mind the file size and video quality is based more on bitrate than resolution which means bitrate higher results in big file size, and lower visible quality loss, and vice versa.

Learn also: Store Purchased Movies to Seagate Wireless Plus


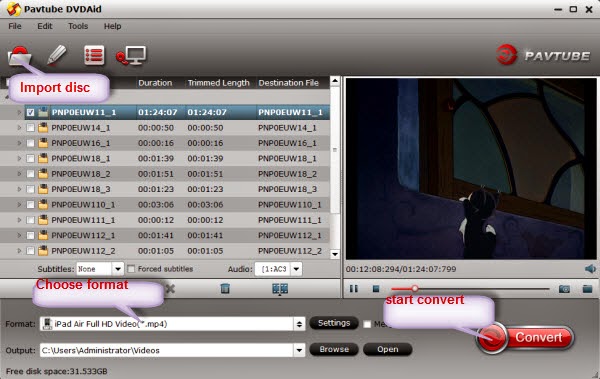
Step 3: Start ripping DVD to Synology DS416

Click the big red“Convert” button under the preview window, and the DVD to Synology DiskStation Ripper will start the conversion from DVD movies to MKV. 

When you put ripped DVD to Synology DS416, you can watch these DVD movies on many devices via Synology, like Apple TV, PS4, LG HD TViPad. If you don’t know how to set up the connection between your Synology NAS and your DLNA/UPnP-compliant DMAs, here is a detailed guide. And if your DLNA/UPnP-enabled device is an Apple TV, here is a more simple tutorial on setting up Synology NAS with Apple TV.  

Read More:

Tuesday, March 24, 2015

How can I put a Blu-ray/DVD on a USB flash drive?

How can I put Blu-ray on USB drive for TV? Play movies from USB, transfer Blu-ray disc movies to USB, convert Blu-ray and DVD to MKV, AVI, WMV, MOV, MP4 for USB.


People are inevitably in need to rip Blu-ray and DVD for storing onto USB drive or a portable USB disk (16gb/32gb/64gb), because nearly all released HDTVs can read video files from USB, in this way, you don’t need a Blu-ray or DVD player connected to HDTV, it is so convenient. However, it seems that seldom Blu-ray/DVD backup software has the profiles for that. For example, they may raise such question: I tried your software but could not determine such as: 

How to convert a DVD MKV format to a USB Flash Drive Scan Disk? 
Could you tell me how this is done with your software? 
How to realize putting Blu-ray video to the USB?  

It is easy to transfer Blu-ray or DVD disc movie to USB, what you need is Blu-ray/DVD Ripping software, this software can rip or convert purchased Blu-ray and DVD disc movie to any common video formats, like MKV, AVI, MP4, etc, and then you can put converted videos to USB for watching on LED/LCD TV. Read the review. 

Note: For Mac users, you can turn to Pavtube BDMagic for Mac. The Top 5 Blu-ray ripper for Mac review. 

Step-by-Step: How to Backup Blu-ray/DVD movies on a USB flash drive

Step 1: Load Blu-ray/DVD movies

Free download Blu-ray Ripper for Windows or Mac. This software can convert Blu-ray disc, Blu-ray ISO file, or DVD disc, ISO image, and IFO file to any formats. 


Step 2: Target a proper output format 
  
Before picking an output format, please remember that the final purpose is not copying and storing the converted DVD and Blu-ray movie in your USB flash drive. The USB flash drive is just an intermediate, and the final purpose is DVD/Blu-ray playback on other devices like Android, iDevices, or editing in video editing system. So you need to pick the right format according to the playback device or the editing program you are using. You can rip Blu-ray and DVD movies to Android, iPad, iPhone, iPod, Samsung, FCP, FCP, iMovie, etc. Here, you can choose MKV as the example. 


Step 3: Adjust video specs or change aspect ratio (Optional)  

You can click settings button to adjust the parameters as you need, such as resolution, bitrate, etc. 

Step 4: Start Blu-ray/DVD Conversion

Click convert button to start. The Blu-ray to USB converter will convert Blu-ray with fast speed. NVIDIA CUDA and AMD APP acceleration is supported, so it can save you much time.

When the Blu-ray to USB conversion is finished, you can copy Blu-ray to USB flash drive, pen drive or memory card, and then you can play Blu-ray movies on HDTV via USB. Please take a free try, hope this Blu-ray to USB Converter can help you. 

Read More:

Tuesday, February 3, 2015

Remove and Record iTunes rental movies to MP4 for playing on Laptop

Summary: This guide will show you how to remove iTunes video DRM and convert them to an open mp4 video formats so that you can enjoy your own video on Laptop. 
   
Question: “I have a couple of files from iTunes rental movies that I’d really like to put them on a external hard drive to give to a friend, who wants to put on her Laptop. I was hoping to record ITunes rental movies and remove DRM to keep indefinitely and I have tried multiple options with no results. Can I even do that given they are copy protected?” 

best m4v drm converter

If you search Google for the free way to convert iTunes video to mp4, you will find out those methods are not working well. In order to play iTunes videos on your laptop, the DRM must be stripped off iTunes videos, or in other words, iTunes M4V videos must be converted to a unprotected format. MP4, the most compatible format which can supported by most of devices or media players, is the most suitable format for converting iTunes M4V videos to. 

To make the magic happen, you need is a powerful DRM removing tool and iTunes M4V Video Converter- like Pavtube ChewTune.(Read Top 10 Best DRM Removal Review) Below, the tutorial will show you how to convert iTunes video to mp4 so that you can play iTunes movies on Laptop, SD Card or any portable player freely.

Tips for who choose Pavtube Best DRM Removal Tool: 

One: If you are a Mac user, please turn to ChewTune for Mac. Free download the right version and enjoy your iTunes M4V movies on Laptop without any hassle! 

Two: here, we’ll show you the biggest Money-Saving Boundles:

DVDAid($35) + ChewTune($29) = Only $49.9, Save $14.1
BDMagic($49) + ChewTune($29) = Only $49.9, Save $28.1
Video Converter Ultimate($65) + ChewTune($29) = Only $74.9, Save $19.1
ByteCopy($42) + ChewTune($29) = Only $54.9, Save $16.1 

Three: My verdict on it can be summed up with “It’s awesome!” Pavtube ChewTune not only help you strip off DRM protection from iTunes M4V movies, but also can removal iTunes DRM Music to your SD Card, Amazon Instant Videos to Surface Tablet, so that you are able to watch almost all DRM movies on multiple smartphones and tablets anywhere you like. 
   
You can choose to download a free trial version of the DRM removal tool: 

Now, you can converting iTunes rental movies (M4V) to MP4 is as easy as 1-2-3. 

Step 1. Download a trial version of Pavtube DRM Removal Tool, and install it. 

pavtube-best-drm-converter

Step 2. Start the iTunes to laptop, hit the "Add video" or "Add from folder" button and browser the source iTunes rental movies location for loading. 

Pavtube DRM Removal Tool

Step 3. From the "Format" drop-down list, choose suitable profile for Laptop. Here I suggest you choose "Common Video > H.264 Video(*.mp4)" as output format. 

play itunes rental movies on laptop

What’s more? – If you like, you could adjust profile settings including video codec, bitrate, frame rate, etc to get better video and audio quality for watching iTunes movies on your laptop. 

Step 4. Hit the "Convert" button to start recording iTunes movies. After it finishes, click the "Open" icon to locate the recorded iTunes movie, and you are ready to transfer and stream these MP4 videos to laptop, it's very easy. 

Now, you can record iTunes rental movies and remove DRM to keep indefinitely. Your friends can easily enjoy your iTunes rental movies on her laptop. 
  
Read More: 

Saturday, December 20, 2014

Copy a DVD with both stereo and 5:1 audio to NAS for streaming

If you want to watch DVD movies on NAS device for streaming with keeping stereo and 5:1 audio, get this DVD to NAS Converter to lossless copy DVD to to MKV/MP4 with multi-track/stream.

NAS, with Network Attached Storage in full, is the extender for home sharing. NAS is often manufactured as a computer appliance - a specialized computer built from the ground up for storing and serving files.

Copy DVD to NAS

To make the most of NAS, you may want to manage your DVD discs on kinds of DLNA compatible devices, then is it possible to backup DVD on NAS for freely streaming, even keeping both stereo and 5:1 audio?

Absolutely Yes, all you need is to rip and compress DVD contents to MP4/MKV with multi-track/stream while maintaining good video quality for storage on NAS. To reach this goal, why don't you choose  Pavtube Bytecopy.

With it, you are you can 
easily backup your DVD with whole content digital folder to lossless MKV or MP4 files with multiple audio and subtitle tracks from original DVD and remove unwanted subs streams and audio tracks at will. For Mac users, you can get ByteCopy for Mac. Now follow below guide to learn how to.

How to Rip and transfer DVD movie to NAS with both stereo and 5:1 audio

Firstly, you should have download and installed the Multi-track DVD Converter. Now let's go.

Step 1. Launch it and load your DVD.

Also read how to convert BR ISO to MKV lossless.

Multi-track DVD Converter

Step 2. Go to "Format" to find "Multi-track Video" catalogue. Select "Loss/encoded Multi-track MKV(*.mkv)" or "Multi-track MP4(*.mp4)", which will provide lossless backup DVD to MKV/MP4 with multiple audio and subtitle tracks.

Multi-track mkv or mp4 format 

Tip: If you want to remove unwanted audio or subtitle stream from original DVD for output, just unselect the box in front of it and keep both stereo and 5:1 audio.

multi-track settings 

Step 3. Click "Convert" to start converting DVD to MKV/MP4. The Conversion can be completed within a short time, then click "Open" to find generated files.

Then you can connect your DLNA devices (PS3, Samsung TV, Galaxy Tab, etc) to the NAS for our home viewing with keeping both stereo and 5:1 audio.

What's more, what Bytecopy can do is more than it, let's go to below tips to find more.

1. You may be confused about the other two options under "Multi-track Video" catalogue: Multi-track MOV(*.mov) and Multi-track Interlaced DV PAL Video (*.avi). They are used to transcode DVD to .mov and .avi output files. The point is that they support saving encoded multiple audio tracks. So you could enjoy it on iOS devices or media players.

2. Directly Copy and Copy the entire disc provide you another two ways to lossless output with both stereo and 5:1 audio. Directly copy will save 100% intact VOB main movie from original DVD, and Copy the entire disc will allow to 1:1 copy DVD to Video_ts folder with all. subtitle and audio tracks preservation.

Tuesday, November 11, 2014

Top Best 3 DVD to Music Rippers Review- Convert DVD to MP3/AAC/AC3 Audios

This article gives the introduction of best 3 DVD to music rippers for converting audio from a DVD to MP3/AAC/AC3 for playing with music players.

Are you a DVD collector? Ever thought of ripping a certain dialog from your favorite DVD movie? Or rip music from your choice DVD so you can save to iPod, iPhone or upload to YouTube, MySpace? In fact you need nothing but a DVD to music ripper. Yes, this article is talking about best 3 DVD to music rippers and review on them right away.
Top Best 3 DVD to Music Rippers
Top 1. Pavtube DVDAid

Price: $35

Pavtube DVDAid

To DVD music to MP3/AAC/AC3 audio files, Pavtube DVDAid can do the job for you. Numerous popular audio formats from Blu-ray, WMA, WAV, M4A, AAC, AC3 and OGG are supported. It offers easy and effective solutions to extracts audio files from DVD; you can even choose which segments to extract. Furthermore, you can preview the video with the built-in player and even take a snapshot of a certain scene. Extracted audio still maintains its high quality. 

Pros: Easy to use; Editing features; Support dealing latest DVD disc, DVD folder and DVD ISO/IFO files
Cons: No support for outputting Apple Lossless Audio Codec
OS: Windows XP/2003/Vista/Windows 7/Windows 8/Windows 8.1/Windows 

Top 2. Tipard DVD Ripper Platinum

Price: 1 year: $39; lifetime: $59
Tipard DVD Ripper Platinum

Tipard DVD Ripper Platinum features super-high output quality, ultrafast conversion speed and pretty high compatibility in terms of converting any DVD (Disc/Folder/IFO) to popular video/audio formats, like MP4, WMV, AVI, MOV, MKV, M4V, MPG, MTV, SWF, MP3, FLAC, WMA, etc. Its all-round capability also benefits 3D video zealots, as it provides best solution to convert DVD to 3D videos for high-end HD TVs as well.

Pros:Output various Audios; Versatile Editions; Rip DVD to popular 3D format; Works with DVD discs, folderes, and ISOs as input
Cons:Cannot output/store as DVD folder or ISO; Need much time to access the right title you want to convert
OS: Windows XP (SP2 or later), Windows Vista/7/8

Top 3. Xilisoft DVD Audio Ripper

Price: $29.95
Xilisoft DVD Audio Ripper

Xilisoft DVD Audio Ripper extracts audio files from DVD; you can even choose which segments to extract. Furthermore, you can preview the video with the built-in player and even take a snapshot of a certain scene. Extracted audio still maintains its high quality.

Pros:Specify Exact Target File Size;Rip Audio From a Segment in Video; Customizable Lyrics
Cons:Support only DVD-Video, DVD folder, IFO File; Few output format; cannot trim a segment of one title to audio; 3 times slower
OS: Windows XP (SP2 or later), Windows Vista, Windows 7

Conclusion

As you can see, Pavtube DVDAid is your best choice to copy audio from a DVD and convert DVD music to MP3/AAC/AC3 file for different music players with intact quality due to its comprehensive features, fastest conversion speed and quality service. The windows version is Windows 10 compatible and the mac version: DVDAid for Mac can also support the lateast Mac OS X 10.10 Yosemite. 

Besides, it can rip DVDs to popular video formats, AVI, MOV, WMV, MP4, FLV etc, for playback on PC, Mac and mobiles or uploading to video-sharing website. Bettter still, it makes perfect copy of your DVD discs with original structue to protect DVDs from being scratched.

More tips: 

Friday, October 24, 2014

Convert DVD films to MPEG-1/MPEG-2 for watching with DVD Converter Software

Confused with how to convert DVD to MPG/MPEG video with high quality? Get a handy DVD to MPEG converter software to convert all types of DVDs to MPEG-1/MPEG-2 video formats.

Now I have many gorgeous DVDs like Queen Live at Wembley, Phil Collins Final Farewell Tour, Eagles farewell tour 1, etc. how to "convert" these DVDs to a MPG file or MPEG-2, for easier editing and authoring. I want do conversion without affecting the video or audio quality.

Convert DVD films to MPEG-1/MPEG-2

As above, if you want to back up your DVD collections on your hard drive, converting DVD to MPG/MPEG format must be a nice idea. After converting, you can import converted mpg files to mobie devices for enjoyment easily and conveniently. This article here will show you the best solution to rip DVD movies to MPEG (MPEG-1, MPEG-2) for tablets, media players, video sharing sites, etc.

At first, if you are looking for converting DVD to MPEG solution software, Pavtube DVDAid or DVDAid for Mac is what you need! It is a multifunctional program which will come in handy not only for DVD to MPEG-1/MPEG-2 format conversion quickly and efficiently, but also deal with many other video format issues. Try it now and see for yourself!

Step 1: Free download and start up the DVD to MPEG Converter, and then insert your DVD disc to the DVD drive. Click "Load file(s)" button to load DVD movies to the program. The imported videos can be previewed on the right window.

DVD to MPEG Converter

Step 2: Select Common Video --> MPEG-1 Video(*.mpg) or MPEG-2 Video(*.mpg) on the drop-down menu as output format which is still suitable for playing.

best format suitable for playing

Step 3: Change DVD to MPEG

Click the Browse button to locate the folder in which the program should save the output files. Otherwise, your video will be saved in the default /Videos/Movavi library location. Then hit the Convert button to start the conversion.

Tips:

1. You can adjust video and audio parameters, including the Bitrate of Video and Audio, the Codec of Video and Audio, Video Size, Sample Rate, Frame Rate, Audio Channels, etc., in the Profile Settings.

2. If you have Nvidia CUDA/ATI AMD ready graphics card, you can have GPU encoding. Check the status of the CUDA/AMD button on the main interface and you’ll learn if CUDA/AMD encoding is in use which will help users accelerate conversion speed.

3. If you want to edit your DVD files before converting, you can click Edit to trim, crop the DVD so as to get the part you want or add some special effect on your movie.

Now you can watch your converted MPEG videos on your portable devices any time. Note that if you use Windows Media Player, you may need a special decoder to play MPEG-1 or MPEG-2 files.

If you are a move lover, you may also like to convert DVD to HD MP4, MKV, MOV on Mac, free copy DVD to AVI format and transcode MP4 to MOV video with ease.

Friday, September 5, 2014

Copy Blu-ray collection to hard drive with good quality picture/sound for Tablet/TV viewing

Copy Blu-ray to Hard Drive for viewing on tablets/TV? How to enjoy with good quality picture/sound quality? This article will teach you how to...

I own lots of Blu-ray movies and want to copy my BD collection to hard drive and for tablet viewing more Flexibly as I tend to watch these children's films with 4 year old son. I want a top ripping tool which works very well in converting my Blu-ray moives for enjoying on my samsung tablet and TV (On Network Hark Drive) with good quality picture/sound output.
Copy Blu-ray collection to hard drive


If you are looking for such a powerful, easy-to-use third-party assistance software that output playable video with excellent quality, turn to Pavtube BDMagic that can digitize their physical Blu-ray disks onto computer HDD. With this app, you can help you remove the Blu-ray/DVD disc protection and convert them to playable format for various purposes within a few clicks. Besides, you can copy source BD/DVD disc to computer hard drive with same structure preserved. Refer to the guide below.

The app is also available for Mac OS – Get BDMagic for Mac if you work with OS X 10.5/10.6/10.7/10.8/10.9.

FYI: If you want to rip BD/DVD with keeping all the audio tracks (language) and soft subtitles, here's another choice for you: 30% off ByteCopy/ByteCopy for Mac.

Easily backup Blu-ray to hard drive with good quality picture/sound for viewing

1. Launch the highly recommended Blu-ray Ripper. Insert your Blu-ray movie to BD drive, and click “Load Disc” button on Pavtube BDMagic interface to load Blu-ray disc; it also support importing BD ISO and BD folder.

Best Blu-ray Ripper

2. Select the main title and set subtitles/audio language you'd like to preserve.

3. Click "Format", you can find many video formats in the dropdown list, you can choose the one you need like "H.264 Video(*.mp4)" or "MKV(Matroska) Video (*.mkv)" from "Common Video" option.

Format for Tablet/TV viewing

4. Change target video/audio specs (Optional)

If you are not satisfied with the default video/audio specs, click "Settings" to adjust video seize(pixel), frame rate, bitrate (the higher bitrate, the larger file size and better video quality), or audio settings.

MP4 Settings

5. Start Conversion.

Click the big "Convert" to start converting Blu-ray to Hard Drive as MP4/MKV format. After conversion, you can click "Open" to find the converted files.

Now you can successfully rip and backup Copy Protected Blu-ray to hard drive Up to the format you wish for playing on Samsung tablet and TV.

Tips:

1. You can hit the Copy the entire disc icon on BDMagic main interface and start Blu-ray, DVD backing up process.

2. If you’d like to copy only movie content and leave out the extras and commentary, the Directly Copy is exactly what you need, which copies intact M2TS/VOB main movie from original BD/DVD disc without extras.

Read more:

Thursday, August 14, 2014

Copy Blu-ray to 12T La Cie Thunderbolt drive for various end use

How to copy blu-ray disc to 12T La Cie Thunderbolt drive to let it stored and played back freely on your computer? The following guide can help you achieve it easily.

Want to prevent your Blu-ray from scratching, cracking and other physical damages even lost? Embarrassed by variety of Blu-ray protections? Searching for a way you can convert a bookshelf of movies into 12T La Cie Thunderbolt drive that fits in your palm? Then copying Blu-ray or creating digital backup of your BD disc can be the best choice to achieve all your goals!

12T La Cie Thunderbolt drive

Best solution to backup Blu-ray to 12T La Cie Thunderbolt drive

Remember that, it is not over after copy Blu-ray movie to 12T La Cie Thunderbolt drive which means that you can enjoy Blu-ray movies without ever having to get off your couch to drop a disc in your Blu-ray player.

Now with Pavtube BDMagic- the best Blu-ray coping tool, you can backup main Blu-ray in .m2ts format or transcode your Blu-ray to perticular format you need. For example, by converting Blu-ray movie to AVI format, you can playback the movie on computer since majority of media player like PS3, can recognize AVI file. Ripping Blu-ray to MP4 have more advantages, such as play and watch Blu-ray movie on multimedia portable devices. And iPad, iPhone, iPod touch, PSP, Samsung Galaxy Tab are all delightful platforms for Blu-ray videos.

What's more, if you like to cut and save some of favorites scenes from my Blu-rays, Pavtube BDMagic can be a magic tool to help you get it done. The app is also available for Mac OS – Get BDMagic for Mac if you work with OS X 10.5/10.6/10.7/10.8/10.9.

FYI: If you need to keep all the audio tracks (language) and soft subtitles when ripping Blu-rays, here's another choice for you: Pabtube ByteCopy.

How to convert Blu-ray to 12T La Cie Thunderbolt drive with playable Divx AVI format 

1. Launch the highly recommended BD Copier. Insert your Blu-ray movie to disc drive, and click “Load Disc” button on Pavtube ByteCopy interface to load Blu-ray from BD drive; it also support importing Blu-ray ISO and Blu-ray folder.

Blu-ray to 12T La Cie Thunderbolt drive

2. Select the main title and set subtitles/audio language you'd like to preserve.

3. Select a format for conversion. To convert Blu-ray to Divx video, press on "Format" and choose "Common Video>> DivX AVI - Audio Video Interleaved(DivX)(*.avi)" format.

12T La Cie Thunderbolt drive Video Format

Tip: Powerful edit function including Trim, Crop, Add subtitles, etc will give you great experience for conversion. For example, you can use Trim to cut off the adverts/intro/credits that you don’t want to retain in output videos.


4. Start ripping Blu-ray movie to Divx AVI for playing.

5. After conversion completes, press "Open" to locate resulted avi files. Copy these AVI to 12T La Cie Thunderbolt drive via usb or cable and then transfer them to your media player or mobile devices for watching.

Tips:

1. You can hit the Copy the entire disc icon on BDMagic main interface and start Blu-ray backing up process.

2. If you’d like to copy only movie content and leave out the extras and commentary, the Directly Copy is exactly what you need, which copies intact .M2TS main movie from original Blu-ray disc without extras.


3. If you have a large DVD collection, just learn how to convert old DVDs to MKV and copy DVD on 12T La Cie Thunderbolt drive.

Saturday, July 26, 2014

Backup/Copy Blu-ray Disc to BDMV with Pavtube BDMagic in 2 clicks

If we choose to backup full blu-ray disc to a BDMV folder, you are lucky enough to have an isured Blu-ray copy permanently we can play the video file inside directly on our PC or burn the folder to another Blu-ray disc anytime we like.

In general, Blu-ray Discs are easy to break and after we backup Blu-ray disc, we can rest assured of playing the Blu-ray disc without worrying about the damage to the optical disc due to frequent playing.  Here I will specify the steps of backing up full Blu-ray disc to BDMV folder in the hard drive in details:

Copy Blu-ray Disc to BDMV

Please first prepare a Blu-ray backup program capable of backing up full Blu-ray disc to a complete Blu-ray folder. Here, Pavtube BDMagic ranks top on the Blu-ray ripping, conversion and backup application list which can rolls off Blu-ray/DVD disc protection, supports loseless 1:1 Blu-ray backup and keeps all the disc titles and chapter structure perfectly.

Easy Guide: 2 Clicks Copy/Rip Blu-ray Disc to BDMV with Pavtube BDMagic

They provide free trial (no time limitation) before purchase; and you can reach the Mac version here.

Note: Before coping, you need to hook up an external Blu-ray drive with your computer, and insert your Blu-ray Disc into the drive.

Step 1.
Run Best Blu-ray Ripper and import disc.

Click “Load files” icon to load your inserted Blu-ray disc . 

Step 2. Make 1:1 Full Disc Copy

Once loaded, click “Browse” to specify where to send the generated files to. When ready, click “ Copy the entire disc" icon to start copying your Blu-ray movie to an intact Blu-ray folder.


And it could take 1-2 hours to copy a Blu-ray to PC a depending on data reading speed of your HDD and source disc. After ripping you can click the “Open” button to locate generated files and transfer them into it or directly store it on your computer. The final output files have the same structure as that on the original Blu-ray disc.

Trial limits: Full Disc Copy feature can be used for 3 times only.

Tip: If you only want to copy the intact main movie without any recoding on Mac, turn to the guide to learn backup Blu-ray disc in M2TS.

Thursday, June 26, 2014

Backup your Blu-ray disc without worry about scratched by your kids

WIth the high qualiy Blu-ray discs in hand, it is necessary to keep an eye on how to protect your favorite Blu-ray disc from scratched by your kids. This article mainly tells you how to backup your Blu-ray movie without worry about this issue

When I bought blu-rays, sometimes my kids have damaged them by accident. And I used to hate whenever my BD discs got scratches which would affect the playing of the flick.


In this case, it will be a wise decision to backup your Blu-ray disc as first for future watching conveniently. Looking for third-party software to copy Blu-rays without sacrificing the picture quality?

For mac users, here Pavtube BDMagic for Mac is the best tool to remove the Blu-ray/DVD copyright protection of the disc and convert to whatever videos you want. With it, you can enjoy your favorite Blu-ray/DVD movies at any time without worry about scratched by your kids. And it will provide you two ways to backup of the Blu-ray discs, just choose the one you like most.

First of all, free download Mac version (Pavtube BDMagic is for Windows users) and run the software to learn how to copy Blu-ray disc in 2 ways.

Step 1. Import Blu-ray discs to Pavtube BDMagic for Mac.

Run the best Mac Blu-ray backup software, click "Load files" icon to load the Blu-ray discs. After successful 100% load, click the select main title you are able to preview the whole movie in the preview window, which works just like a media player.

Note: When loading discs, please make sure your computer is networked and Blu-ray disc drive is installed properly.


Step 2. Two ways for copying Blu-ray disc to avoid scratched by kids.

Method 1. Full disc copy: 1:1 backup the entire disc with original structure and chapter marks

If you want to copy a 3D/2D Blu-ray discs in output files for further playback, or keep the original structure of disc for further creating ISO files or DVD discs, that is what exactly "Full disc copy" can do for you.

Click "Copy the entire disc" icon on the interface and you are brought to conversion progress immediately. After conversion, go to "Open output folder" you will get a generated folder combined with two folders: "BDMV" and "CERTIFICATE". All the M2TS files are located in BDMV folder.


Tip:
Here BDMagic for Mac ($49) + DVD Creator for Mac($35) = Only $49.9, Save $28.1 is preferable for users who want to backup/burn Blu-ray disc. And this bundled product will give you a special price and save more money! Try it right now if you are interested.

Method 2. Directly Copy: 100% backup the intact main movie of Blu-ray discs

If you just want to copy the main movie for playback without the menu and promotional clips etc, "Directly Copy", which will takes less time for conversion and occupies less space than Full disc copy, is right for you.

Click "Format" menu and go to "Copy" option, choose "Directly Copy" for output format.


Then click "Convert" button to start conversion. Once finished, you will get a converted file in M2TS format for Blu-ray disc.

Every time when the conversion is finished, "Open" button on the main interface will help you to locate the generated files.

Above all, you can choose any way of them to copy your Blu-ray disc without quality loss and then share them with your family or friends. And now you will not worry about the problem that you Blu-ray disc will be scratched by your kids!

More related: 

Convert DVD to Digital Copy in Windows/Mac
Tips and Tricks for Selecting a Blu-ray to MKV Ripper

Monday, April 28, 2014

How to Convert DVD to Digital Copy in Windows/Mac

Description: This guide introduces how to convert DVD disc, folder, IFO/ISO to Digital Copy, so that you can watch dvd movies on portable devices like iPhone, iPad, PSP and more or even share them online at any time.

If you have a large collection of DVD movies, it’s a good idea to make a digital copy of DVD so as to backup them in digital format in case your discs get damaged or destroyed; you can freely enjoy your favourite DVDs without loading DVD disc, isn’t it fantastic?


How to convert DVD to digital copy? To get the answer, just read on to learn how to make a digital copy in video formats of DVD.

At first, the most important thing is to backup dvd into a most common format which could be accepted by most of your devices. After many trials, I prefer to save them into MP4 format as it’s widely supported by my iPhone, iPad, Android tablet and Samsung Smart TV.

To rip DVD into MP4 format with best quality, I recommend Pavtube DVDAID as it’s capable of ripping/converting just about every title that I own; it’s easy of use and choices for decode/encode to all popular formats. The Mac version is Pavtube DVDAID for Mac.

P.S.
Now I'm glad to announce that here comes Hailey's 22th birthday, who is a warm and generous girl works for Pavtube Studio.

And Great info! Get a part of Hailey's birthday! You can get DVD Ripper offers~

1. Download our questionnaire and fill the info to get 30% OFF!
2. Share our event to your friends to get 40% OFF~
3. Participate Hailey's Day and get 50% off by sharing your photo with "I Love Pavtube"!

Pls pay attention to Hailey's Birthday special page, and contact customer service to get welfare Only at Apirl 29, 2014! Never miss!!!

How to convert DVDs to digital videos with Pavtube DVD Ripper

Step 1. Launch Pavtube DVD Ripper; import disc

Inset your DVD to computer; Then hit “load disc” to import the discs. You can also drag and drop Blu-ray/DVD folder, ISO/IFO files to it directly. Note that you shall keep Internet connected during this period.


Step 2. Choose format


Hit “Format” drop-down list and choose “HD Video> H.264 HD Video(*.mp4)” as the most widely used format for playback on smartphones, tablets and HDTV, or choose the optimized preset for your device. If you want to play DVD with Windows Media Player, you can choose WMV as the output format.


Step 3. Adjust output settings (Optional)


You can click “Settings” (besides “Format”) to change target video size, bitrate, frame rate and other specs. Change the size to “Original” to get full size picture that can be playback on TV clearly. And the higher bitrate you choose, the better video quality will be.

Step 4. Star conversion

Back to the main interface and hit the “Convert” to start converting DVD to HD MP4; this converter will start all the tasks in batch. Wait for a while till the conversion completed; click “Open output folder” to quick locate the converted files. Now start trasferring your DVD movies for playback and sharing.

Related articles: