Overview:

In this article, we will show you two parts:
Part I: How to Import DVD to iMovie Freely and easily?
Part II: How to burn iMovie project to DVD on Mac effectively?
Hot Search: iMovie Alternative, iMovie Best Formats, iMovie Converter, iMovie and FCP …
Why you need Import DVD to iMovie and Burn iMovie project to DVD on Mac?
Import DVD to iMovie - You may purchased a vast collection of DVD disks, and want to copy DVD movie to iMoive, a pre-install application on Mac which allows you to edit the films, make clips, add music/narration/photos, and create fun trailers from all that footage. iMovie for Mac enables you to import VOB files on homemade DVDs, but it lacks native support for importing commercial DVDs. You first have to convert the audio and video files from your DVD to iMovie friendly format such as MPEG-4, H.264, DV and AIC, while a DVD to iMovie converter software is required.
Burn iMovie project to DVD on Mac - iMovie is a great free movie making software for Mac with tons of advanced features. You may have some home videos and enjoy making movies with iMovie. After finished the movie editing, you have multiple ways to share your masterpiece: save to computer, transfer to iTunes, share to YouTube, Facebook, MobileMe Gallery, etc. And of course, burn the iMovie project to DVD for better video preservation! Want to burn iMovie to DVD so that you can watch the home movies on DVD player or TV with family and friends?
Part I: Step-by-step: How to Rip and Import DVD to iMovie on Mac
A: There are two things that you need to know about importing DVD to iMovie:
1. If you want to edit a homemade DVD in iMovie on Mac, you can import the DVD video to iMovie without using DVD ripping software like HandBrake only if you still had the original video, which should be created by iPhone, iPad or other Apple devices instead of any other HD camcorders. For people who most often use iMovie for home videos, bear in mind that you can directly transfer your DVD to iMovie on Mac without any third-party aid.
>> Getting Panasonic GH4 4K Footage into iMovie
2. If you are trying to import a commercial DVD to iMovie on Mac, I'm afraid a DVD ripper is a must-have because of iMovie compatibility issues. HandBrake is free and easy to use, but when it comes to ripping DVD with copy protections to iMovie, like Disney copyprotection, commercial DVD CSS encryption, Sony ARccOS, etc, it can't work as expected. Luckily, there is still other DVD to iMovie ripping software solutions for Mac you can easily find, such as Pavtube DVDAid for Mac, MPEG Streamclip and so on.
>> Backup Disney DVD Movies with strict copy protections on Mac Yosemite
B: How to Rip/Import DVD movies to iMovie on Mac with ease
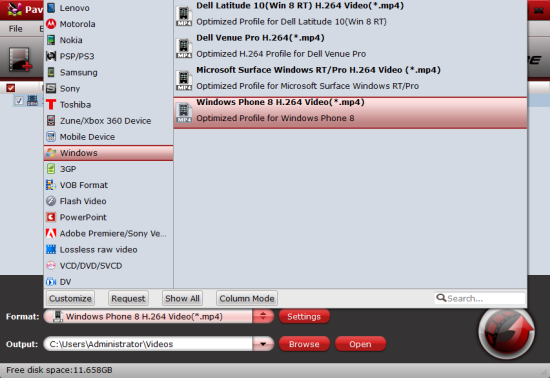
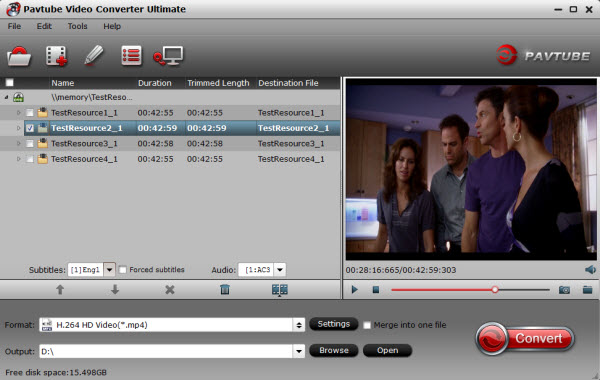
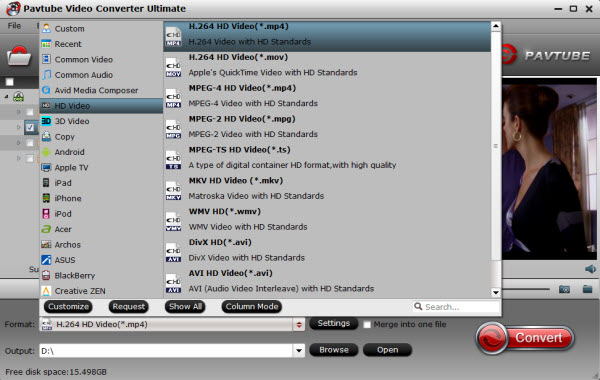
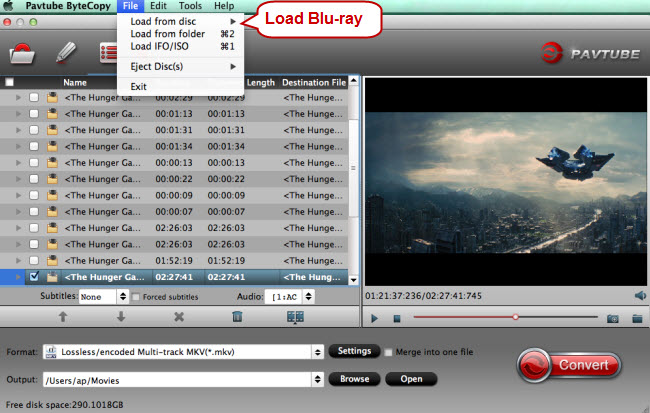
We write down this DVD to iMovie ripping tutorial and hope it will help you figure out problems like what formats are iMovie compatible with, how to rip DVD to iMovie on Mac, how to import video to iMovie without DVD ripper like HandBrake, etc. Here Pavtube BDMagic for Mac (Here is review) is recommended to you which I recently come to discover and utilize the updated version to do this. This Mac DVD ripping tool can rip any protected DVD and convert DVD to AIC for using in iMovie natively ensuring maximum editing quality and efficiency when working with iMovie.

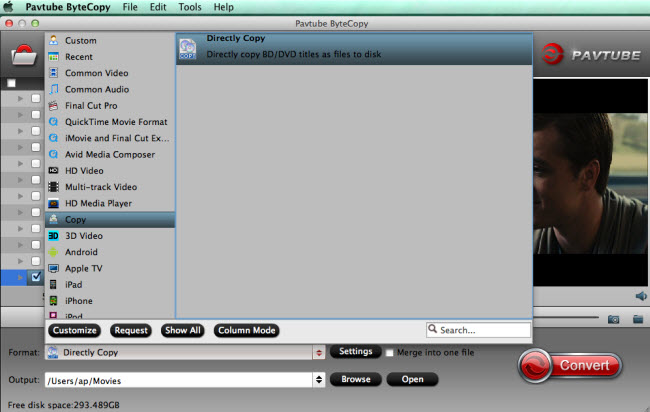
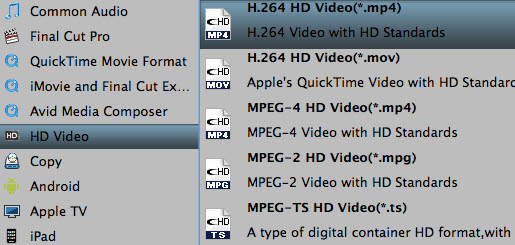
The built-in editor also allows you to extract DVD clips with the very part you want. Or, it also supports converting DVD to any video and audio formats that are compatible with QuickTime, iTunes, Real player, Apple devices, such as MOV, MP4, M4V, AVI, MPG, MPEG-4. Now download the program to learn the DVD to iMovie/FCE conversion process. Step-by-step guide from: Import DVD to iMovie Tutorial
Part II: How do I burn my iMovie project to DVD?
Answer:: Use Toast to make a DVD from your iMovie project.
Step by Step:
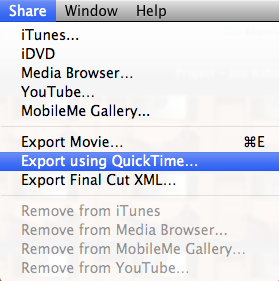
1. After you've finished editing your movie in iMovie, click Share --> Export Using Quicktime.
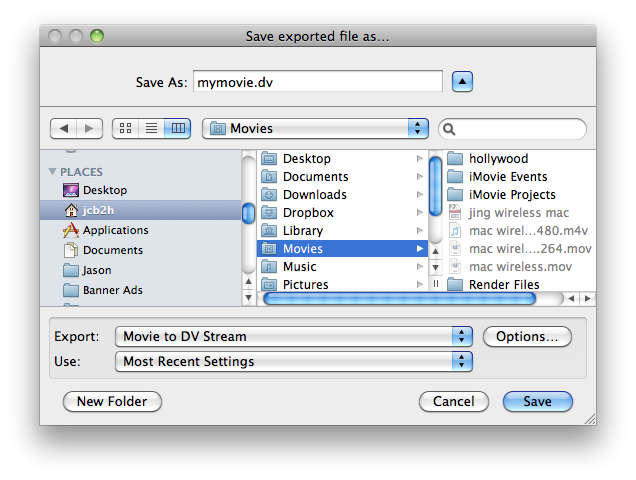
2. Select Movie to DV Stream from the Export: menu at the bottom of the window. Type in a name for your movie and click Save.
3. Once your project has finished exporting you must quit iMovie before launching Toast.
4. Launch Toast by clicking the icon in the dock.

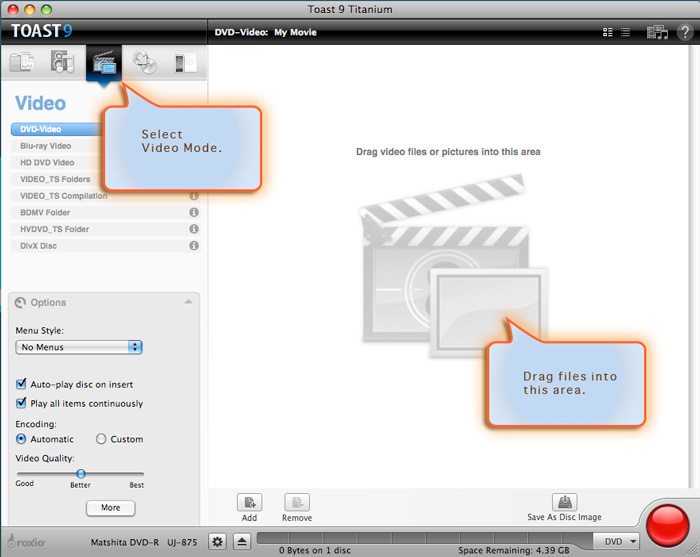
5. Click the Video tab.
6. Select Video Mode if it is not already selected. Under options, select No Menus in the Menu Style drop-down menu. Check the box next to Auto-play disc on insert . These options will allow your finished DVD to be played on most DVD players.
7. Drag and drop your saved .DV file from steps 1-2 from its location on the hard drive into the Toast window.
8. Eject any CDs or DVDs by pressing the eject button on the keyboard. Insert a blank DVD-R into the slot on the right hand side of the computer.
9. Click the red record button. Your project will begin encoding and burning.
10. When finished, remove your DVD from the tray or slot.
Or, you can get the Pavtube DVD Creator for Mac is here to burn iMovie Projects to playable DVD videos. And good news is that this bundle software BDMagic for Mac($49) + DVD Creator for Mac($35) = Only $49.9, now which price is less than the original Video Converter Ultimate. You can save $28.1 if you choose it and see more special offers here. Learning A Beginners Guide to Burning DVDs.
Further Reading - iMovie Compatible Formats:
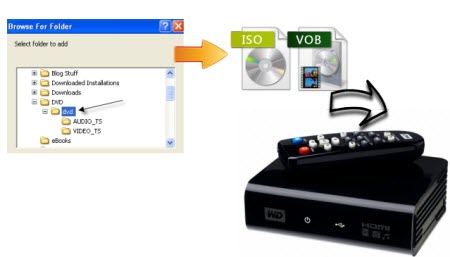
To answer all DVD-iMovie-importing questions, we need to first get to the bottom of it – what are iMovie compatible formats. We are talking about methods of ripping DVD to iMovie on Mac here just because what's in the VIDEO_TS folder is MPEG 2 video, which is not included in the iMovie list and you may get stuck with a box with message like "Incompatible Video Format". So read carefully the following iMovie format information and you will know which format you should rip your DVD to for edit in iMovie, especially on Mac here.
1. DV
2. DV Widescreen
3. HDV 1080i (25 and 30 fps)
4. HDV 720p (25 and 30 fps)
5. MPEG 4 Simple Profile
6. iSight
* There might be others that can work in iMovie, like AVCHD or some video containers, which contains one of the above. However, DIVX, Windows Media files, etc. would need to be converted.
Read More:
" If you are fond of some video clip from a DVD movie and want to edit it in Apple iMovie project, you got the right place! The following tutorial will share with you how to convert DVD to iMovie friendly video format and import DVD into iMovie for editing. Then, you can burn iMovie project to a new DVD disc. "
In this article, we will show you two parts:
Part I: How to Import DVD to iMovie Freely and easily?
Part II: How to burn iMovie project to DVD on Mac effectively?
Hot Search: iMovie Alternative, iMovie Best Formats, iMovie Converter, iMovie and FCP …
Why you need Import DVD to iMovie and Burn iMovie project to DVD on Mac?
Import DVD to iMovie - You may purchased a vast collection of DVD disks, and want to copy DVD movie to iMoive, a pre-install application on Mac which allows you to edit the films, make clips, add music/narration/photos, and create fun trailers from all that footage. iMovie for Mac enables you to import VOB files on homemade DVDs, but it lacks native support for importing commercial DVDs. You first have to convert the audio and video files from your DVD to iMovie friendly format such as MPEG-4, H.264, DV and AIC, while a DVD to iMovie converter software is required.
Burn iMovie project to DVD on Mac - iMovie is a great free movie making software for Mac with tons of advanced features. You may have some home videos and enjoy making movies with iMovie. After finished the movie editing, you have multiple ways to share your masterpiece: save to computer, transfer to iTunes, share to YouTube, Facebook, MobileMe Gallery, etc. And of course, burn the iMovie project to DVD for better video preservation! Want to burn iMovie to DVD so that you can watch the home movies on DVD player or TV with family and friends?
Part I: Step-by-step: How to Rip and Import DVD to iMovie on Mac
A: There are two things that you need to know about importing DVD to iMovie:
1. If you want to edit a homemade DVD in iMovie on Mac, you can import the DVD video to iMovie without using DVD ripping software like HandBrake only if you still had the original video, which should be created by iPhone, iPad or other Apple devices instead of any other HD camcorders. For people who most often use iMovie for home videos, bear in mind that you can directly transfer your DVD to iMovie on Mac without any third-party aid.
>> Getting Panasonic GH4 4K Footage into iMovie
2. If you are trying to import a commercial DVD to iMovie on Mac, I'm afraid a DVD ripper is a must-have because of iMovie compatibility issues. HandBrake is free and easy to use, but when it comes to ripping DVD with copy protections to iMovie, like Disney copyprotection, commercial DVD CSS encryption, Sony ARccOS, etc, it can't work as expected. Luckily, there is still other DVD to iMovie ripping software solutions for Mac you can easily find, such as Pavtube DVDAid for Mac, MPEG Streamclip and so on.
>> Backup Disney DVD Movies with strict copy protections on Mac Yosemite
B: How to Rip/Import DVD movies to iMovie on Mac with ease
We write down this DVD to iMovie ripping tutorial and hope it will help you figure out problems like what formats are iMovie compatible with, how to rip DVD to iMovie on Mac, how to import video to iMovie without DVD ripper like HandBrake, etc. Here Pavtube BDMagic for Mac (Here is review) is recommended to you which I recently come to discover and utilize the updated version to do this. This Mac DVD ripping tool can rip any protected DVD and convert DVD to AIC for using in iMovie natively ensuring maximum editing quality and efficiency when working with iMovie.
The built-in editor also allows you to extract DVD clips with the very part you want. Or, it also supports converting DVD to any video and audio formats that are compatible with QuickTime, iTunes, Real player, Apple devices, such as MOV, MP4, M4V, AVI, MPG, MPEG-4. Now download the program to learn the DVD to iMovie/FCE conversion process. Step-by-step guide from: Import DVD to iMovie Tutorial
Part II: How do I burn my iMovie project to DVD?
Answer:: Use Toast to make a DVD from your iMovie project.
Step by Step:
1. After you've finished editing your movie in iMovie, click Share --> Export Using Quicktime.
2. Select Movie to DV Stream from the Export: menu at the bottom of the window. Type in a name for your movie and click Save.
3. Once your project has finished exporting you must quit iMovie before launching Toast.
4. Launch Toast by clicking the icon in the dock.
5. Click the Video tab.
6. Select Video Mode if it is not already selected. Under options, select No Menus in the Menu Style drop-down menu. Check the box next to Auto-play disc on insert . These options will allow your finished DVD to be played on most DVD players.
7. Drag and drop your saved .DV file from steps 1-2 from its location on the hard drive into the Toast window.
8. Eject any CDs or DVDs by pressing the eject button
on the keyboard. Insert a blank DVD-R into the slot on the right hand side of the computer.9. Click the red record button. Your project will begin encoding and burning.
10. When finished, remove your DVD from the tray or slot.
Or, you can get the Pavtube DVD Creator for Mac is here to burn iMovie Projects to playable DVD videos. And good news is that this bundle software BDMagic for Mac($49) + DVD Creator for Mac($35) = Only $49.9, now which price is less than the original Video Converter Ultimate. You can save $28.1 if you choose it and see more special offers here. Learning A Beginners Guide to Burning DVDs.
Further Reading - iMovie Compatible Formats:
To answer all DVD-iMovie-importing questions, we need to first get to the bottom of it – what are iMovie compatible formats. We are talking about methods of ripping DVD to iMovie on Mac here just because what's in the VIDEO_TS folder is MPEG 2 video, which is not included in the iMovie list and you may get stuck with a box with message like "Incompatible Video Format". So read carefully the following iMovie format information and you will know which format you should rip your DVD to for edit in iMovie, especially on Mac here.
1. DV
2. DV Widescreen
3. HDV 1080i (25 and 30 fps)
4. HDV 720p (25 and 30 fps)
5. MPEG 4 Simple Profile
6. iSight
* There might be others that can work in iMovie, like AVCHD or some video containers, which contains one of the above. However, DIVX, Windows Media files, etc. would need to be converted.
Read More: