Showing posts with label Apple. Show all posts

Thursday, April 3, 2014

How to ingest and convert Blu-ray/DVD to Apple Aperture 3 for editing, playing on Mac

Summary: In this article, you can get the info of covnerting Blu-ray/DVD movies to Apple Aperture 3 compatible codec for editing.

"Is there any way I could adopt to import/load my Blu-ray and DVD movies to Aperture 3 to complete some video editings? If possible, what do I need and what are the steps?"


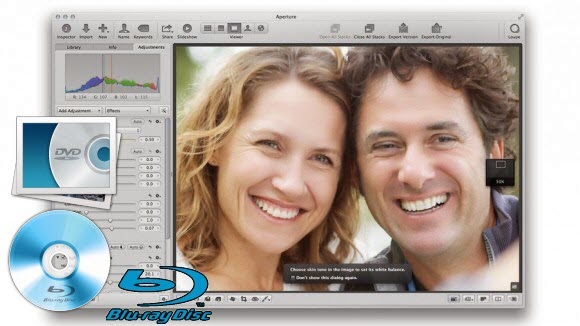
The answer is no doubt Yes. As an ideal video editing tool, Apple Aperture 3 has full multi-media capabilities. That's right. Finally something that handles all those video files from your HD dSLR. Import, rate, scrub video, trim your clips. Add audio. Make a full-on OVIE within Aperture or export to Final Cut Pro. Insanely cool. Since Aperture can't accept loading your Blu-ray/DVDs, you only need to rip and convert Blu-ray/DVD movies to Aperture compatible videos on your Mac computer.

To make Blu-ray/DVD friendly with Apple Aperture 3, it's a good choice to convert BD/DVD to Apple Aperture 3 best supported video formats, such as Apple Prores MOV, and then you can edit Blu-ray/DVD videos in Apple Aperture 3 smoothly. You can follow the easy steps below.

Import and Edit Blu-ray/DVD in Apple Aperture 3 with the best Blu-ray Ripper for Mac

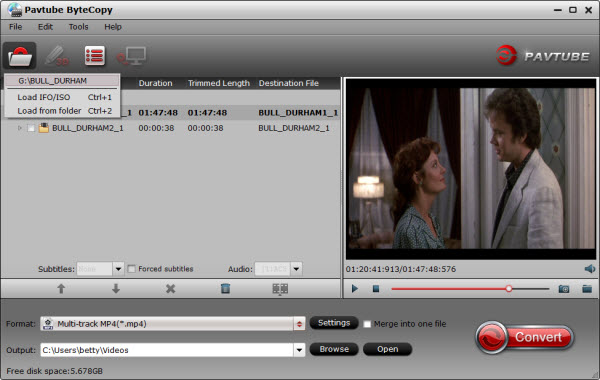
Step 1: Load your disc.

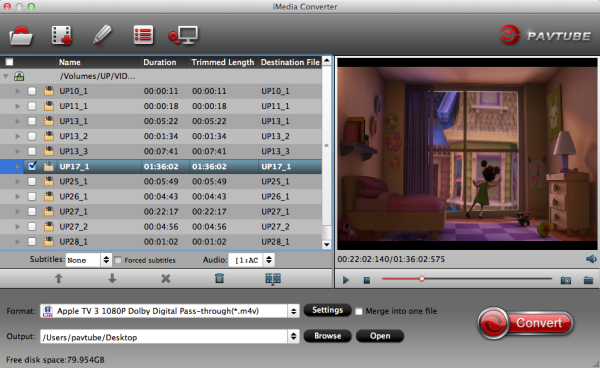
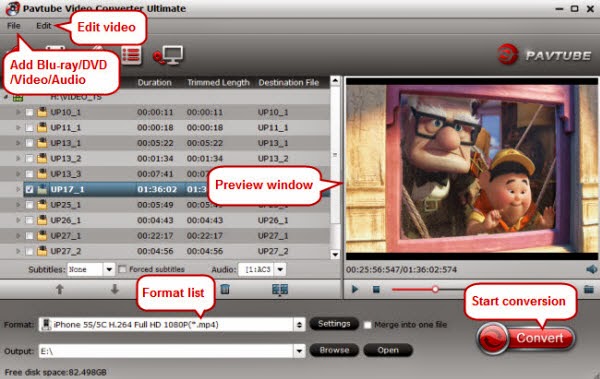
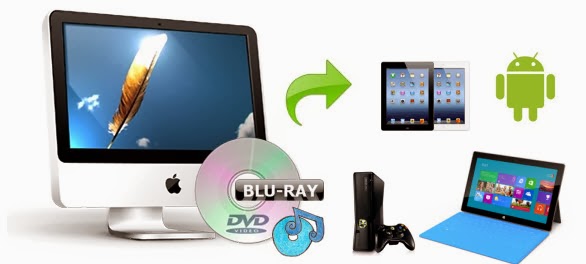
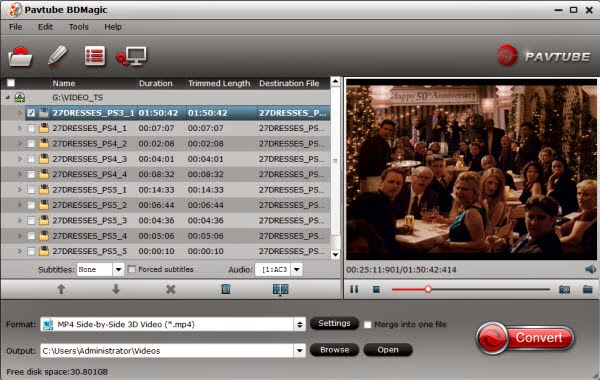
Get this Best Mac BDMagic installed here; you can order a license directly or download a trial version for free before purchase. This software does a good job in decrypting and transcoding Blu-rays/DVDs so that you can easily get the files you want, no matter audio/video only, or both. There is a disc icon on the top left which let you load from disc, folder or ISO/IFO respectively.
 
 
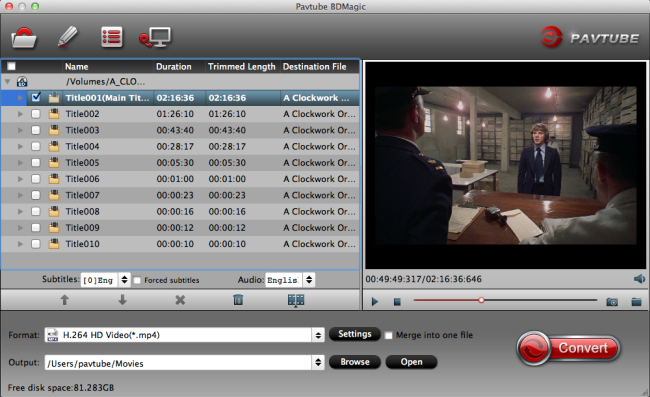
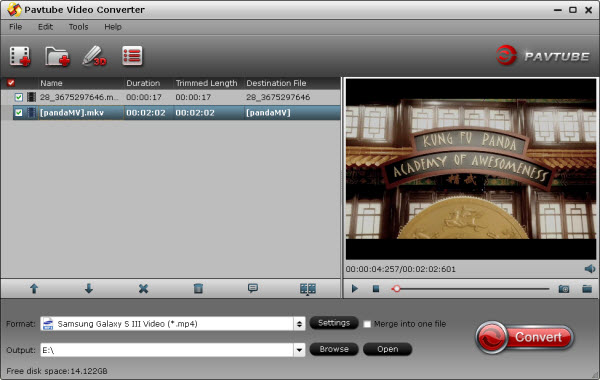
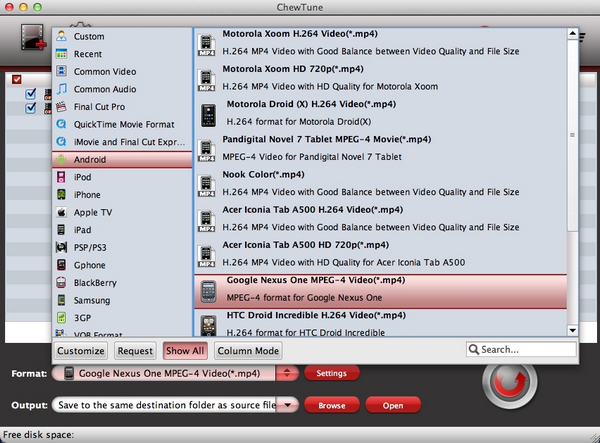
Step 2. Choose your Output directory down which is marked as 2.

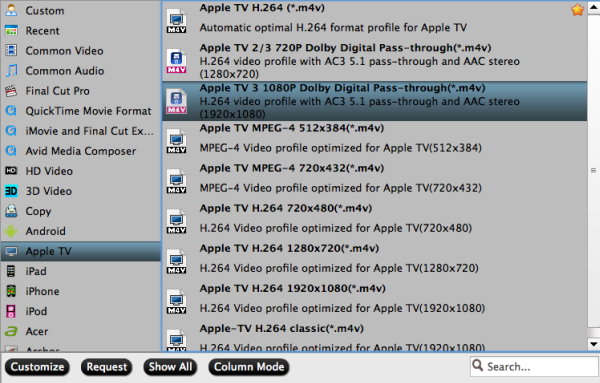
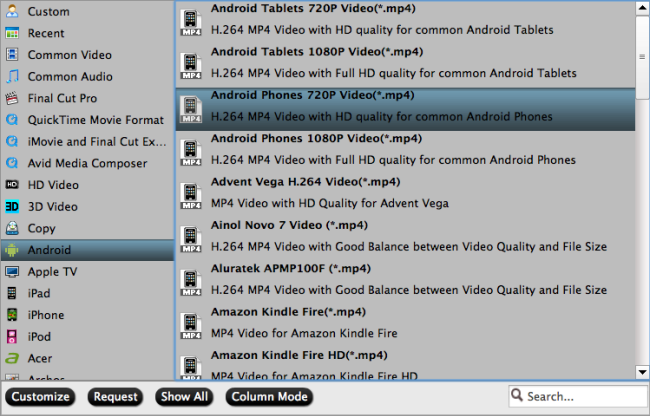
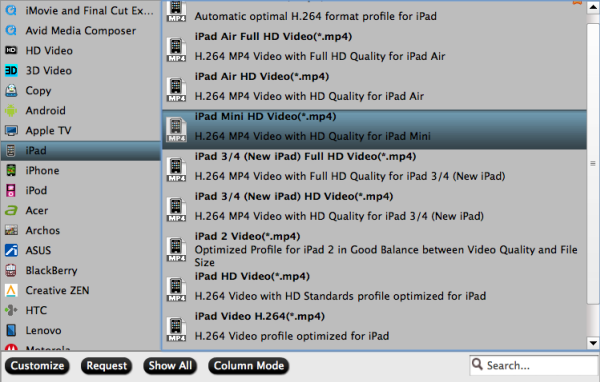
For editing Blu-ray movies in Apple Aperture 3, the Prores is preferred. Click "Format" and choose "Final Cut Pro > Apple ProRes 422(*.mov)".


PS: It has various profiles and formats so that you can rip blu-ray/dvd to various formats according to your needs.

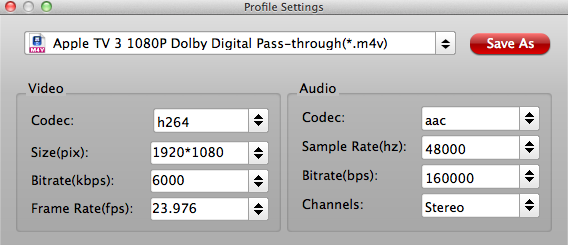
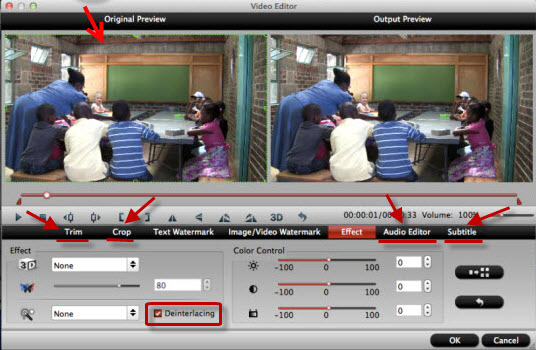
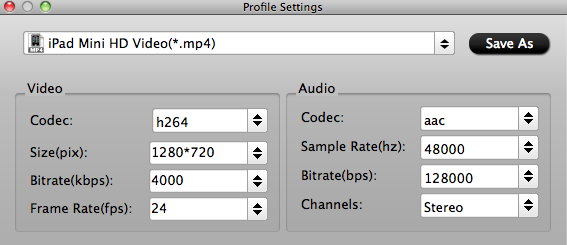
Step 3. set up frame rate, bitrate and other output settings.

Click Settings, you can find file details including codec, size, bitrate and frame rate. You are able to fix them according to your needs. FYI: the higher bitrate you choose, the better video quality it outputs.


Step 4. Now just press the big circular "Start Conversion" button to convert Blu-ray/DVD to Prores MOV for Apple Aperture 3 and let it do its magic.

After converting, you can load your Blu-ray/DVD movies to Apple Aperture 3 for editing as you want, now you can have a try.

More related:

Blu-ray to iMovie Converter-Convert Blu-ray to iMovie/FCE on Mac
FCP Not support .Blu-ray? Convert Blu-ray to edit in Final Cut Pro
Editing Blu-ray/DVD movies in FCP X retaining surround sound track

Thursday, February 20, 2014

ATV 3 MKV best approach-Get MKV videos to play on Apple TV 3 without problems on Mac

The guide shows you how to quickly convert MKV to ATV 3 playable video formats so that you can play 720p/1080p MKV videos on Apple TV 3 without problems.  

MKV is a container format and well-known as Matroska video. It is wildly used for delivering HD video content which up to 1080p. It is an envelope for which there can be many audio, video and subtitles streams, allowing the user to store a complete movie or CD in a single file.


The problem is that many standalone devices simply do not support the MKV format, often preferring the MP4 container format for use with H.264/MPEG-4 AVC encoding. ATV 3 (Apple TV 3) is one of them, you will find that Apple TV 3 just not a MKV Player. So is there any way to help you to play .mkv files on the Apple TV 3 without limitation? 

In order to stream MKV files to Apple TV 3 for playback, you may have to convert MKV to Apple TV 3 playable format (e.g. m4v). Along with some help from third-party software. With Pavtube iMedia Converter Mac, a great Mac MKV Converter for Apple TV 3, you can easily achieve your goal smoothly. Overall, this all-in-one Video Converting tool can help you to rip Blu-ray, DVD and various video files to your Apple TV 3 for watching.


The following guide shares with you how to encode 1080p/720p MKV to Apple TV 3 for playback on Mac step-by-step. 

Step 1. Install and launch the MKV Converter for Apple TV 3

Click "Add file" or "Add from folder" button to load your MKV files. The software supports batch converison so that you can add several MKV files to convert at one time.  


Step 2. Click on "Format" boarder to set output format. 

Now that we're converting MKV for Apple TV 3, a recommended format is "Apple TV 3 1080P Dolby Digtal Pass-though(*.m4v)" from "Apple TV" option.  


Tip: You can click settings button to adjust the output video’s parameters, such as bitrate, resolution, etc.


Step 3. Finally click on "Convert" button to start converting MKV to 1080p HD MP4 for Apple TV 3 on Mac. 

After conversion, get converted video files for transferring to ATV 3 from Mac. In this way, you can get MKV files playable on Apple TV 3 with Mac OS X without problems. We hope this short article will bring some new multimedia life to your Apple TV 3.

Related articles

Monday, February 10, 2014

2014 Best iPhone 6 Video and Movie Converter Review

The upcoming iPhone 6 can bring you convenience to enjoy multimedia collection. Can't find the best apps to play your own Blu-ray, DVD, MKV, AVI, VOB or MPG files, etc on iPhone 6? Look at this article, I will give you the 2014 Best iPhone 6 Video and Movie Converter Review for you to take as reference.
Apple has spent millions developing a Sapphire screen that is said to be stronger than concrete. If Apple is able to bring a screen technology like this that would be able to withstand the abuse of not only everyday life but extreme situations it is likely that many people will be interested in grabbing the iPhone 6 upon release.


Anyhow, the bigger screen will bring you more clarity you going to see in your movies and videos. However, movie playback is one area where Apple hasn’t really done much on iOS device. iPhone 6 does a decent job of playing videos but can’t recognize certain formats and doesn’t allow you to set up playlists.

Truth be told, you will find it a painful experience sometimes you can not play your MKV, AVI, VOB or MPG, etc files on iPhone 6, or can't bring your Blu-ray/DVD disc onto it directly. But the good news is that there are a ton of Video and Movie Converters for iPhone 6 to tackle your TV shows, movies, Blu-rays and DVDs.

Then which one is right for you? Here let's take a look at the 2014 most hotly-anticipated iPhone 6 Video and Movie Converter in the following passage .


1. Video Converter (Win/Mac)


It can can work as the powerful iPhone 6 Video Converter for Win/Mac. With this best Video Converter and Editor for Mac, users can finish SD/HD video converting and editing process with fast speed and high video qualtiy.

Overall, this app offers an easy way to transcode virtually all video and audio types, camcorder HD footages and TiVo recordings to desired video/audio format for portable multimedia devices, HD media players or video editing software, such as:

  •  Devices: iPad Air, iPad Mini 2, iPhone 5S, iPhone 5C, iPhone 5, iPad 4, iPad 3, iPad Mini, iPod 5, etc.
  • Players: Apple TV 3, WD TV, PS3, Xbox 360, Popcorn Hour, Xtreamer Ultra, Dune HD Base 3D, Iomega ScreenPlay MX HD Media Player, NETGEAR NeoTV Max Streaming Player(NTV300SL), Asus O!Play Mini Plus, etc.
  • Video Editing Softwares: FCP, iMovie, Avid Media Composer, Premiere Pro, etc. Plus, you are allowed to freely customize and personalize the conversion files through its settings and options in order to get an individual output in your own way.
Features:

  • Support nearly all HD/SD video and audio formats
  • Edit videos, trim/crop/merge/split, add watermarks/subtitles/soundtracks/video effects
  • 6X faster conversion speed with GPU acceleration technologies available
  • Compatible with any Tablets & Phones, HD Media Players, video editing software
  • Best TiVo/DVR to MP4/MKV/WMV/MOV Converter
Price: 35

Requires: Windows XP/2003/Vista/Windows 7/Windows 8/Windows 8.1

2. Video Converter Ultimate (Win/Mac)


Served as the top all-in-one Movie Converter for iPhone 6, you can easily enjoy Blu-ray/DVDs movies on smartphone/tablets with family and friends; playback family’s memory video on computer &tablets &smartphones &other devices, or smoothly transfer your camera footage to editing program without any format problems, etc. All can be finished with this Video Converter Ultimate.

Features:
  • Backup your Blu-ray/DVD discs for longtime preservation
  • Transfer Blu-ray/DVD movies to smartphones, tablets, Xbox/PS3, etc.
  • Convert videos/footages to various video formats
  • Change 2D/3D Blu-ray/DVD/Video to 3D videos for playback
  • 6X faster conversion speed
Price: $65

Requires: Windows XP/2003/Vista/Windows 7/Windows 8/Windows 8.1

3. 
 ByteCopy (Win/Mac)
  
 bytecopy importing interface

Being viewed as the excellent and easy-to-use BD/DVD coping & ripping tool to backup files from Blu-ray discs and standard DVDs to MKV container format with multiple audio tracks and subtitles included. More than lossless output, it is possible to recode the source movie into MKV/MP4/MOV/M4V video with certain video/audio codecs. Give it a try and you will be in love with it. 

Features:
  • Backup BD/DVD to MKV without quality loss. (Keep 1080p quality at 16:9 aspect ratio).
  • Convert/rip/shrink/copy latest Blu-ray/DVD movies for Android/iOS/Windows devices.
  • Allow full preservation of all audio tracks, subtitles and chapter markers.
  • Remove unwanted subs streams and audio tracks at will.
  • Preserve soundtracks and subs in multiple languages, e.g. English, Spanish, French, Deutsch…
Price: $42

Requires: Windows 2003/XP/Vista/Windows 7/Windows 8/Windows 8.1

From the review above, you can clearly learn about the features of each tool. Choosing the best iPhone 6 Video and Movie Converter will surely give you wonderful movie entertainment on your iPhone 6. Without worrying about any format limitation. Hope you love this roundup!

Sunday, February 2, 2014

Play Blu-ray with multi-track MP4 on Apple Devices (iPad, iPhone, iPod & Apple TV)

This article tell you how to watch Blu-ray movies on Apple Devices (iPad, iPhone, iPod & Apple TV) in multi-track MP4 format so you can switch to the desired language during playback.
Apple Devices, like iPad, iPhone, iPod & Apple TV are becoming more and more popular, according to CNBC's All-America Economic survey, the Apple- buying household on average has a total of three Apple products. Overall, the average household has 1.6 Apple devices with almost one quarter planning to buy at least one more in the next year.


Perhaps you have many rental Blu-ray movies and was planning to watch it for enjoyment on your new Apple device. And you are so busy that you have no time to watch it. Returning date is coming soon. Then you may have the question as below:

Anyone know a way to make it possible to watch the blu-ray movie on my iPad or iPhone? Becides, I want to keep the multi-tracks of the movies, then I can enjoy it with any language by switching to the desired one.

Have you meet the same problem? To stream the blu-rays movies to your Apple device for watching without time limitantion with multiple language, you need to rip blu-ray to iPad, iPhone, iPod & Apple TV compatible mp4 format as well as multiple audio tracks saved. Below is a brief guide for you to play Blu-ray with multi-track MP4 on Apple Devices (iPad, iPhone, iPod & Apple TV).

Required Software: 

This top Blu-ray/DVD backup and coping tool can rip Blu-ray movies and DVDs to MP4 container format with multiple audio tracks and subtitles included. It could also convert Blu-ray/DVD to any video format you like. Moreover, you can edit movie by trimming, cropping, merging, etc and support adding *.srt and *.ass subtitles to BD/DVD movies.

Step by step guide to convert Blu-ray to multi-track MP4 on Apple Devices (iPad, iPhone, iPod & Apple TV)

PS:

This application can work on Windows XP/2003/Vista/Windows 7/Windows 8/Windows 8.1.

The Mac version work on Mac OS X 10.5 or 10.5 above (including Mac OS X Leopard, Snow Leopard, Mac OS X Mountain Lion, Mavericks 10.9) with 1G Hz or above Intel processor.

Step 1: Install the Blu-ray Ripper for Apple device, then load your rental blu-ray movies to the program.


Step 2: If you want to watch your rental blu-ray movies with multi-tracks, click the "Format" bar and choose the "Multi-track MP4(*.mp4)" format under "Multi-track Video" option which is designed for keeping multiple audio tracks.


Step 3: Click on "Settings" to modify video codec, resolution, frame rate, sample rate etc. Of course, different settings will have different results. And you should know, the higher video quality with bigger video size, please pay attention to your storage. You can change these settings according to your own devices.


Step 4: Start ripping rental Blu-ray movies to Apple device by clicking on the "Convert" button.

Once the conversion completed, transfer the result MP4 video file to your iPad, iPhone, iPod & Apple TV where you want to enjoy it.

How to Install multi-track player and watch multi-track video on Apple Devices

1. Type in the keyword “multitrack player” in Apple Store, many free or charged apps would show up, choose one and install it.


2. Open iTunes, and add created multi-track MP4 movie to this multi-track player.


3. Open this multi-track player, open the source multi-track MP4, and choose wanted language during movie playback.


Related articles:


Get more money-saving tip:
ByteCopy($42) + Video Converter Ultimate($65) = Only $79.9, Save $27.1 
ByteCopy($42) + DVD Creater($35) = Only $44.9, Save $32.1 
ByteCopy($42) + Vidpie($29) = Only $54.9, Save $16.1 
ByteCopy($42) + MXF MultiMixer($45) = Only $69.9, Save $16.1 
Video Converter Ultimate($65) + Vidpie($29) = Only $74.9, Save $19.1 
Video Converter Ultimate($65) + DVD Creater($35) = Only $64.9, Save $35.1

Sunday, January 12, 2014

Convert recorded Films (TS) from my SAT-Receiver to Apple TV on Mac

Have got some TS recordings from SAT-Receiver? Looking for some tutorials leading you to convert these .ts files to your Apple TV for watching on Mac? This article will teach you how to.

I'm a product manager and I like Triathlon very much. Now I recorded some ts videos from a USB-Harddisk which is connected to my SAT-Receiver. I want to convert recorded Films from my SAT-Receiver for watching with Apple TV on Mac. So I need to get a professional and easy-to-use tool to convert .ts-formatted files. 


When transferring the TS files copied from your SAT-Receiver to your Apple TV for playback, you might have found that some 1080p TS files are unaccepted by your Apple devices as above. Then how to solve the problem, the best way is to convert TS to M4V format which is fully compatible with Apple products like Apple TV.

This article focuses on the best and easiest solution to transcode SAT-Receiver TS recordings to ATV acceptable M4V videos on Mac.

First and for the most, you need to choose a professional app- the TS to ATV Converter for Mac as your assistant. The demo worked perfectly so I bought the full version and downloaded it and installed it. It can finish the entire task with super high speed and keep the output files in good quality simultaneously.

With it, you can convert  SAT-Receiver TS files to M4V with lightening speed and extraordinary quality on Mac (Mavericks 10.9 included). Becides, it is also designed to convert other kinds of HD videos. After converting, you can play TS files from SAT-Receiver on some media players like Quicktime with ease or import TS to iMovie/FCP/FCE/Avid/Premiere for editing smoothly. What's more, it can work as a video editing tool with Trim, Crop, Merge and Watermark function.

Simplest way to convert/deinterlace SAT-Receiver TS files to M4V for playing on Apple TV on Mac

Step 1. Add TS files to the Top TS Converter for Mac

Please note that you must have the entire TS file structure when loading them to TS converter to do format conversion. If you just have some lose .TS clips, your files will have image only without sound.

Downlaod, run the TS Converter for Mac, then click “Add Video” button to load the TS files from SAT-Receiver.


Step 2. Select the output format

Click the “Format” drop-down list, you can choose "Apple TV 3 1080P Dolby Digital Pass-through(*.m4v)" from "Apple TV" for playing on your Apple TV.


Step 3. Start converting SAT-Receiver TS to Apple TV on Mac

Click “Convert” button to start converting SAT-Receiver TS file to M4V format for playback.

After conversion, you can watch your SAT-Receiver TS file on Apple TV without problem. It's no doubt that you can get your desired video with this best Mac TS Converter. The converted TS files will be fully fitted with your M4V-compatible Apple TV.

TS Related articles:

Friday, December 27, 2013

Downloading TiVo files to Mac for Apple TV 3, iPad and iPod Streaming

Here it shows some useful information on how to convert & transfer TiVo files to mac iTunes for Apple TV 3, new iPad 3, iPod streaming and playing with best HD video quality using a top TiVo Converter for Mac.

As the most advanced and innovative DVR (digital video recorder) ever built, the TiVo brings the best entertainment from cable and the web together in one place. That way we could record what we were already paying for and watch shows when I had the time to watch them. Yeah Tivo has a monthly fee but it’s the principle of the thing! Besides, a new toy is cool and fun to play with. Our biggest problem with TiVo was working out how to get the shows from the TiVo box to our Apple TV 3, iPad 3, and iPods where we could watch them the way we wanted to.


As is well known, the standard application for moving recordings from the Tivo box to the Mac is Roxio Toast. It’s what Tivo recommends and it’s what Hollywood has blessed. The problem with Toast is that DRM Tivo attaches to all recorded shows doesn’t allow any editing or transcoding of your recorded Tivo file. That’s when I started looking around for another way. What I found that worked best was an application called Pavtube iMedia Converter for Mac, a top Mac TiVo Converter.

The program is a great little application that allows you to download your Tivo recordings to your Mac. And it packs perfect support for TiVo recordings as well as HD footages, Flash videos, General Video, QuickTime video(*.mov), etc. With the application, you can easily convert TiVo HD shows to Mac iTunes compatible formats without quality loss for smoothly streaming with Apple TV 3, iPad/iPad 2 /new iPad, iPhone 4S and other iOS devices.

Free Download the TiVo Converter for Mac


Convert/Transfer TiVo recordings to Mac iTunes for streaming to Apple TV 3, new iPad 3, iPod with original HD quality
  
Step 1: Launch the best TiVo Converter for Mac iTunes, Click on the “Option” button, switch to TiVo tab, and enter your Media Access Key. Click “OK” to confirm.


Step 2: Drag and drop the *.tivo files to the software.


Step 3: Click on the pull down menu of “Format” and then tap “Appele TV”, the preset “Apple TV 3 1080P Dolby Digital Pass-through(*.m4v)” is recommended to you. The profile is speically designed for Apple TV 3 with 1080p HD effect.


For watching iPad and iPod, choose the corresponding profile from "iPad" and "iPod" option.

Some more helpful features of the app:
  
1. Settings- Click to set video resolution(1920×1080/1280×720/720×480), bitrate(from 2Mbps to 10Mbps), frame rate for different needs. For example, you can set birate from the default “8Mbps” to “4Mbps” for new iPad 3. (Note: The file size is based more on bitrate than resolution. I find that bitrate higher results in big file size, and lower visible quality loss)


2. Editor (next to “Add” icon)- click to set deinterlace, denoise, mute, volume up, trim, crop, etc.

Step 4: Start the process by converting TiVo to Mac iTunes H.264-compliant MP4 for Apple TV 3, iPad and iPod.

Step 5: Import new .mp4 file into iTunes (drag .mp4 file to the iTunes icon on the dock)

PS: Transferring TiVo recordings to Mac is not that easy and straight-forward as to PC. The TiVo Desktop software for the Mac (supplied by TiVo) does not allow user to transfer TiVo recordings to Mac, here I take some help from the freeware TiVoDecode Manager which gives you some of the features for taking content from your TiVo, moves it over to your computer, and automatically adds it to iTunes. Although it does have support for conversion, the quality of the result videos is poor and converting speed is so slow yet the output for apple devices are terrible.

On Apple TV 3, I browsed the iTunes library for the movie and it played the converted TiVo shows smoothly. I found the quality to be excellent and see no difference when compared to playing the TiVo recordings themselves. Of course, the same result as on iPad 3 and iPod.

Read more:

Get MKV videos to play on Apple TV 3 without problems on Mac
How to rip your Blu-ray and DVD collection for iPad/Apple TV
Getting DVD (ISO) video to Apple TV 3 with Dobly Digital 5.1 audio

Tuesday, December 10, 2013

Rip Blu-ray,DVD movies on portable devices and convert DRM-videos on Mac

In this article I will share the process of ripping Blu-ray/DVD movies to play on iPad, Surface, Android, PC and Xbox 360, meanwhile you can also learn an easy way to remove DRM protection from Amazon, iTunes and Google Play videos.
The reason I write this guide is I was in the same dilemma few months ago before I find Pavtube BDMagic for Mac– rip BD/DVD for playing on portable devices on Mac (Mac Mavericks 10.9 included), and ChewTune for Mac – the best Mac DRM removal and record tool I ever used.


Part I: First of all, let’s talk about the way ripping Blu-ray and DVD movies to PC, Xbox 360 and portable tablet like iPad, Surface, Android for playback on Mac.

After I searched widely and I got some tech support for converting Blu-ray and DVD movies to Android/Apple/Windows device video on Mac 10.9 Mavericks & Mountain Lion without losing quality in a simplest way, I find more than one people suggest to rip Blu-ray/DVD to MP4 format which is the most compatible format for portable devices on Mac with BDMagic for Mac.

It is an ideal Mac app for you to rip Blu-ray, DVD, ISO/IFO files to MP4 video. Plus, it also can help you to convert Blu-ray, DVD to almost any other common video format such as VOB, FLV, WMV, AVI, MKV or backup the BD, DVD keeping the whole movie structure as you need. Now are on 30% off for Christmas Special.

Top Blu-ray Ripper for Mac Review: Rip Blu-ray Movie on Your Mac


Users Reviews:

We are a modern normally family with different devices. I had the Mac Version which worked really well for me. I have lots of Blu-ray, DVD and other legally bought films which I want to play over my home network on tablet devices. Between us my family and I have iPads, Surface, Android, PC's and Xbox's so disk format, particularly with copy protection means they would normally be useless and if I had not brought Pavtube product to the market. I would not have purchased the DVD's and Blu-Rays. With Pavtube BDMagic for Mac, I can freely enjoy 2D/3D Blu-ray/DVD on my portable devices with ease. So ironically Pavtube actually help the movies studios sell more as without its solution I would not buy their films.

Below is how I rip my Blu-ray and DVD movies to MP4.

Now just download it and follow the tutorial below.

1. Click the top left icon to import Blu-ray/DVD discs correspondingly.
 

Click the drop-down list on the bottom; choose proper presets according to your device model. You can see columns for normal devices.

Basically the “Common Video -> H.264 Video (*.mp4)” is a universal format for your tablets and smartphones or NAS devices.

Or depends on your device, you can choose a suitable video format from “Android” or "iPad" or "Windows" catalogue, or you can use the small search box to locate your device quickly.


2. Check the pencil-like icon to activate the editing function. Here you can trim video for your needed length, crop video to get rid of annoying black edges, join multiple video clips into one, add text/image watermark and add subtitles.

For example, if the original Blu-ray/DVD movie has no subtitle or the subtitles you need, you can download it from website and then add it into the output videos for full enjoyment with this software.

Notice the small triangles under the progress bar? Click them to adjust frame by frame easily.


3. If you want to output video in specific size, bitrate or frame rate, click “Settings” (which is marked as “3″) and change the digits as you need. Pls notes that the video quality improved with the bitrate, but not the higher the better. You need to consider your device configuration as the high bitrate required higher read&write speed.

4. Ok now click the “Convert” button to start converting/copying Blu-ray/DVD to iPad, Surface, Android, PC and Xbox 360 for playing or streaming. After conversion, click “Open” to locate the converted video directly.

The Windows version is Pavtube BDMagic, it’s also on 30% off to thanks for your great support;

Part II. As iTunes, Amazon or Google Play videos are no good due to the DRM protection which will lock you for playback directly, so I'm considering about how to remove the DRM protection from these videos to unprotected mp4 files so as to play on my device easily.

I use Pavtube ChewTune for Mac, perfect tool to legally remove DRM protection from purchased iTunes movies, Amazon Instant Videos, and digital copies.

Three simple steps for recording and converting DRM videos to portable devices

1. Import a single DRM video or a folder to free downloaded Pavtube DRM removal.

2. choose optimized output formats. I can find at least one profile for every smartphone or tablet I have.


What about your device not listed? Don’t worry, choose similar device and change presets to suit the needs of your device, which can be easily handled.

2. Last but not least, hit the “Convert” icon to start DRM removing process.

It would take as long as the source movie length for the whole DRM removing conversion  process since Pavtube ChewTune for Mac records source DRM videos in 1:1 video and audio quality. I would prefer to start converting my DRM videos before bedtime, so it could run overnight and the conversion would be successfully complete when I get up, which it would not interface my spare time.

More info for converting DRM protected videos:

Make sure that your computer is authorized for source videos, that is to say you can play the source iTunes movies in iTunes, play Amazon and digital copy using Windows Media Player.
Allow the audio driver installed during the Pavtube ChewTune for Mac installation.


Good News! Pavtube Studio is offering money saving bundles for ChewTune for Mac. With either bundle package, not only can you save money, you will get the most powerful combination from Pavtube to handle Blu-rays, DVDs, regular videos as well as DRM protected videos files.

Read more:

Enjoy Blu-ray movie on widescreen Smart TV
Play Netflix Blu-ray on iPad Mini 2, iPad Air on Mac
Converting HD-DVD (.evo) files to NAS for streaming to Xbox 360

Sunday, December 8, 2013

Play Netflix Blu-ray on iPad Mini 2, iPad Air on Mac without Airport Extreme

A detailed guide to show how to transfer Blu-ray disc, folder or ISO image filesto MP4 for iPad Air/iPad Mini with Retina Display with best settings and propersize; you can also learn how to sync video from iTunes to iPad properly.

“My Airport Extreme seems to be working well with my iPad, iPhones, andKindle. However, the signal to the Blu-Ray Player and TV is weak. When I try toplay a movie on Netflix, the screen shows I am receiving about 0.3 mbps. The result is that the movie will hesitatefor a few seconds and then play for a few seconds etc. Any ideas on why my one device is not receiving the adequate download and what I should do?”

Many of you may choose to rent Blu-ray disks from local Netflix. And with an AirportExtreme, you can also stream online Netflix Blu-ray movies from your Mac to iPad Mini 2 or iPad Air for playback, but it requires good Internet connection. Also both the two methods have time limitation, and it’s very inconvenient ifyou want to take Blu-rays while traveling or leaving town for a while.


What if we prefer to watch Netflix rented Blu-ray movies on iPad Air/Mini 2 anywhere? How can we get a permanentcopy of rented Blu-rays?

Nobiggie, here is a simply solution. Pavtube BDMagic for Mac is such a professional Mac Blu-ray to iPad Converter with very easy-to-use interface. You can import both rented or purchased Blu-ray discs, Blu-ray folder or Blu-rayISO image files to this converter, and transcode Netflix Blu-ray movie to best MP4 file for playback on iPad Mini 2 (Retina display) and iPad Air.

Good News:Pavtube Blu-ray Ripper for Mac just updated to work with Mac OS X 10.9 and Mountain Lion 10.8!

The windows version is Pavtube BDMagicMagic. And both 30% off now at Thankgiving Big Deal.

Surprising! You can share Thanksgiving Promotion to your Facebook to earn 20% OFF any Pavtube programs.

Tutorial: How to watch Netflix Blu-ray on iPad Air, iPad Mini with Retina display


Step 1: Run this Pavtube Blu-ray Ripper for Mac as Mac Netflix Blu-ray to iPad Converter; loadBlu-ray discs, Blu-ray folder, Blu-ray ISO image files or DVDs.

Thisprogram will help you analysis ISO files automatically so that there’s no needto run virtual drive to mount ISO image files any more.


Step 2. Chooseformat.

Click“Format” drop-down list and choose “iPad>iPad Air Full HD Video(*.mp4)” asthe most compatible preset with best video quality for iPad Air. If you have aiPad Mini, just choose iPad Mini HD Video(*.mp4).


Step 3. Customizevideo specs (Optional).

Click“Settings” to free change video resolution, bitrate(quality), frame rate andother settings.

Note:if you want to get video in smaller size, just turn down the “bitrate”settings.

Step 4. Start Conversion.

Youcan hit the big red “Convert” to start converting Blu-ray to MP4 with best videosettings for iPad Air and iPad Mini 2. After the conversion, click “Open outputfolder” in the conversion window, or “Open” in main interface to quick locatethe converted video.

After getting the converted movies files,you can transfer them to iPad Air or iPad Mini 2 via iTunes. If you don’t knowhow to put and play video on it, just follow the steps:

1) Make sure youhave install iTunes. If not, you can free download iTunes here at first. And launch the iTunes.

2) Connect iPad Air to Mac/PC.

3) Choose “File –> Add File to Library…”

4) Drag the MP4 file you want to the iPad icon.

Here you got it! Now you can enjoy Blu-ray movies on iPad Air, iPad Mini 2 anywhere.

How to sync media files from iTunes 11 to iPad
Sync Video, Music, Photo, iBook to iPad Air with iTunes 11

More articles: 

Best way to watch Blu-ray movies on iPad Air
View DVD Movies on iPad Air easily
Enjoy MKV, AVI, VOB, Tivo, MPG, WMV, FLV videos on iPad Air
How to Enable iPad Mini 2 to play Blu-ray movies on Windows/Mac?
Converting DVD ISO/IFO files to Multi-track MP4 for iPad Air

Wednesday, November 13, 2013

Make Thanksgiving Blu-ray movie playable on iPad Air & iPad Mini 2

With the excellent 30% off BDMagic for Mac, you can easily convert and sync Thanksgiving Blu-ray movies to your iPad Air & iPad Mini 2 for smoothly playback. 
APPLE's revamped tablet line-up, including a high-definition "Retina" iPad Mini 2 and a slimmed-down, speeded-up iPad Air, has received an enthusiastic reception from the critics - and both models are now available to buy.


Overview of the new iPad models

The iPad Air, which Apple says is 20 per cent faster than its predecessor thanks to a new A7 chip, will be available in silver, white, 'space grey' and black. It has the same 9.7-inch screen as the iPad 4, which will no longer be available. The iPad Mini 2 also gets an A7 chip and it too now has a Retina display - Apple's term for its highest-definition screens. The previous generation of iPad Minis had less sharp displays. We can say without reservation that it absolutely rocks for watching HD movies even Blu-ray movies. 

Meanwhile, it is just in time for holiday shopping, and many Thanksgiving Day and Black Friday Blu-rays are on Sale. During Thanksgiving, it would be a nice thing to watch Blu-ray movies with our families. You must collect many fantastic Thanksgiving Blu-ray discs, just like me and prepare to enjoy these Thanksgiving Blu-ray movie on iPad Air & iPad Mini 2?

However, just like its previous, the iPad Air & iPad Mini 2 has no drive for Blu-ray playback. This article will talk about how to put Thanksgiving Blu-ray movies on iPad Air & iPad Mini 2 via Mac.

Free Download the App

Pavtube BDMagic for Mac (Currently on sale - 30% OFF during Pavtube's Thanksgiving Specials Offer) is highly recommended. - An excellent Blu-ray/DVD converter for iOS device which can help you decrypt and rip Blu-ray/DVD to iPad Mini/new iPad 3/iPhone 5S/iPhone 5C/iPad Air/iPad Mini 2 optimized formats on Mac (Mavericks 10.9 included) at ease.


If you are a Mac user, you can use its equivalent Windows version - BDMagic to finish your work on Windows PC.

Now just get the right 30% Discount BDMagic to encode and transfer Thanksgiving Blu-ray movies to your iPad Air, iPad Mini 2 for smoothly playback in just a few clicks.

Preparation:

1. Mac
2. iPad Air & iPad Mini 2
3. Mac Blu-ray Player
4. Blu-ray drive (internal/external with USB above 2.0)

Convert, Rip and copy Thanksgiving Blu-ray movies to iPad Air & iPad Mini 2 on Mac

Step 1: Once run the Mac BDMagic software, click on "BD/DVD disc" icon to load movie from Blu-ray source(Disc, folder, ISO).


Step 2: Click on "Format > iPad", you will find many profiles for iPad including all iPad models. Choose "iPad Mini HD Video(*.mp4)" for iPad Mini 2, you can also select "iPad HD Video(*.mp4)" which fit iPad Air perfectly.


Tips:

1. If you like, you can click "Settings" to change the video encoder, resolution, frame rate, etc. as you wish. Remember the file size and video quality is based more on bitrate than resolution which means bitrate higher results in big file size, and lower visible quality loss.

2. It has powerful edit functions such as trim video for your needed length, crop video to get rid of annoying black edges, join multiple video clips into one, add text/image watermark and add subtitles. For example, if the original Blu-ray movie has no subtitle or the subtitles you need, you can download it from website and then add it into the output videos for full enjoyment with this software.


Step 3: Start to rip Thanksgiving Blu-ray to iPad Air & iPad Mini 2 on Mac

When you are satisfied with all the settings, you can click "Convert" and let the software do the Blu-ray to MP4 conversion for your Apple iOS devices (iPad Air & iPad Mini 2).  

Step 4:
Transfer Converted Videos to iPad Air & iPad Mini 2

When the conversion completes, you can transfer the result videos to your iPad Air & iPad Mini 2 via iTunes, here's the way to go:

1) Launch the iTunes and connect iPad Air/ iPad Mini 2 to PC.
2) Choose "File – > Add File to Library…"
3) Drag the .mp4 file you want to the iPad Air/iPad Mini 2 icon.

In this way, you can watch Thanksgiving Blu-ray movies on iPad Air & iPad Mini 2 on the go as you like. I don't think it could get much simpler (unless of course, Apple provides native support for Blu-Ray which doesn't seem likely).

P.S. If you have any problems about enjoying movies on iPad 2, iPad 3, the original iPad and the new iPad or iPad Mini, iPad Air, iPad Mini 2, just check out the iPad Video Specials to find solutions.

You can also get the All-in-one Video Converter Ultimate tool to encode Blu-ray/DVD and various formats of 1080p/720p HD videos to your iPad Air & iPad Mini 2 for watching.

Learn more special offer:

Free DVD Ripper and Free Video DVD Converter Ultimate

Related Tips:

Sync Video, Music, Photo, iBook to iPad Air with iTunes 11
Transfer Blu-ray to iTunes 11 for iOS Devices with forced subtitles on Mac
How to put SD/HD Videos to iPad Mini 2
Best way to watch Thanksgiving Blu-ray movies on iPad Air