Thursday, July 17, 2014

Rip and Convert DVD to HD MP4, MKV, MOV, M4V, AVI, WMV, etc. on Mac

If you want to watch DVD movies on Mac with high quality, read this paragraph to learn how to convert DVD to HD MP4, MKV, MOV, M4V, AVI, WMV, etc. on Mac for watching.

Digital Versatile Disc (DVD), a type of optical disk technology similar to the CD-ROM. DVDs are commonly used as a medium for digital representation of movies and other multimedia presentations that combine sound with graphics It consists of movies compressed in MPEG-2 format, allowing you to play them on DVD players and computer DVD-ROM drives.


If you are a Mac user, you may consider counting down hard drive space as well as avoiding video quality to be worse. Then resolve this issue, you need to rip DVD to High Definition video formats like HD MP4, MKV, MOV, M4V, AVI, WMV, etc.. In facet, if you convert a 7-8 GB DVD to standard video formats, the output video size would be hundreds of MB and if you convert them to HD videos, the size is often a little bigger but will surely decrease the video damage. So the HD video seems to be lossless compared with the original DVD.

To accomplish this goal, Pavtube BDMagic for Mac is a fast and fully loaded Blu-ray/DVD ripping solution that makes it easier than ever to rip encrypted commercial BD/DVD movies to any video formats such as HD MP4, MKV, MOV, M4V, AVI, WMV, etc., and enjoy your favorite movie collection anywhere with iPhone, iPod, iPad, PS3, PS4, Xbox360 and other devices. Besides, this program can duplicate Blu-ray and DVD video to backup with 1:1 quality on your Mac with original quality.

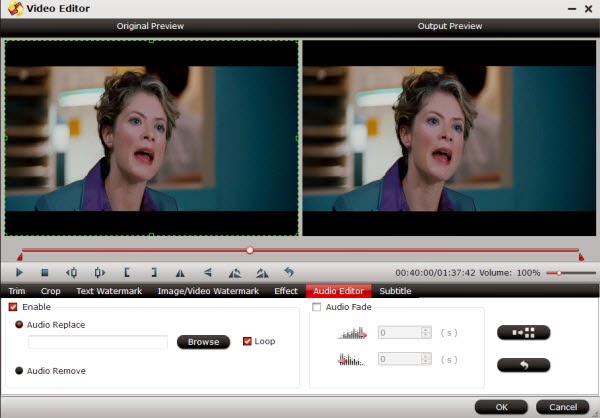
What is more, you can even edit and touch up BD/DVDs with an intuitive built-in editor for a better BD/DVD visual enjoyment.
  • Rip Blu-ray/DVDs to virtually any video & audio formats without loosing quality.
  • Ready presets for devices like iPhone, iPad, PSP, Xbox 360 and more.
  • Convert BD/DVDs to be to edit in iMovie, Final Cut Pro, FCE etc.
  • Backup Blu-ray and DVD movies to your Mac, Macbook, external hard drive and online
How to convert DVD to HD videos format (MP4, MKV, MOV, M4V, AVI, WMV, etc.) on Mac

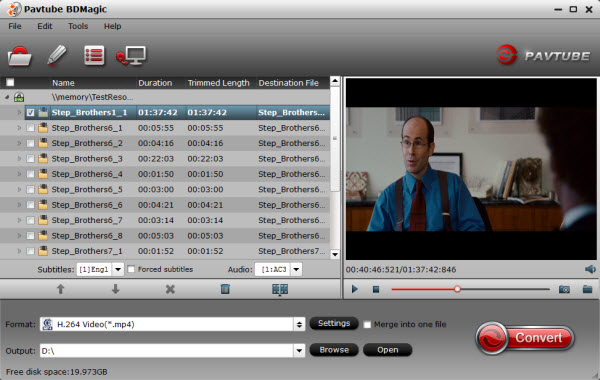
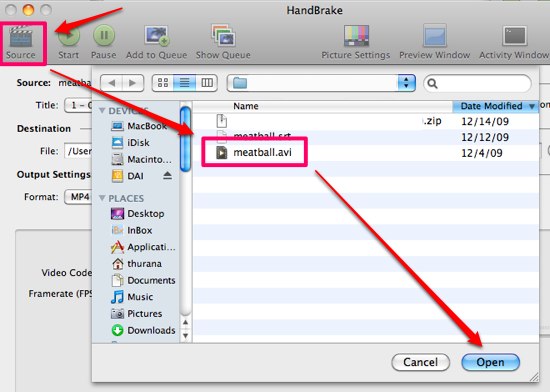
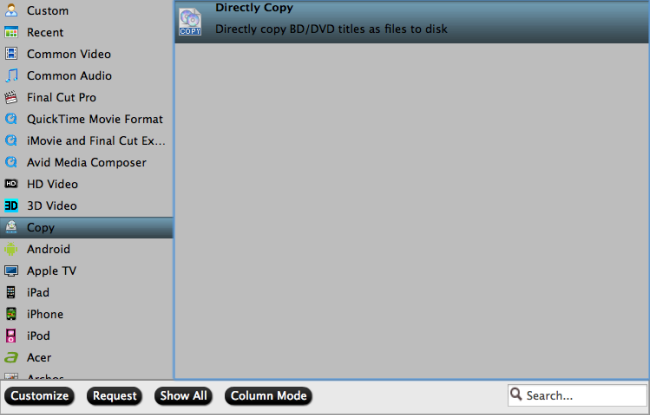
Step 1. Run Pavtube BDMagic for Mac, and load your inserted Blu-ray to it.


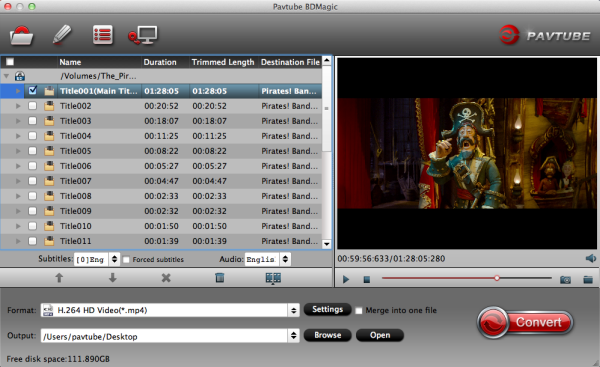
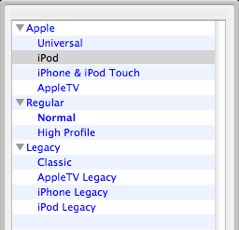
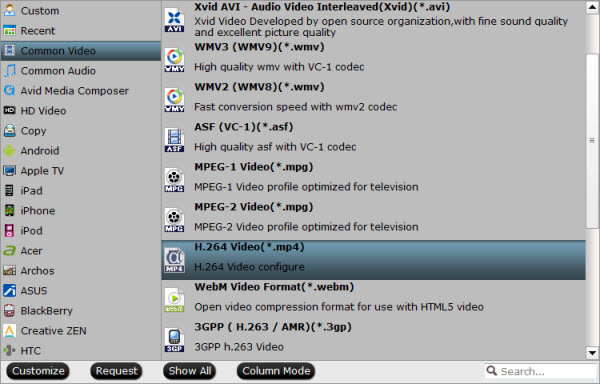
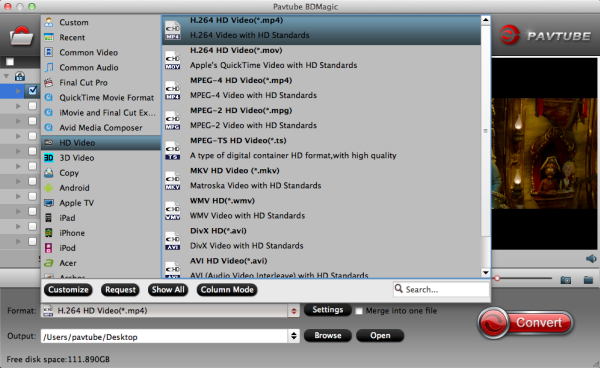
Step 2. Select output format.

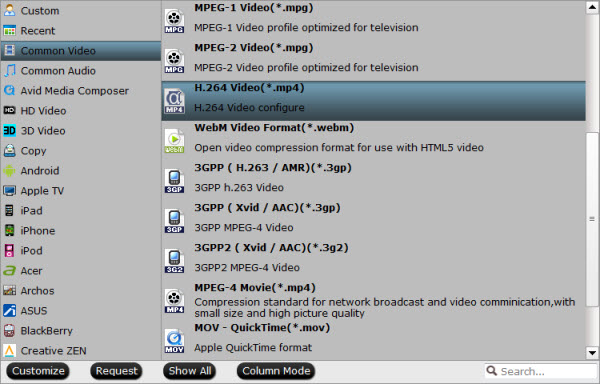
Click "Format", you can find many video formats in the dropdown list. There are HD MP4, HD MOV, HD AVI, HD WMV, etc. available for your choice.


Tip: The top DVD ripping software come with preset formats for more than 150 devices, such as Apple TV, iPhone 5S/5C, Samsung, iPod nano, HTC, iPod touch 5, Creative Zen, Sony, Sandisk, Motorola, Archos, Nokia, Zune, BlackBerry, iRiver, PSP, Xbox 360, PS3 and more.

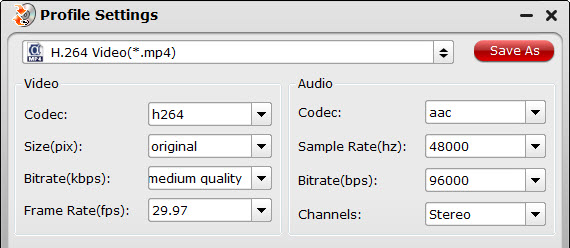
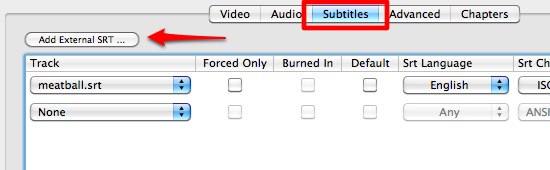
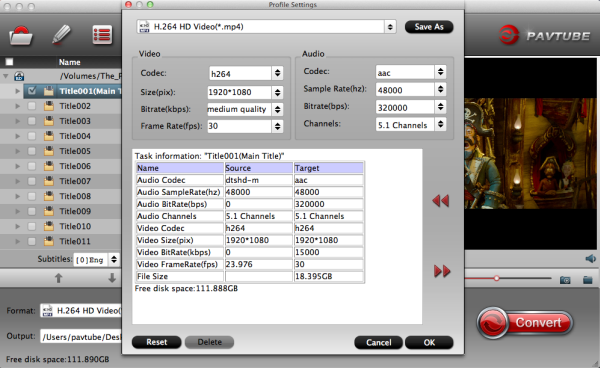
Step 3. Change target video/audio specs (Optional)

If you are not satisfied with the default video/audio specs, click "Settings" to adjust video seize(pixel), frame rate, bitrate (the higher bitrate, the larger file size and better video quality), or audio settings.


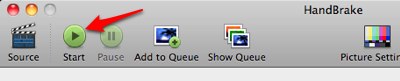
Step 4. Start Conversion.

Click the big "Convert" to start converting DVD to HD MP4, MKV, MOV, M4V, AVI, WMV, etc. for storing on you Mac hard drive or watching on your portable devices.

Movies converted from your DVD files to 1080p will give great visual quality. The only thing is that the larger files with more pixels will result in much slower conversions. Get the Pavtube DVD Ripping tool on Mac to start your conversions today! Here is the top DVD Ripper for Windows users.

Read more:

How to Free Copy DVD to AVI Using Pavtube Free DVDAid
Make it easy to watch DVD MPEG-2 videos on HTPC
Upload music DVD files to play on your Mobile Phone 

Thursday, July 10, 2014

The Hassle-Free Guide to Enable 2D/3D Blu-Ray and DVD Playback in XBMC


This article shows how to remove your 2D/3D Blu-ray and DVD protection and rip them into MP4 format for playing via XBMC.

XBMC is a free and open source media player developed by the XBMC Foundation. It is a popular multi-platform alternative to Windows Media Center for HTPC (Home Theater PC) use.

XBMC


XBMC Supported formats:

Video formats: MPEG-1, MPEG-2, H.263, MPEG-4 SP and ASP, MPEG-4 AVC (H.264), HuffYUV, Indeo, MJPEG, RealVideo, RMVB, Sorenson, WMV, Cinepak.

Audio formats: MIDI, AIFF, WAV/WAVE, AIFF, MP2, MP3, AAC, AACplus (AAC+), Vorbis, AC3, DTS, ALAC, AMR, FLAC, Monkey's Audio (APE), RealAudio, SHN, WavPack, MPC/Musepack/Mpeg+, Shorten, Speex, WMA, IT, S3M, MOD (Amiga Module), XM, NSF (NES Sound Format), SPC (SNES), GYM (Genesis), SID (Commodore 64), Adlib, YM (Atari ST), ADPCM (Nintendo GameCube), and CD-DA.

Unfortunately, 2D/3D Blu-ray and DVD discs aren't supported by default in our favorite media center application, XBMC, and you may have the issues below:

I'm very frustrated at the moment. I just bought a blu-ray drive for my HTPC, and then learned that playing blu-ray discs on XBMC is somewhere between non-trivial and impossible. Any way to help me out?

In that case, we need to convert 2D/3D Blu-ray and DVD videos to XBMC media center supported format at first, then playing them on HTPC will be as easy as a pie. Note that you must have a BD drive in the first place to support blu-ray playback.

Then, a professional Blu-ray Ripper is the key. I found Pavtube BDMagic which aims to solve this problem by giving us the ability to store our purchased physical 2D/3D Blu-ray and DVD discs to local computer, hard drive then add to XBMC for smooth playback. It has a simple yet very easy-to-use UI, and has a large output list that supports various formats. The most important thing is it accepts my every disc, which Handbrake and Jack the Ripper couldn't.

Download a trial version and follow the step-by-step guide on ripping, converting Blu-ray (2D and 3D) /DVD to XBMC for playback.  If you are working on Mac OS X, please get BDMagic for Mac.


How to rip 2D/3D Blu-ray and DVD movies to view on XBMC
Step 1. Load disc

Run the Blu-ray/DVD Ripper for XBMC and click "Load files(s)" to import DVDs and Blu-rays. Note you need to have an external Blu-ray drive if you want to rip ISO, IFO, and BD/DVD folder as well as Blu-rays, DVDs are all supported by the app.


Keep Internet connected during importing.


Step 2. Choose format.

Although XBMC support lots of formats, I still recommend MP4 format as it's most acceptable by most devices, so that you can stream the converted video on other devices.

Click "Format" and choose "Common Video>H.264 Video(*.mp4)" as below:


If you want to keep 1080p resolution as source movie, you can choose HD Video > H.264 HD Video(*.mp4) for XBMC.

Step 3. Adjust output settings (Optional)

Click "Settings" to change video size, bitrate, frame rate and audio specs. You can chose "original" size to playback on TV.


Step 4. Start conversion

Click "Convert" in the main interface to start the conversion (batch conversion supported). After conversion, click "Open" which is below the "Settings" to find the converted video.

Add your ripped mp4 video and transfer this media file to XBMC, now just stream 2D/3D Blu-ray and DVD movies to other portable devices for watching.

Main features in Pavtube BDMagic:

* Full Disc Copy can 1:1 backup the whole Blu-ray/DVD disc with original structure including chapter markers.

* Directly Copy will backup 100% intact Blu-ray/DVD main movie with all the multiple tracks excluding menu.

* Rip and Convert latest Blu-ray/DVD to various video formats for playback or editing, edit the video before conversion including trim, crop, effect, etc, add *sst and *ass subtitle into video part and so on.

Read more: 

Rip BD/DVD to MP4 on Mac for my iPad, Apple TV, PS 3, Xbox 360, Roku
Convert FIFA World Cup Games TiVo to MP4/MPEG for NAS Sharing

Tuesday, July 8, 2014

Move personal MKV, AVI, VOB, M2TS, MPG files to Galaxy NotePro 12.2 without audio playback issues

Do you want to Play or Watch MKV, AVI, VOB, M2TS, MPG videos on Galaxy NotePro 12.2? Here’s an article, it will show you get it done without any issue.

Galaxy Note Pro's design is perfectly acceptable. It's a big device, with that 12.2-inch screen 2560 x 1600 pixel display and it weighs 753 grams. In addition, it also doesn't put too big a strain on the Pro's 9,500 mAh battery, which managed around 9 hours of usage.


In such cases, Galaxy NotePro 12.2 will surely bring you HD experience no matter playing games, browsing the website, or watching HD videos on it. As Galaxy NotePro 12.2 video format limit is the big obstacle for you when watching movies, it is necessary to converting the large range of video formats, like High Definition Video, Video Camcorder and Standard Definition Video, to Galaxy NotePro 12.2 supported format at first. How to make it possible? 

Now take a lesson about the best Galaxy NotePro Video Converter.

Here recommend Pavtube Video Converter Ultimate which helps you to achieve excellent conversion from any HD and SD video formats like MKV, AVI, VOB, M2TS, MPG, etc. to Galaxy NotePro 12.2 compatible formats for playing. All the videos output with HD video quality in perfect video and audio sync. The mac version is iMedia Converter for Mac.

Now, follow the step-by-step guide I list below to learn how to move MKV, AVI, VOB, M2TS, MPG files to Galaxy NotePro 12.2 without audio playback issues.

1. Download and install Pavtube Video Converter Ultimate to your PC.

2. Drag and drop MKV, AVI, VOB, M2TS, MPG video files to the main interface for converting.

3. Click "Format" and select "Samsung Galaxy Note(*.mp4)" from " Samsung" option for your Galaxy NotePro 12.2.


Optimize the settings
– The default settings may not satisfy you, and you can click the settings button to change the settings by yourself. Keep in mind that the file size and conversion quality is based more on bitrate than resolution (bitrate higher results in big file size, and lower visible quality loss, and vice versa).

4. If you're happy with the output videos, just press the "Convert" button to begin encoding MKV, AVI, VOB, M2TS, MPG video to MP4 for Galaxy NotePro 12.2.

Once the format compatibility problems have been solved, you can transfer the converted videos to your Galaxy NotePro 12.2 for viewing on the move. Have fun!

How to sync the converted video from Mac to Galaxy Note 3 via Kies?
Transfer video files from PC to Samsung Galaxy Tab with Kies 

P. S. If you have many Blu-ray and DVD collection in hand now, here is the best way to Rip Iron Man 3 Blu-ray/DVD for backing on Galaxy NotePro 12.2.

Monday, July 7, 2014

Adding Subtitle to Movie Videos by Using Handbrake

In this article, we will provide detailed solutions on how to use Handbrake to add subtitle to movie files, in both hard and soft ways.

Movies come from all over the world and such flicks are usually accompanied by their original language. For instance, a movie from French naturally goes with French subtitles while an anime is often embedded with subtitles in Japanese.


As freeware, the highly-acclaimed Handbrake is really a versatile tool. It can convert DVD and video to various formats, and it also supports video filtering like, decombing, scaling, cropping, etc. As a result, it has got many people’s compliments. Here you will be impressed by another amazing feature of it: add hard or soft subtitles to movies.


Adding Subtitles The Soft Way

Using a common media player like Quicktime or VLC to play the movie, you can also display the subtitles simply by putting the subtitle file in the same folder with the movie. The only requirement is that both the movie and the subtitle files should go under the same name but with different extensions. Something like “title.avi” and “title.srt“.


Using this method, you can choose what language to display by changing the subtitle file inside the folder. But the method will not be effective if the movie file is edited as the subtitle will appear at the wrong time.

Another way to display subtitles is by making it a permanent part of the movie. This method is called hard-subbed and will guarantee the consistency of the subtitle even if the movie is edited. However, rendering subtitles on the movie will reduce video compression and it could not be turned off nor changed into another language.

The new version of Handbrake – the 64-bit build – that we discussed in the previous articlecomes with a feature called soft subtitles. This ability allows users to add subtitles as a part of the movie with the option to turn the subtitle on and off. Something like DVD movie subtitles.

If you already have both the movie file and the subtitle file, you can start adding soft subtitles to your movie.

Open Handbrake and choose the source.


Open the Subtitles tab and click “Add external SRT” button.


You could add more than one subtitle to the movie by repeating the above process.

If you prefer to attach subtitles to a movie file as hard subtitles, check the “Forced Only” box next to the file.

Choose the desired format from the side window.


And click “Start“


After the conversion is finished, you can then enjoy the movie using any kind of media player. If you are using Quicktime, you can easily turn the subtitles on and off by going to the “View > Subtitles” menu.


Other players use slightly different names. Under Mac OS X, you can easily find the menu by going to the Help menu and typing “Subtitle“. You will be guided by the Help menu to find it.


Handbrake is available for Windows, Linux and Mac.

Tips: Do you know another alternative method to attach subtitles to a movie? Handbrake can only deal with DVDs without copy protection. If you want to rip encrypted DVDs, you can turn to Pavtube DVDAid for Mac. If you want to convert not only DVD, but also videos as well as attching subtitles, you can try Pavtube iMedia Converter for Mac.

You may want to know:

Hard subtitles (also called hardsubs or open subtitles) are irreversibly merged in original video frames. They cannot be turned off and it isn’t editable.

Soft subtitles (also called softsubs or closed subtitles) are separate instructions and relatively easy to create and change. They are designed for a certain group of viewers, and can usually be turned on/off or selected by the viewer.

Thursday, July 3, 2014

30% OFF Top Mac DVD Converter at 2014 Summer Vacation Special Offer

Woo-hoo, after a long-term study, 2014 Summer Vacation begins! Havn't got any plans? If you are a frequent traveler or ready to prepare a travel this summer holiday by hiking, fishing, camping, or going to seaside with your kids, chances are they'll be clamoring to see some favorite movies when they aren't off at camp or jumping in the pool.


Now with 30% OFF Pavtube DVDAid for Mac, you can get the holiday more enjoyable! Now just watch your favorite DVD movies with smartphone phone/tablet/laptop on the go, or make your own summer video freely! Full supported Mac OS X 10.10 Yosemite.

Follow this link to enjoy 49% off and more FREE products~

https://www.facebook.com/pavtubefans/app_186981981345123

Expire on Jul. 15th.

It's never to later to make your choice!

More details here:

http://www.multipelife.com/summer-2014-deals

Friday, June 27, 2014

Upload music DVD files to play on your Mobile Phone

Looking for the best way to back-up your music DVD for playing on your mobile phones? Get the best DVD Ripper to rip and convert your DVD with original quality.

Apart from the basic functions of calling and SMS, a mobile phone is also a pretty good multimedia player, which enables you to play games, enjoy videos/music and browse images, etc., so long as the media is accepted by the specific phone.


As a DVD collection fan, you may have many classic music DVDs, then what if to play DVD on your mobile phone, such as Nokia, HTC, etc?

Do not worry, that's where this article originated from.

As we all know, DVDs are usually hard to be backed up due to region code and disc encryption protection, you’d better to use a DVD copying program to remove the disc protection and copy source disc with same structure preserved. I have done google search and the resulting ratings sites rated Pavtube DVDAid highly. Most important thing is I like its ability to rip and encode for many popular devices.
Main features:

1. High Speed
2. Audio Quality
3. Friendly User Interface
4. Ability to converts different types of DVD formats
5. Advanced functions to convert DVD to video formats

How to Rip my DVD to MP4 for free playing on Mobile Phone?

Step 1. Launch the highly recommended DVD to mobile Ripper. Click the "DVD" icon to load DVD movie from ROM, "ISO/IFO" icon to import movie from DVD ISO or ISO. When importing DVD movie you need to keep your PC/Mac networked so as to access keys for hacking DVD copy-protections.


Not a DVD enthusiasts? Want to copy 1080p Blu-ray to your mobile phone for seeing it? Well, I think the best Blu-ray to Mobile Ripper is what you need.

Step 2. Optional - You can click on the dropdown list of "Subtitles" to select subtitles of desired language so that you can view DVD films on your phone with proper subtitles, same steps you can do with Audio track selection. Make sure you select the main movie before setting subtitles.

Step 3. From the drop-down list of "Format", you will see many presets sorted of different device models and programs. Move your cursor over the left column to locate your device model/manufacturer, or you can try the small search box on the bottom right corner and select the exact output formats for your mobile phone.


Step 4. Optional - If you think the video size this not suitable for your Phone, you can first choose any one of the provided type, then change the settings, see the following picture:

Please remember the file size is based more on bitrate than resolution which means bitrate higher results in big file size, and lower visible quality loss.

Step 5. Optional - You can click Edit to enter the video editing window. Video editing functions like Trim, Crop, Rotate, Add Watermarks and more are provided, enabling you to polish your videos up in clicks.

Tip: If you want to replace/remove original audio of your music DVD, or set audio fade in/out effects, pls turn to Audio Editor and do settings.


Step 5.
Click the big "Convert" button to let the software do the DVD to MP4 conversion. After the ripping, you can click "Open" to locate the converted MP4 video files and just transfer them to your put them to your mobile, and then you can enjoy your favorite music DVD movies on the mobile phone wherever you go.

Additional Tips:

1. If you want to convert all kinds of videos (including MKV, AVI, Tivo, VOB, FLV, MPG, DVD, Blu-ray, ISO, IFO, etc.), a software can be completely solved, it is Pavtube Video Converter Ultimate.

2. I used another Pavtube program called ByteCopy to backup my DVDs without quality loss. Meanwhile, several audio tracks and subtitles are preserved so I can switch language when watching movies.

Thursday, June 26, 2014

Backup your Blu-ray disc without worry about scratched by your kids

WIth the high qualiy Blu-ray discs in hand, it is necessary to keep an eye on how to protect your favorite Blu-ray disc from scratched by your kids. This article mainly tells you how to backup your Blu-ray movie without worry about this issue

When I bought blu-rays, sometimes my kids have damaged them by accident. And I used to hate whenever my BD discs got scratches which would affect the playing of the flick.


In this case, it will be a wise decision to backup your Blu-ray disc as first for future watching conveniently. Looking for third-party software to copy Blu-rays without sacrificing the picture quality?

For mac users, here Pavtube BDMagic for Mac is the best tool to remove the Blu-ray/DVD copyright protection of the disc and convert to whatever videos you want. With it, you can enjoy your favorite Blu-ray/DVD movies at any time without worry about scratched by your kids. And it will provide you two ways to backup of the Blu-ray discs, just choose the one you like most.

First of all, free download Mac version (Pavtube BDMagic is for Windows users) and run the software to learn how to copy Blu-ray disc in 2 ways.

Step 1. Import Blu-ray discs to Pavtube BDMagic for Mac.

Run the best Mac Blu-ray backup software, click "Load files" icon to load the Blu-ray discs. After successful 100% load, click the select main title you are able to preview the whole movie in the preview window, which works just like a media player.

Note: When loading discs, please make sure your computer is networked and Blu-ray disc drive is installed properly.


Step 2. Two ways for copying Blu-ray disc to avoid scratched by kids.

Method 1. Full disc copy: 1:1 backup the entire disc with original structure and chapter marks

If you want to copy a 3D/2D Blu-ray discs in output files for further playback, or keep the original structure of disc for further creating ISO files or DVD discs, that is what exactly "Full disc copy" can do for you.

Click "Copy the entire disc" icon on the interface and you are brought to conversion progress immediately. After conversion, go to "Open output folder" you will get a generated folder combined with two folders: "BDMV" and "CERTIFICATE". All the M2TS files are located in BDMV folder.


Tip:
Here BDMagic for Mac ($49) + DVD Creator for Mac($35) = Only $49.9, Save $28.1 is preferable for users who want to backup/burn Blu-ray disc. And this bundled product will give you a special price and save more money! Try it right now if you are interested.

Method 2. Directly Copy: 100% backup the intact main movie of Blu-ray discs

If you just want to copy the main movie for playback without the menu and promotional clips etc, "Directly Copy", which will takes less time for conversion and occupies less space than Full disc copy, is right for you.

Click "Format" menu and go to "Copy" option, choose "Directly Copy" for output format.


Then click "Convert" button to start conversion. Once finished, you will get a converted file in M2TS format for Blu-ray disc.

Every time when the conversion is finished, "Open" button on the main interface will help you to locate the generated files.

Above all, you can choose any way of them to copy your Blu-ray disc without quality loss and then share them with your family or friends. And now you will not worry about the problem that you Blu-ray disc will be scratched by your kids!

More related: 

Convert DVD to Digital Copy in Windows/Mac
Tips and Tricks for Selecting a Blu-ray to MKV Ripper