Tuesday, May 5, 2015

Rip Blu-ray to Apple TV 3 in full HD with AC3 pass through on Mac

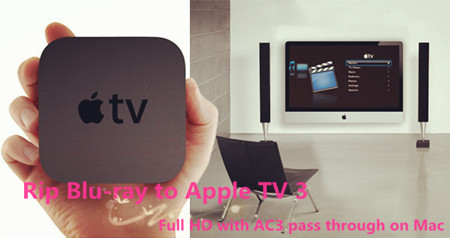
Want to watch Blu-ray movies on Apple TV 3 (in full HD with AC3 5.1 channel)? Now, there is nothing eye catching as enjoying a 1080p Blu-ray movies on Apple TV 3 with family and friends in the comfort of your home. Well, you may encountered many problems when Apple TV 3 can't playback Blu-ray directly. In page, we will share a way to rip Blu-ray to iTunes format for streaming to Apple TV 3 for full HD enjoyment with AC3 5.1 channel pass through on Mac.


As you know, Blu-ray disc or even the decrypted Blu-ray rips can’t be supported by Apple TV 3. Of course, most of you are not about to pay iTunes' ridiculous prices to watch movies and TV shows I already own on Blu-ray. Instead, you'll just rip those Blu-ray discs to an Apple TV 3 friendly format. The best solution is to rip and convert Blu-ray to iTunes compatible format then sync to Apple TV 3 for playback without any limit. Below is how to. 

To get more solutions, view Apple TV 3 Column  |  iPhone 6 Column  | Roku Column.  

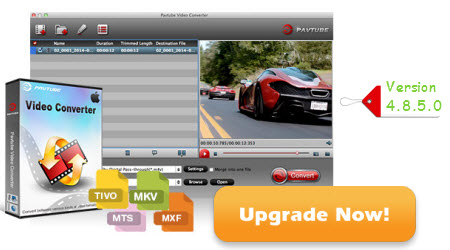
Here, Pavtube BDMagic for Mac (Review can help you convert Blu-ray to iTunes compatible format then sync to ATV 3 for full HD playback without any limitation. I've found the quality to be excellent, and see no difference when compared to playing the discs themselves. The sound can be kept with the original Dolby Digital 5.1 surround sound. For ripping Blu-ray to iTunes for ATV 3 on Windows, please turn to BDMagic (Guide for Windows). 
   
Convert Blu-ray to iTunes for streaming to Apple TV 3 with AC3 5.1 audio on Mac?

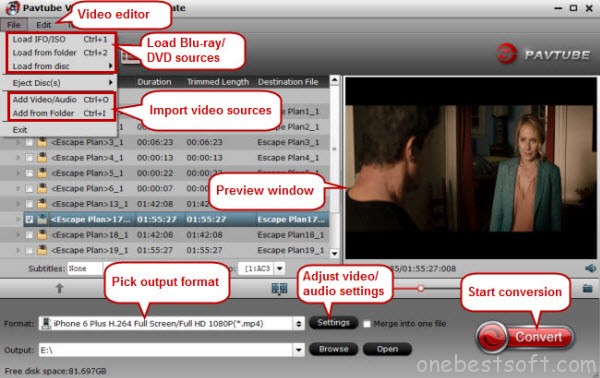
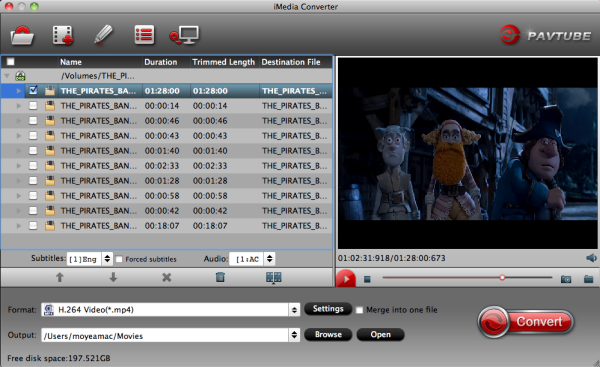
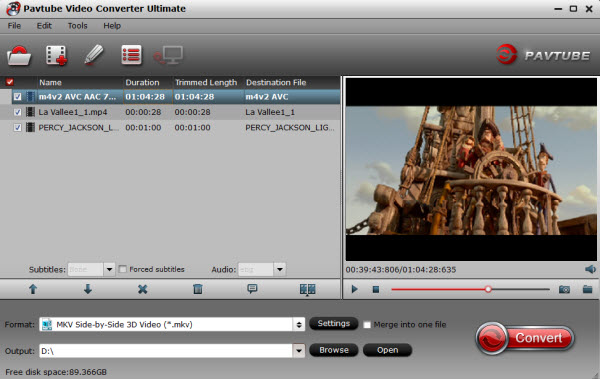
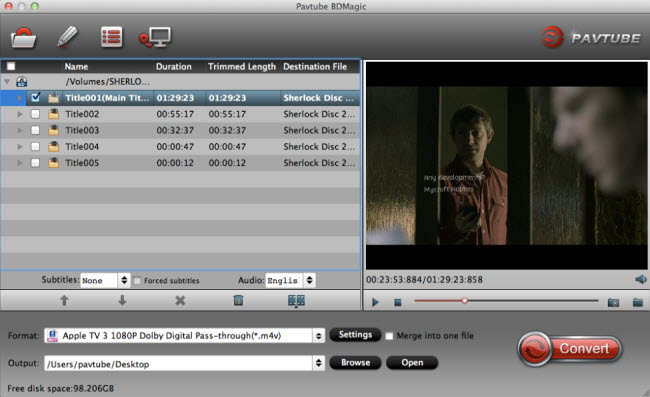
Step 1. Load Blu-ray source.

First of all, insert your Blu-ray to Blu-ray drive and keep networked. Now it's time to open the best Blu-ray to Apple TV 3 Converter for Mac and click "Load files" icon to load Blu-ray source.


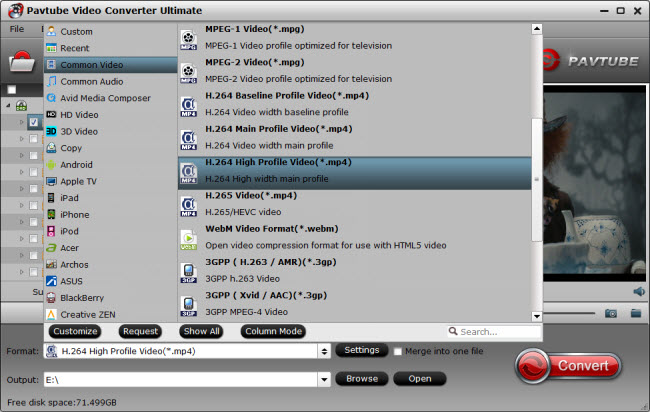
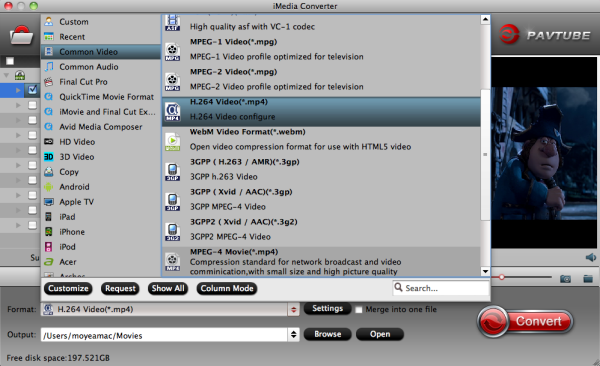
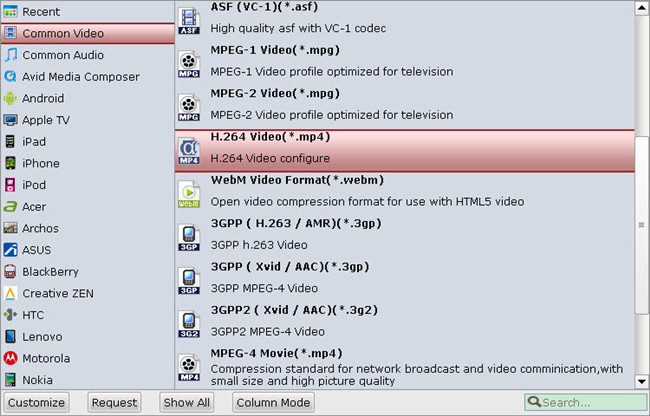
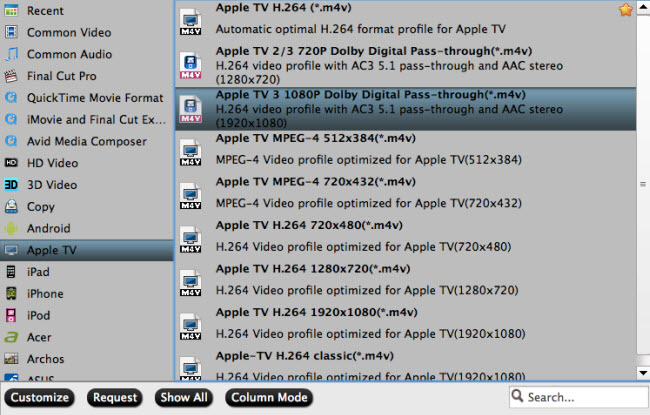
Step 2. Choose output format for Apple TV 3.

In the dropdown list of Format menu, you can find several Apple TV options for output. This Blu-ray to iTunes Converter has a number of presets for Apple TV, Apple TV 2, and Apple TV 3rd Generation, to export a Apple TV 3 1080p video with ac3 5.1 pass-through for AV receiver decoding, "Apple TV 3 Dolby Digital Pass-through (*.m4v)" preset is highly recommended.  


Tip: If you want to add the Blu-ray movie to iTunes for play on iPhone, iPad, iPod, you can also directly select iPhone, iPad, or iPod as the output format to get videos with optimized settings for your iDevices.

Step 3. Convert Blu-ray to iTunes Apple TV 3 video. 

Click "Convert" button to rip Blu-ray to iTunes recognized video for playing on Apple TV 3 generation with Dolby Digital 5.1 surround sound pass-through. Afterwards, transfer the Blu-ray to iTunes and import to Apple TV 3 for watching with ease. There you have it! Now it is time to enjoy your favorite Blu-ray movies with Apple TV 3. 

If you're new to Apple TV, the below guide will help you get started with Apple TV setup: How to set up Apple TV 3 for streaming HD videos with Dolby Digital 5.1 sounds? 
  
Mac guys copy Blu-ray to Apple TV 3 mainly for three factors:

Firstly, Blu-ray Discs are easy to break, but a digital copy is safe and permanent, even if the data get lost, there’re ways to recover. 

Secondly, ripping Blu-ray to Apple TV 3 on Mac will protect the expensive Blu-ray Discs from scratches and wore out– do you think you’ll still hunt for a movie in hundreds of DVDs and BDs while you can easily find and play the movie on the bed with a remote control in hand? 

Thirdly, ripping Blu-ray to Apple TV 3 solves the problem of BD region code restriction. Commercial Blu-ray Discs could be Region A, B and C, and not a BD player will read full region Blu-ray Discs. Things happen that your BD player refuse to read the BD you BD purchased from oversea market (unauthorized region). After ripping BD to Apple TV 3, you get unprotected HD contents, which can be copied to media players as long as the codec is supported. 

There you have it! Enjoy your Blu-ray Movies on Apple TV 3 in full HD with AC3 pass through on Mac. Have a good time! 

Read More: 

Sunday, May 3, 2015

About MPEG Converter Questions from Google/Yahoo and Solutions

Q:”What is MPEG Converter?”, Q:”The best MPEG Converter is…?”, Q:”How to convert MPEG?”,etc. Many people often ask this question in the Yahoo answers. It means that how to use MPEG Converter to convert MPEG files really bothers a lot people. In fact this problem is not so difficult as you imagine, you only need a software can be solved easily. The articles will guide you How to convert MPEG with the best converting MPEG software – Pavtube MPEG Video Covnerter Ultimate


What is MPEG?

MPEG (also known as MPG), another file format, is the file extension of MPEG-1 and MPEG-2, mainly used for saving media datas for TV, DVD and so on. MPEG-1 is an early generation of container file (which hold the video/audio) and video/audio codecs. You'll find these on old 'multimedia CDs' and as .mpg files on the internet. MPEG-2 is a later generation, and MPEG-2 files are rather large, so they're mostly used with high end video editing. MPEG-2 is the native format on DVDs. MPEG-3 was discontinued, and never released. MPEG-4 is the latest generation, and is most common on the web. DivX and XviD are the best MPEG-4 video encoders (AVI containers). MP4 and MPEG-4 are the same. MP4 is the abbreviation of MPEG-4.

Brief Introduction of 10 Popular Video Formats: MKV, MOV, AVI, FLV, MP4, M4V, Tivo, MPG, MTS and MXF. 

How to Play MPEG Videos with Commen Video format for Portable devices

Here Pavtube MPEG Video Covnerter Ultimate is such a must-have video converter to convert MPEG-1, MPEG-2, MPEG-3, MPEG-4 videos to output various video and audio formats, like H.265/HEVC, MKV, MP4, MOV, DivX, AVI, MP3, FLAC, etc and to multiple devices like Apple media devices, Android smartphones and tablets, Windows media players, various smartphones and more. (Review is here). This Top MPEG Converter not only could convert MPEG to your devices, but also trims and splits MPEG videos to meet your needs. After downloading and installing it, you can use it to convert videos like A-B-C. Follow the tutorial and start converting. 

Now, free download this Best MPEG Converter: 


A. Add MPEG videos to the MPEG converter. 

Install and launch the MPEG Video Converter tool on your PC, click “Add Video” to import your source materials in .mpg format. Besides MPG, you can also load FLV, AVI, WMV, VOB, TiVo, MKV, MOV, etc. files to the program. The software supports batch conversion so that you can also add several files to convert at one time. 


B. Choose output format

There are optimized format for iPad, iPhone, Surface tablet, Galaxy devices and more.

Basically the "Common Video -> H.264 High Profile Video(*.mp4)" is a universal format for Android/iOS/Windows tablets and smartphones. Or depends on your device, you can choose a suitable video format from "Android" or "iPad" or "iPhone" catalogue. 


Tip : Click “Settings” to set video and audio parameters, such as video/audio codec, bit rate, video size, audio sample rate, channels.

C. Start MPEG Conversion. 

Hit the “Convert” button to begin converting MPEG files! When the conversion completes, click “Open” to locate the ripped MPEG files and transfer the converted movies to your devices and you can enjoy MPEG movies on your APP without hassles. 

So, you get the Top MPEG Converter in the world, you may not have any MPEG playback issues after read this guide. Enjoy! 
  
Read More: 

Wednesday, April 29, 2015

Alternative: Download the Best Format Factory for Mac (Yosemite included)

Format Factory is a free, fully-featured multimedia converter that lets you convert audio, video, and even images, between the most popular formats.  However, Format Factory only works in Windows (Including Windows 10) and there is still no plan for developing Format Factory for Mac. Anyway, if there Format Factory for Mac that functions the same or come close? Absolutely. In this article, I'll share one such amazing tool that enriches and deepens your digital life in Mac too. And we will show you how to convert your DVD and video to any regular video/audio format easily with the best Format Factory for Mac alternative.  


Anyway, to download Format Factory for Mac for video conversion can be a Walkover as long as you own a video converter designed for Mac OS specifically. Pavtube iMedia Converter for Mac (Yosemite & Mavericks included) can be the ultimately professional yet effortless-to-use Mac Format Factory alternative that lets you convert all videos like AVCHD, MTS, M2TS, MKV, WMV, MP4, MOV, FLV, AVI, etc to your Mac system and even download YouTube videos for playing on your iPhone, iPad, iPod, Android, etc. 

Besides that, it can also rip Blu-ray for multiple use on your Mac system instead of a Blu-ray player for Mac. and even turn BD/DVD/Video into editable format for FCP,iMovie, Avid Media Composer, etc. Below is the detailed tutorial to use the Format Factory for Mac to convert DVD/Video on Mac (Mavericks and Yosemite supported). 

Convert DVD/Videos using Alternative Format Factory Mavericks/Yosemite

Step 1. Import DVD and video files

Launch Format Factory for Mac alternative first. (There is a windows version of Format Factory alternative for Windows users as well.) Click the "Add Video" button to import your local video files and click the disc button to import DVD files for converting. Or you can directly drag the videos you want from your Mac to this program. 


Step 2. Select output format you want

Click the "Format" icon, and then go to the right category to find the video format you want. As you can see, various video formats like MP4, MOV, MKV, FLV, WMV, AVI, etc. are provided. You can also choose the icon of iPhone, iPad, iPod, iMovie, Final Cut Pro, Samsung, Android, etc. to get videos with best settings for the selected device/software.


Tip: If you want to customize the output video quality, you can click the "Settings" button to open the Settings window and set video resolution, frame rate, bit rate, codec, etc.

Step 3. Edit your DVD/video files with an alternative Format Factory(optional)

If necessary, you can perhaps try to edit your video files with the alternative Format Factory for Mac. Nothing unfamiliar from the Format Factory, you can also easily cut and rotate/flip your videos and add watermark. In addition to that, you can trim, crop, add effects together with the insertion of subtitles to your video clips.

Step 4. Start DVD/Video Conversion on Mavericks/Yosemite

Click the "Convert" button to start converting DVD and videos. You can follow the conversion process from the pop-up Windows. Once the task bar shows in 100%, just click Open button to locate the output files. Hence, you can now transfer and play your video files anywhere and anytime you like it.

More related:

Monday, April 27, 2015

News! Pavtube Video Converter for Mac 40% OFF Upgraded

Big news for all! Pavtube studio has announced that its hottest product Mac Video Converter has upgraded to latestversion 4.8.5.0. According to the official news, this updated product can decode the H.265/HEVC video codec well. In other words, it has become the hottest and comprehensive video converter for all Mac users!


What’s new in this upgraded version?
  • Fix the bug of breakdown when importing MXF and XAVC format.
  • H.265/HEVC decode well.
  • Solve the issues well for decoding basic codec
  • Support the VPx series codec perfectly

Main features:
  • Convert various video/audios as input and output.
  • So many popular editing tools and media players are available.
  • Easy operation workflow and faster conversion speed.
  • Extra acceleration function for Windows users.
  • Strong ability of setting and editing output vides.
Outstanding highlight for H.265/HEVC supported:

If you have more touched this new H.265 codec enough, you may know well about it. For H.264/MPEG-4 and H.265/HEVC, those two codec are said to double the date compression at the same level of video quality. This H.265 can be said as the Intro Time of 4K Generation. With the H.265 codec videos, we can get the higher definition and smaller vide size.

Pavtube Video Converter for Mac Version 4.8.5.0 ---Deserved to choose as your favorite!

Now this brand new video has updated to a more powerful one, new features like adding H.265/HEVC decode which can provide much higher quality than H.264, videos shooting under XAVC mode can be loaded flawless, more output items added to consider about the compatible with old system or devices. What’s more, we will not be disappointed with its’ original fast speed and easy operation.

Release Name: Pavtube Video Converter for Mac v4.8.5.0
Developer: Pavtube Studio
License: ShareWare
Language: English, Japanese, Chinese
Size: 31 MB
OS: Mac
Download: Pavtube Video Converter for Mac 4.8.5.0 Retail

Notes: Upgraded Windows version also provided for all Windows users

Another surprise for you! 

All of us can get 40% discount off on Pavtube Video Converter for Mac from FaceBook. before May, 1st, 2015. Come on!  

Learn More: http://www.multipelife.com/pavtube-video-converter-for-mac-upgrade.html

Friday, April 24, 2015

How to View iTunes Movies via Kodi?

XBMC, officially renamed to Kodi on 1 August 2014, is a free and open-source media player software which allows users to play and view most videos, music, and podcasts from online services and all common digital media files from local and network storage media. If you’re would like to create a home theater system to enable media sharing among all of our digital devices, there will be a trouble that you are not able to play the movies downloaded from iTunes Store via Kodi. In this guide, you can learn how to play iTunes DRM M4V to Kodi player on Mac and Windows. 


Apple protects the media contents from iTunes Store with DRM which makes it impossible to view iTunes movies via Kodi. So, the best way to get Kodi play iTunes movie is to remove DRM from those M4V movies. To accomplish this goal, Pavtube best DRM Converter and Removal - ChewTune is highly recommended for its easy-to-use interface, straight workflow and reliable video quality. It can easily get rid of Apple’s DRM protection from those iTunes downloaded m4v video, and transfer it to various video formats including MP4 profiles for Kodi. (Here is the review). 

The Video Formats Kodi (XBMC) Supports

To better play iTunes DRM M4V via Kodi, we have to know what's the video format the Kodi supports at first. 

Kodi as a common used Add-on tool for many online streaming websites like PrimeWire, IceFilms and Project Free TV etc., it can support most common video formats including MPEG-1, MPEG-2, H.263, MPEG-4 SP and ASP, MPEG-4 AVC (H.264), HuffYUV, Indeo, MJPEG, RealVideo, RMVB, Sorenson, WMV, Cinepak. 

Step by Step Guide on Converting iTunes DRM M4V for Kodi Player

Step 1. Download Pavtube ChewTune as the Best DRM removal software.

   (Click here for Mac OS X 10.5) 

There would be a command window pop up during the installation to install specific soundcard drive for DRM Removal, please do not shut down it and let it running until the installation completed. 


Step 2. Run Pavtube ChewTune, drag and drop the source iTunes video and music from local computer to ChewTune. Or hit the “Add Video” button to import your iTunes DRM contents. 


Step 3. Let’s click the drop-down-list besides “Format” and move to “Common Video” column and choose “H.264 Video(*.mp4)” as output format for your Kodi. 


Step 3. You can click “Settings” to enter Profile Settings window and customize target video spec, you can find settings for video size, codec, bitrate and frame rate.

Step 4. Click the big “Convert” button on software main UI to start iTunes to Kodi conversion. After the conversion completes, you may find the iTunes movies in MP4 format and add them to XBMC as freely as you like.  

Tips:

1. The DRM removing process may mislead your anti-virus software to falsely report virus/worm. Please ignore the report to keep on ripping.

2. This product cannot convert unplayable video (damaged, unauthorized, etc).

After that, you can directly play the movie on your PC or you can stream the movie to your HDTV for playback with families and friends via Kodi home theater system. 

Read More: 

Tuesday, April 21, 2015

Play 4K/HD Videos and Movies to Surface Hub Tablet on Windows 10

Are you fond of watching 4K or HD videos? Read this article to find out the way of playing 4K/HD Videos and Movies to Surface Hub Tablet on Windows 10 smoothly. 
   
Microsoft Surface Hub - It is an 84-inch tablet giant being packed with a 4K screen resolution and a 55-inch version with HDTV resolution, will run Windows 10 apps, both have capacitive touchscreen displays (like your smartphone). Given the irresistible trend of 4K UHD, we'd like to show you here how to watch 4K movies on Surface Hub, instead of how powerful the Surface Hub works. What’s the Top 4K/HD Video Converter for Surface Hub Tablet? Keep scrolling and you will get the full answer you need. 


Part I: Where to Get and Free Download 4K UHD Movies for Microsoft Surface Hub?

Thus, watching online 4K movies on Surface Hub may be stutter. But good news is that you can have a fluent viewing if you download 4K movies and play them on Surface Hub offline. So you need the Pavtube 4K YouTube Converter (Win Mac)

This 4K YouTube Downloader is simply the fastest YouTube downloader to save anything from YouTube, so that you can watch YouTube videos on Mac, PC, iPhones, iPads, iPod, Android devices at any time. It is able to download 1080p and 720p HD videos in minutes and convert YouTube videos to popular formats for various use. 


Part II: Step-by-step guide on Convert 4K/HD Videos and Movies to Surface Hub Tablet on Windows 10
   
The first thing you should be aware of that an up-to-date Video to Surface Hub Converter is needed if you want to play your 4K/HD Videos and Movies on the new Windows 10 device - Surface Hub. Here, Pavtube Video Converter Ultimate (Read the review) is highly recommended. This is the Top HD/4K Video Converter and editor which could be functional in all HD/4K videos to Surface Hub conversion. As an H.265/HEVC decoder, it can also convert H.265 video to Surface Hub supported format for playback on Windows 10. For Mac users, turn to iMedia Converter for Mac.  

Step 1: After the successful installation, click “Load file(s)” or “Add video” to load video file you want to convert in your PC into the program. It supports batch conversion, you can you can add movies in different formats like HD/4K videos at one time. 


Step 2: When you click the “Format” bar to come to the output list, as we mentioned above, we can suggest you to choose the “Microsoft Surface Windows RT/Pro H.264 Video (*.mp4)” as the best output one for Surface Hub. For others? You can drop down the list and find more. And the video/audio parameters can be reset in “Settings” to achieve a satisfying playback in for Surface Hub.


Step 3: Hit the big button “Convert” to get the cork started. If you follow several steps mentioned above, after easily transferring files to Surface Hub tablet, we can enjoy the HD/4K videos nicely with high definition. Would you like to have a try?

Tips: How to Troubleshoot Insufficient Space for Storing 4K Movies on Surface Hub?

It is known to all that 4K movie file size is very big. The first 4K movie you can download is 160GB. It really requires massive space to save 4K movies. Check the 4K movie storage suggestions below. 

1.Stream 4K movies from computer/PC to Surface Hub. 

This solution requires you to download 4K movies on your computer, and then stream 4K movies from computer to Surface Hub. Thus, you can watch 4K movies on Surface Hub without occupying memory. Wireless Projection enables users to share their Windows desktop to the Surface Hub both wired and wirelessly. 

2.Compress 4K movies to fit for Surface Hub with minimum quality loss. 

If you want to store 4K movies on Surface Hub with relatively less storage, Pavtube Video Converter Ultimate can also help compress 4K movie size to fit for Surface Hub with minimum quality loss or realize both conversion and compression of Fraps videos. Only several mouse clicks are required: load downloaded 4K movies -> select output profile for Surface Hub -> settings changes ->hit Convert to begin compressing -> once finished, simply transfer the compressed 4K movies to Surface Hub. 

Note: Click “Settings” near the format bar to go to “Profile Settings” interface. Compress your Fraps video to a smaller size than the original one by clicking “Size” dropdown list under “Video” option.

Now, you can enjoy the 4K/HD Videos and Movies to Surface Hub Tablet on Windows 10 for entertainment. Please feel free to share this tutorial if you think it is helpful!

Read More: 

Friday, April 17, 2015

Import DVD to iMovie and Burn iMovie project to DVD on Mac

Overview:

" If you are fond of some video clip from a DVD movie and want to edit it in Apple iMovie project, you got the right place! The following tutorial will share with you how to convert DVD to iMovie friendly video format and import DVD into iMovie for editing. Then, you can burn iMovie project to a new DVD disc. "

In this article, we will show you two parts: 

Part I: How to Import DVD to iMovie Freely and easily?
Part II: How to burn iMovie project to DVD on Mac effectively? 

Hot Search: iMovie Alternative, iMovie Best Formats, iMovie Converter, iMovie and FCP

Why you need Import DVD to iMovie and Burn iMovie project to DVD on Mac? 

Import DVD to iMovie - You may purchased a vast collection of DVD disks, and want to copy DVD movie to iMoive, a pre-install application on Mac which allows you to edit the films, make clips, add music/narration/photos, and create fun trailers from all that footage. iMovie for Mac enables you to import VOB files on homemade DVDs, but it lacks native support for importing commercial DVDs. You first have to convert the audio and video files from your DVD to iMovie friendly format such as MPEG-4, H.264, DV and AIC, while a DVD to iMovie converter software is required. 

Burn iMovie project to DVD on Mac - iMovie is a great free movie making software for Mac with tons of advanced features. You may have some home videos and enjoy making movies with iMovie. After finished the movie editing, you have multiple ways to share your masterpiece: save to computer, transfer to iTunes, share to YouTube, Facebook, MobileMe Gallery, etc. And of course, burn the iMovie project to DVD for better video preservation! Want to burn iMovie to DVD so that you can watch the home movies on DVD player or TV with family and friends? 

Part I: Step-by-step: How to Rip and Import DVD to iMovie on Mac

A: There are two things that you need to know about importing DVD to iMovie:

1. If you want to edit a homemade DVD in iMovie on Mac, you can import the DVD video to iMovie without using DVD ripping software like HandBrake only if you still had the original video, which should be created by iPhone, iPad or other Apple devices instead of any other HD camcorders. For people who most often use iMovie for home videos, bear in mind that you can directly transfer your DVD to iMovie on Mac without any third-party aid. 
 
>> Getting Panasonic GH4 4K Footage into iMovie
 
2. If you are trying to import a commercial DVD to iMovie on Mac, I'm afraid a DVD ripper is a must-have because of iMovie compatibility issues. HandBrake is free and easy to use, but when it comes to ripping DVD with copy protections to iMovie, like Disney copyprotection, commercial DVD CSS encryption, Sony ARccOS, etc, it can't work as expected. Luckily, there is still other DVD to iMovie ripping software solutions for Mac you can easily find, such as Pavtube DVDAid for Mac, MPEG Streamclip and so on. 
 
>> Backup Disney DVD Movies with strict copy protections on Mac Yosemite

B: How to Rip/Import DVD movies to iMovie on Mac with ease 

We write down this DVD to iMovie ripping tutorial and hope it will help you figure out problems like what formats are iMovie compatible with, how to rip DVD to iMovie on Mac, how to import video to iMovie without DVD ripper like HandBrake, etc. Here  Pavtube BDMagic for Mac (Here is review) is recommended to you which I recently come to discover and utilize the updated version to do this. This Mac DVD ripping tool can rip any protected DVD and convert DVD to AIC for using in iMovie natively ensuring maximum editing quality and efficiency when working with iMovie. 


The built-in editor also allows you to extract DVD clips with the very part you want. Or, it also supports converting DVD to any video and audio formats that are compatible with QuickTime, iTunes, Real player, Apple devices, such as MOV, MP4, M4V, AVI, MPG, MPEG-4. Now download the program to learn the DVD to iMovie/FCE conversion process. Step-by-step guide from: Import DVD to iMovie Tutorial

Part II: How do I burn my iMovie project to DVD?

Answer:: Use Toast to make a DVD from your iMovie project.

Step by Step: 
 
1.     After you've finished editing your movie in iMovie, click Share --> Export Using Quicktime.


2.     Select Movie to DV Stream from the Export: menu at the bottom of the window. Type in a name for your movie and click Save.
 
3. Once your project has finished exporting you must quit iMovie before launching Toast.
4. Launch Toast by clicking the icon in the dock.
 
5. Click the Video tab.
6. Select Video Mode if it is not already selected. Under options, select No Menus in the Menu Style drop-down menu. Check the box next to Auto-play disc on insert . These options will allow your finished DVD to be played on most DVD players. 
 
7. Drag and drop your saved .DV file from steps 1-2 from its location on the hard drive into the Toast window.
8. Eject any CDs or DVDs by pressing the eject button  on the keyboard. Insert a blank DVD-R into the slot on the right hand side of the computer.
9. Click the red record button. Your project will begin encoding and burning.
10. When finished, remove your DVD from the tray or slot. 

Or, you can get the Pavtube DVD Creator for Mac is here to burn iMovie Projects to playable DVD videos. And good news is that this bundle software BDMagic for Mac($49) + DVD Creator for Mac($35) = Only $49.9, now which price is less than the original Video Converter Ultimate. You can save $28.1 if you choose it and see more special offers here. Learning A Beginners Guide to Burning DVDs. 
 
Further Reading - iMovie Compatible Formats: 

To answer all DVD-iMovie-importing questions, we need to first get to the bottom of it – what are iMovie compatible formats. We are talking about methods of ripping DVD to iMovie on Mac here just because what's in the VIDEO_TS folder is MPEG 2 video, which is not included in the iMovie list and you may get stuck with a box with message like "Incompatible Video Format". So read carefully the following iMovie format information and you will know which format you should rip your DVD to for edit in iMovie, especially on Mac here.

1. DV
2. DV Widescreen
3. HDV 1080i (25 and 30 fps)
4. HDV 720p (25 and 30 fps)
5. MPEG 4 Simple Profile
6. iSight 

* There might be others that can work in iMovie, like AVCHD or some video containers, which contains one of the above. However, DIVX, Windows Media files, etc. would need to be converted. 

Read More: