Thursday, February 19, 2015

How to Rip and Upload DVD to YouTube for sharing

This article shares with you how to upload DVD to YouTube by converting DVD to a video format that is compliant with YouTube with a professional DVD to YouTube converter.

As we all know, YouTube has now become the most popular online video site. It allows you to upload videos in almost all popular video formats like FLV, AVI, MOV, WMV, MPEG, MP4, MKV, etc to share with the world in minutes. However, when you are trying to upload DVD to YouTube, you may get into trouble since YouTube website doesn't support DVD uploading.
Rip and Upload DVD to YouTube for sharing

According to YouTube Help Center, H.264 video with AAC audio in MOV or MP4 format is preferred for uploading. To share DVD on YouTube, you will need to rip DVD movies to YouTube friendly H.264 MP4 or MOV first. With the assistance of Pavtube DVDAid, all becomes easy.

It can serve as a professional DVD to YouTube converter that lets you get videos with optimized settings for uploading to YouTube. Besides, it can also convert DVD to video formats like AVI, WMV, FLV, ASF, M4V, MKV, etc. and extract audio from DVD to audio preferred by most online websites like Facebook, Vimeo, Break, Metacafe, Dailymotion, Hightai, etc. for sharing anywhere. Better still, you can edit DVD video by cropping, trimming, adjusting effects and cutting your long video clips to a shorter ones, all becoming easy with this DVD to YouTube ripping program.
Free download it now and follow the below steps to convert DVD to YouTube with ease. If you are using a Mac, you can use the equivalent DVDAid for Mac and refer to the mac workflow.

Part I: Convert DVD to YouTube Preferred Video Format for Uploading to YouTube

Step 1. Load DVD movies

Insert the DVD disc into your computer's DVD drive and run DVD Ripper. You can click the "Load DVD" button to load the DVD files to the program. DVD ISO/IFO, VIDEO_TS folder are supported also.


Step 2. Specify output format

As has been stated above, YouTube supports MP4, etc video files. So you can just select "Common Video" > "H.264 High Profile Video(*.mp4)" or choose "HD Video>H.264 HD Video (*.mp4)" as the output video format.


Step 3. Trim/Edit DVD files

Since YouTube has limitations about the uploading video size and length, please pay attention to the video size when ripping DVD movies for YouTube. Here we should highlight the trim function on this software. Just click "Edit" to trim the DVD videos to get the very part you want. Besides trimming, cropping, adding watermark, adjusting special effect, are well supported as well.

Tip: If the video clips you’ve trimmed are still longer than 15 minutes, you can choose to split the DVD movies into smaller parts so as to share on YouTube without limit. Click the Split icon in the main interface, and you can cut your files according to time length and file size.

Step 4. Start converting DVD to YouTube

When all these settings are ready, you can click the "Convert" button to begin the DVD to YouTube conversion. When the ripping is done, you can click on "Open" button to locate the ripped videos.

Part II. How to load video to YouTube

1. Sign into YouTube.

2. Click the Upload link at the top of the page.

3. Select the video you'd like to upload from your computer. (Enter as much information about your video as possible, including Title, Description, Tags, and Category.)

And what we have left is just to follow its instructions. Broadcast yourself now!

More related:
Source: Easiest Solution to Convert DVD for Uploading onto YouTube

Saturday, February 14, 2015

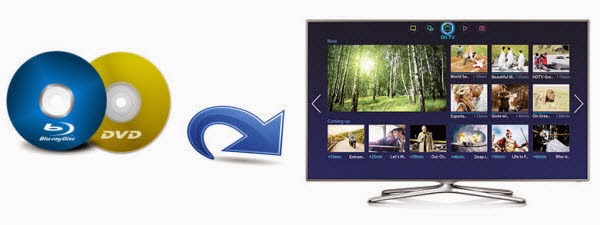
Copy Blu-ray/DVD for playing on Samsung Smart TV via usb-hard drive

This guide will show you how to rip and convert Blu-ray/DVD to lossless MKV to play on a Samsung Smart TV via usb-hard drive with multiple audio tracks and subtitles.

What I want to do is convert my BlueRay/DVD into MKV with the intention to show movie via usb-hard drive on my Samsung Smart TV instead of a Blu-ray player. How to do the conversion with multiple audio tracks and subtitles? I went through a lot of the Internet searching to look for something decent. Tried some free ones that were crap for what I wanted to acceive. 

Backup BD/DVD to lossless mkv for Samsung Smart TV via usb-hard drive

Luckily I hit on to Pavtube ByteCopy by coincidence, which is a powerful and easy-to-use Blu-ray to MKV Converter. It can convert Blu-ray, DVD and ISO/IFO files to MKV retaining all multiple audio and subtitle tracks in MKV files and you are free to select audio codec for every audio tracks in MKV. Seemed the most reliable & easy to use & the site looked safe enough to use credit card on. Easy of use & good format choices. The BD/DVD to lossless mkv conversion is fast, intended to be used via usb-hard drive on Samsung Smart TV. And the MP4 format can be used to save space and remain quality and to be able to run on basically all hardware. Mac version is here. Free download and install it and follow the steps below:
Convert BD/DVD to lossless MKV for playing on Samsung Smart TV via usb-hard drive

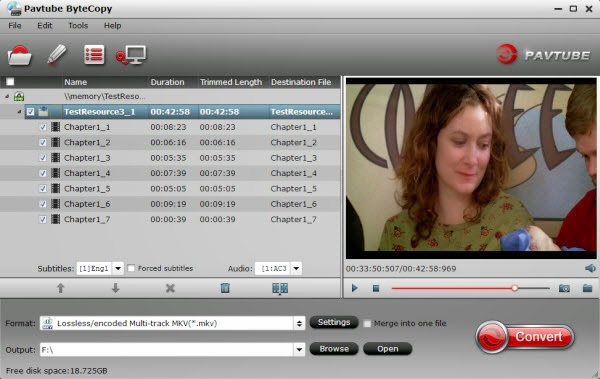
1. Load Blu-ray source.

First of all, insert your Blu-ray to Blu-ray drive and keep networked. Now it's time to import Blu-ray into the software after launching it. Click "Load files" icon to choose Blu-ray source for importing.

Best Blu-ray/DVD Copying & Ripping tool

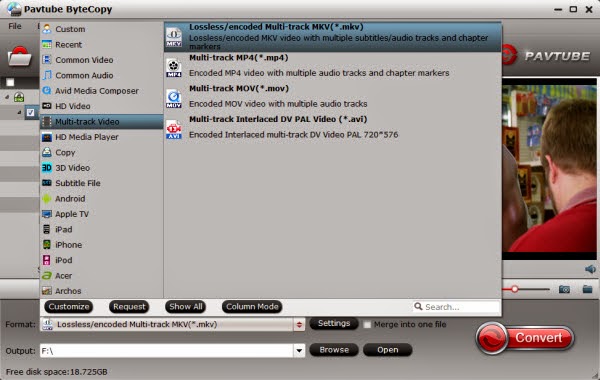
2. Choose output MKV.

In the dropdown list of Format menu, you can find several MKV options for output. Here we recommend "Lossless/encoded Multi-track MKV (* mkv)" under "Multi-track Video" catalogue. Because it will save multiple video, audio and subtitle tracks form original Blu-ray in output MKV and you won't suffer any quality loss.

lossless mkv format

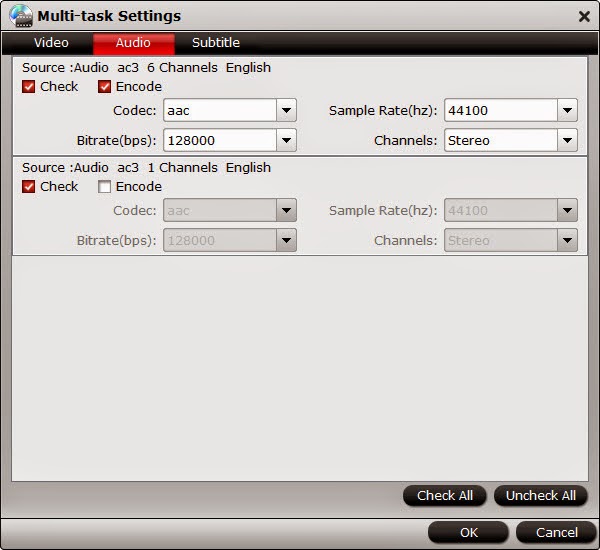
3. Select audio codec for output.

Click "Settings" button on the main interface; you are brought to Multi-task Settings. Here detailed parameters of multiple audio and subtitle tracks are listed and you can change any of them at will.

multi-track settings

In default system setting, every track is checked for lossless MKV output. If you want to remove one of them, just uncheck it from the list. Check "Encode" option, you can change audio parameters like codec, channels according to your needs. In this way, if you don't like DTS audio, you can choose to remove it or convert to AC3 here.

Note: If you change audio parameters under "Encode" option, you will get a encoded multi-track MKV file, not lossless multi-track MKV. Recoding Blu-ray to MKV will take a little more time for conversion than lossless output.

4. Backup Blu-ray to lossless MKV for Samsung Smart TV.

When everything is ready, you can click "Convert" button to start converting Blu-ray to lossless MKV with multiple audio tracks and subtitles keeping.

Once finished, go to "Open" the generated MKV files. Now it is time to transfer converted mkv onto usb-hard drive and enjoy your favorite Blu-ray movies with Samsung Smart TV.

More related:
Source: Backup BD/DVD for Samsung Smart TV via usb-hard drive

Tuesday, February 10, 2015

iTunes to Galaxy Tab 4 - play iTunes on Galaxy Tab 4

Summary: In this guide, you will know how to transfer movies and music from iTunes to Galaxy Tab 4 tablet. you can get rid of the iTunes limitation and play iTunes content freely. 

"Last weekend I just got the Galaxy Tab 4 tablet, now I am wondering whether I can transfer movies from iTunes to Galaxy Tab 4 for watching, because in the past several months I purchased about 30 movies from iTunes store, and many iTunes songs. If I can play itunes movies music on Galaxy Tab 4, that will be great. Can you give me an effective solution or any suggestion? Thanks in advance." – From Tommy. 
  
itunes-to-galaxy-tab-4
 
If you are a Samsung Galaxy Tab user, and also a long-time Apple's iTunes users, you may have the same problems as Tommy. In this case, if you want to transfer movies and music from iTunes to Galaxy Tab S, you will first need to remove DRM from iTunes movies/videos/TV shows, and convert iTunes movies and music to supported format for Galaxy Tab 4, such as MP4 for video and MP3 for audio. So, If you want to play iTunes on Galaxy Tab 4, you need a best iTunes to Galaxy Tab 4 Converter

Pavtube ChewTune - With this powerful all-in-one DRM removal and recorder, you can remove DRM video from iTunes and record/convert iTunes M4V files to Galaxy Tab 4 supported formats. It’s asy-to-use interface, straight workflow and reliable video quality. <Review>. For Mac users, you can try Pavtube ChewTune for Mac. Below is a step-by-step guide will explain you how to play iTunes on Galaxy Tab 4 without any problems. 

Tips: 

1.If you’re movie fans, you may have stored lots of Blu-ray and DVD discs, you can also find the best Blu-ray RipperDVD Ripper for your Galaxy Tab 4. 

2.You can get the biggest discounts from these money saving boundles: 

BDMagic($49) + ChewTune($29) = Only $49.9, Save $28.1
DVDAid($35) + ChewTune($29) = Only $49.9, Save $14.1 

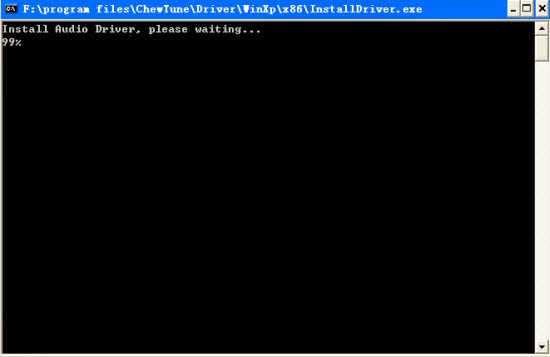
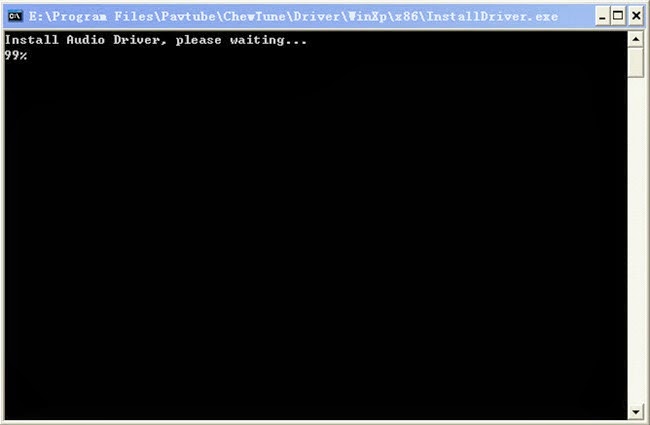
There would be a command window pop up during the installation, pls do not shut down it and let it running until the installation completed. 

do-not-shut-down-the-command-window

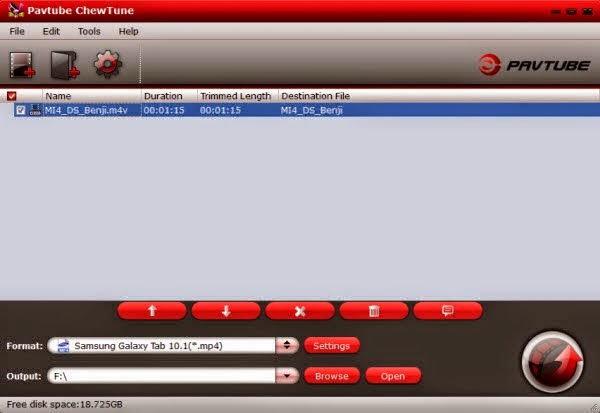
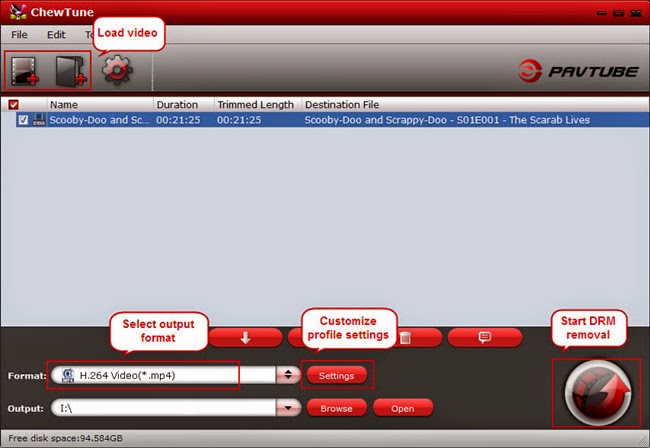
Step 1. Add video and choose target format. Drag and drop your videos to it directly, or you can click icon to import them as below. 

galaxy-drm-removal

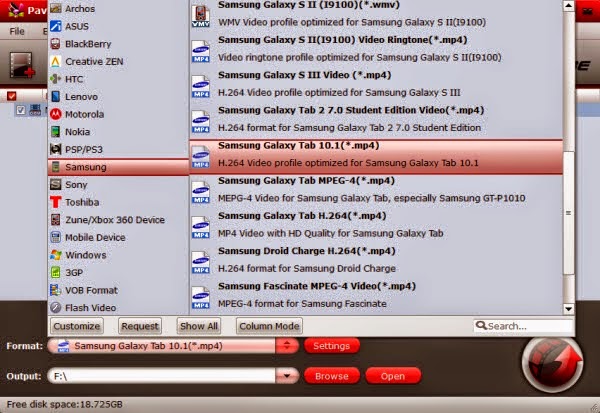
Step 2. Let's click the drop-down-list besides "Format" and move to "Samsung" column and choose "Samsung Galaxy Tab 10.1 (mp4)" as output format for your Galaxy Tab 4. 

galaxy-tabpro-video-format
 
Step 3. If you like, you can enter “Settings” option to adjust profile parameters, such as video codec, bitrate, frame rate, size, etc to get better video and audio quality on Galaxy Tab 4.  

Step 4. Now click the big red icon to start converting iTunes M4V videos to Samsung Galaxy Tab 4 in batch. After the conversion, click "Open output folder" to quick locate the converted video and transfer to Samsung Galaxy Tab 4 from PC. 

Now, Just make full use of your iTunes videos and music on Galaxy Tab 4, enjoy them freely without any limitation. 

Tips for Samsung Galaxy Tab users: 

Friday, February 6, 2015

VOB iTunes Solution: How to Convert VOB to iTunes on Windows/Mac

Summary: Have you ever bothered by the issue that how to convert VOB to iTunes?  Which is the best & professional VOB to iTunes Converter ? Just come to the right place. 

VOB iTunes Solution

VOB is used to store all MPEG-2 audio and video data, which contains not only the video itself but also the menus, buttons and a variety of subtitles. It is widely used in DVDs. When you try to import VOB to iTunes, iTunes won't recognize those VOB files and doesn't allow you to load them. Why that happens? Well, that's because iTunes doesn't support the VOB format (it only supports MP4, MOV and M4V). So, converting VOB to compatible format is your ideal choice. The article will share the simplest solution to convert and import VOB to iTunes in a breeze. Let's move on. 
  
Part I: Get the Best & Professional VOB to iTunes Converter 
   
To convert VOB files to iTunes MP4, MOV, M4V, MPEG-4, H.264 format is actually very easy as long as we have the assistance of this Top VOB to iTunes Video Converter Ultimate <20% off>. Read the review. This is is a professional yet easy to use software which can not only help you to convert VOB format to iTunes format with high output quality and fast conversion speed, but also can help you to edit VOB files as you like. Below I'd like to introduce the striking points of this software to you in detail to prove that I do not run off at the mouth. 

a. Marvelous converting ability: It converts VOB to iTunes, and also other more video formats like AVI, MP4, MKV, MOV, WMV to iTunes. 
b. Fast speed and superb output quality: 6x Faster Conversion Speed
c. High output video quality: Save a 100% intact BD M2TS/ DVD VOB movie without extras
d. Incredible simplicity: I think no one wants to use the program that is complicated and difficult to operate. This VOB to iTunes converter, with an intuitive and simple interface, allows both computer novices and seasoned users to finish the VOB to iTunes conversion task with a few clicks, as easy as 1-2-3. 

Tips: For Mac users, you can try Pavtube iMedia Converter for Mac, It support the conversion on Mac OS X 10.6, 10.7, 10.8 Mountain Lion, 10.9 Mavericks, 10.10 OS X Yosemite. 

Step-by-step instruction: How to convert VOB to iTunes for killing time on the move? 

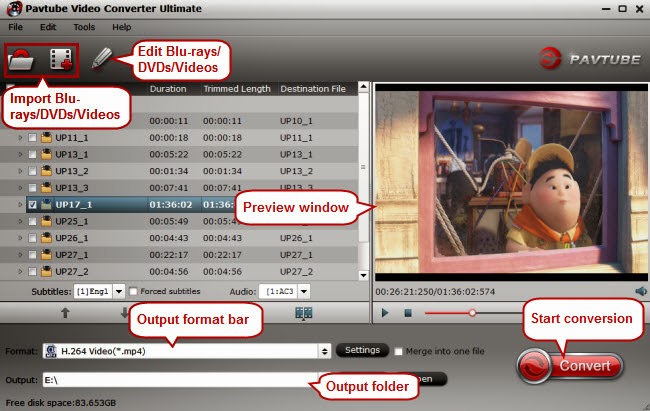
Step 1. Install and run the video converter, and then click the "Load from folder " button to load the .vob videos. You can also use the drag-and-drop method to load the media files to the application UI. 

Best VOB to iTunes Converter

Step 2. Since iTunes supports MP4, M4V and MOV formats, you can click Format bar and choose any of the three from Common Video as the output file format. If you want to load VOB to iTunes for playing on iPhone, iPad, iPod, Apple TV, you can also directly select a format from decent device preset like iPad.  
  
Tips: 

1. By clicking the Settings button beside Profile, you can adjust the output video/audio resolution, frame rate, bit rate, etc. to customize the output files to get the best quality you want. 
2. You can easily enjoy your VOB files to iOS devices like iPhone, iPad, iPod and so on for free time! 
3. If you’re interested in more Blu-ray/DVD ripping Tools, you can go to here, and get more money saving boundles! 
     
Step 3. After everything is ready, simply click the Convert button to start converting the added VOB videos to iTunes MP4. The conversion time depends on your video size. When the process is done, click Open to locate the converted MP4 videos. 

Now the converted VOB video is ready to be imported into iTunes and if necessary, sync with your Apple device. To import videos to iTunes, open iTunes and go to File > Add to Library or directly drag and drop the converted video to iTunes. And then find the video in the Movies category.  

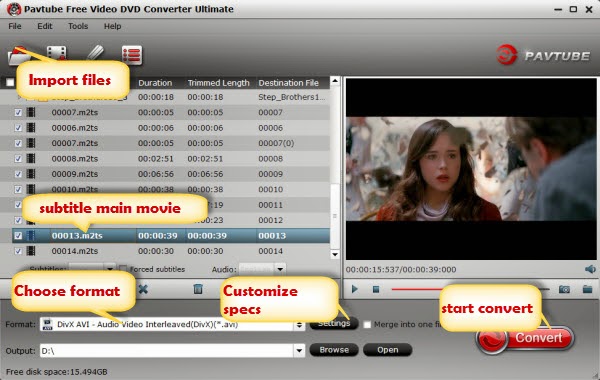
Part 2: Free VOB to iTunes Converter –Pavtube Free Video DVD Converter Ultimate
  
1. Support wide range of source video: Not only DVD disc, DVD VIDEO folder, DVD IFO/ISO file can be loaded into with one click, also various video and audio types are allowed as source file, including AVI, WMV, MP4, MKV, MOV, FLV, F4V, VOB, M2TS, etc. 
2. Rip to various video & audio formats: You can easily rip DVDs and videos to almost all popular SD and HD video formats like mov, mpeg, mkv, wmv for viewing anytime as you like
3. Equipped with a built-in editor, Pavtube Ultimate program is capable of personalizing your DVD and video with few clicks

Free VOB to iTunes Converter

Now, you can easily convert VOB to iTunes or organizing VOB in iTunes and even transfer to iOS devices like iPhone, iPad, iPod, etc. for killing time on the move. 

Read More: 

Tuesday, February 3, 2015

Remove and Record iTunes rental movies to MP4 for playing on Laptop

Summary: This guide will show you how to remove iTunes video DRM and convert them to an open mp4 video formats so that you can enjoy your own video on Laptop. 
   
Question: “I have a couple of files from iTunes rental movies that I’d really like to put them on a external hard drive to give to a friend, who wants to put on her Laptop. I was hoping to record ITunes rental movies and remove DRM to keep indefinitely and I have tried multiple options with no results. Can I even do that given they are copy protected?” 

best m4v drm converter

If you search Google for the free way to convert iTunes video to mp4, you will find out those methods are not working well. In order to play iTunes videos on your laptop, the DRM must be stripped off iTunes videos, or in other words, iTunes M4V videos must be converted to a unprotected format. MP4, the most compatible format which can supported by most of devices or media players, is the most suitable format for converting iTunes M4V videos to. 

To make the magic happen, you need is a powerful DRM removing tool and iTunes M4V Video Converter- like Pavtube ChewTune.(Read Top 10 Best DRM Removal Review) Below, the tutorial will show you how to convert iTunes video to mp4 so that you can play iTunes movies on Laptop, SD Card or any portable player freely.

Tips for who choose Pavtube Best DRM Removal Tool: 

One: If you are a Mac user, please turn to ChewTune for Mac. Free download the right version and enjoy your iTunes M4V movies on Laptop without any hassle! 

Two: here, we’ll show you the biggest Money-Saving Boundles:

DVDAid($35) + ChewTune($29) = Only $49.9, Save $14.1
BDMagic($49) + ChewTune($29) = Only $49.9, Save $28.1
Video Converter Ultimate($65) + ChewTune($29) = Only $74.9, Save $19.1
ByteCopy($42) + ChewTune($29) = Only $54.9, Save $16.1 

Three: My verdict on it can be summed up with “It’s awesome!” Pavtube ChewTune not only help you strip off DRM protection from iTunes M4V movies, but also can removal iTunes DRM Music to your SD Card, Amazon Instant Videos to Surface Tablet, so that you are able to watch almost all DRM movies on multiple smartphones and tablets anywhere you like. 
   
You can choose to download a free trial version of the DRM removal tool: 

Now, you can converting iTunes rental movies (M4V) to MP4 is as easy as 1-2-3. 

Step 1. Download a trial version of Pavtube DRM Removal Tool, and install it. 

pavtube-best-drm-converter

Step 2. Start the iTunes to laptop, hit the "Add video" or "Add from folder" button and browser the source iTunes rental movies location for loading. 

Pavtube DRM Removal Tool

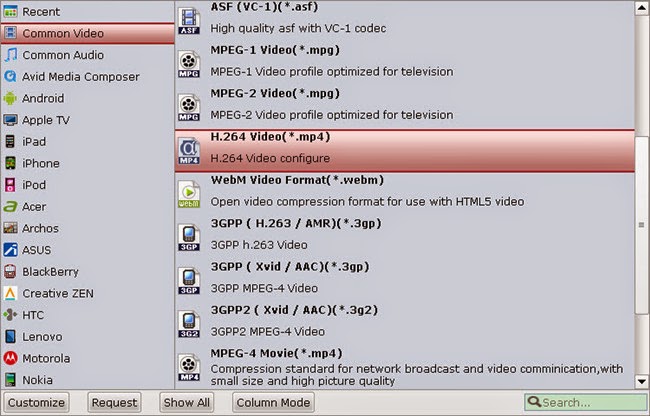
Step 3. From the "Format" drop-down list, choose suitable profile for Laptop. Here I suggest you choose "Common Video > H.264 Video(*.mp4)" as output format. 

play itunes rental movies on laptop

What’s more? – If you like, you could adjust profile settings including video codec, bitrate, frame rate, etc to get better video and audio quality for watching iTunes movies on your laptop. 

Step 4. Hit the "Convert" button to start recording iTunes movies. After it finishes, click the "Open" icon to locate the recorded iTunes movie, and you are ready to transfer and stream these MP4 videos to laptop, it's very easy. 

Now, you can record iTunes rental movies and remove DRM to keep indefinitely. Your friends can easily enjoy your iTunes rental movies on her laptop. 
  
Read More: 

Friday, January 30, 2015

Backup Blu-ray for playback on Samsung Galaxy Tab S 8.4 tablet

How to watch Blu-ray movies on Galaxy Tab S 8.4? Here I’ll show you how to backup and convert Blu-ray to Tab S-friendly mp4 video in just a few mouse clicks.

It will be amazing to play video on Galaxy Tab S 8.4 with the superb AMOLED 2K display. Now I have some Blu-ray diss Pacific Rim and Patton in hand, then what if to make archive copies of my blu ray collection for playback on my Samsung Galaxy Tab S while travelling? While I have been ripping my Blu-ray collection using Handbrake with a PC, I want to rip Blu-rays to better utilize the Galaxy S 8.4 inch screen.

Backup Blu-ray for playback on Samsung Galaxy Tab S 8.4 tablet

After some Google research, I found Pavtube BDMagic which is best one for backing up my Blu-rays to Galaxy Tab S 8.4 with best settings based on reviews. Overall, this program can help users rip Blu-ray and DVD movies to Galaxy Tab S highly supported MP4 video files with fast speed. Besides, it offers many editing functions, like trimming, cropping, adjusting video effects, etc. to get ideal effects as users like. Mac version is here. Now, download the correct version you need and follow the below guide to learn How to convert Blu-ray movies to play on Galaxy Tab S 8.4.

Backup Pacific Rim and Patton Blu-ray for playback on Galaxy Tab S 8.4 tablet

Step 1: Load Blu-ray movie

Insert your Blu-ray disc to Blu-ray drive, and click “Load Disc” button for loading Blu-ray movies to this Blu-ray to Galaxy Tab S Ripper.

Blu-ray to Galaxy Tab S Ripper

Step 2: Select Galaxy Tab S 8.4 compatible format

According to Samsung official website, MP4 is the most compatible video format for Galaxy Tab S 8.4. So, here we recommend you select “Samsung > Samsung Galaxy Tab 3 Video(*.mp4)” as the export format.

Galaxy Tab S 8.4 compatible format

Tips: Customize video specs. (Optional)

Click "Settings" to free choose output video size, bitrate, frame rate and other specs. For example, you can set video size to "1920*1080". Remember the file size and video quality is based more on bitrate than resolution which means bitrate higher results in big file size, and lower visible quality loss.

According to my experience, I recommend ripping Blu-ray to mp4 copies with a 2500 bitrate setting as this seems to make the smallest file size with the an acceptable level of clarity for the 8.4 inch screen.

Step 3: Convert Blu-ray to Galaxy Tab S 8.4

Last but not least, click the “Convert” button to start ripping Blu-ray to MP4 for Galaxy Tab S 8.4 tablet. When it finishes, click the “Open” icon on the main interface to locate the ripped movie and transfer it to your Galaxy Tab S, and then you can play Pacific Rim and Patton Blu-ray on Galaxy Tab S 8.4 while travelling! Just Enjoy!

Tips: If you just want to copy the Blu-ray movies to your computer for digital storage and protection, instead of converting to other portable device, the “Copy the entire disc” feature of this program lets you backup your Blu-ray collection with original video quality and original 5.1 channels Dolby AC3/DTS audio.

For me, apart form Galaxy Tab S 8.4, I also store the ripped movies on a 128 GB SD Card and save an archive Blu-ray copy on a 2 TB external hard drive for watching on the go.

Tuesday, January 27, 2015

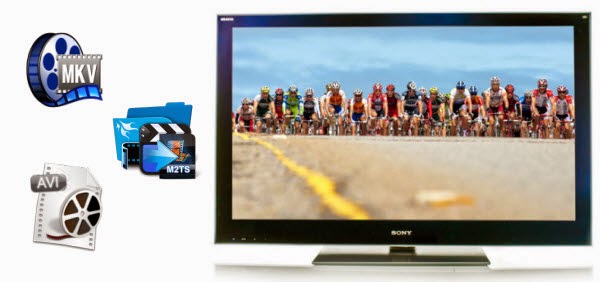
Watch 1080p MKV/AVI/M2TS/ movies on Sony BRAVIA HDTV via USB

Why can't you get 1080p MKV/AVI/M2TS video to Sony Bravia HDTV for USB playback? Are you seeking for a solution? This article will explains.

Sony Bravia TV is one of the most reputable, well built HD TV lines on the market, it supports to play movies via USB port, which is great, USB port solution free you free the cable clusters and the expense for storing blu-ray discs.
Sony Bravia HDTV

Though Sony TV like Bravia enables us to enjoy video files from a USB device, it has video format limitation. It only supports videos in MPEG-1, MPEG-2, MP4, WMV, ASF, DivX HD through USB. If you have a collection of movies in format like MKV, AVI or M2TS, naturally, the solution is to convert these videos into the right format Sony Bravia supports for USB playback first.

To cater to all the video lover's need, the following will introduce a step by step guide on how to transcode 1080p MKV/AVI/M2TS to Sony Bravia supported video format effortlessly.

What you need:

1. USB mobile hard disk or flash disk. The disk file systems should be FAT12, FAT16, FAT32, or exFAT for Sony TV acceptable.

2. Video Converter software. To convert current MKV/AVI/M2TS videos to be supported by Sony Bravia HDTV, Pavtube Video Converter Ultimate is needed to convert any HD or SD video format to Sony Bravia HDTV friendly format- MPEG-4 MP4. (Here is top Ultimate Converter reviews) It provides optimized preset for playing HD video on Sony Bravia HDTV without scarifying image quality. 3D effect on converted video is also supported by this program.

Guides on converting 1080p MKV/AVI/M2TS Videos to MP4 for playing on Sony Bravia HDTV via USB

Step 1. Free download Pavtube Video Converter Ultimate, install and launch the program.

Once you run it, click "Add Video" button to load the videos you'd like to convert. When all the videos are loaded to the program, you can preview the videos.


Step 2. Select best supported format by Sony Bravia HDTV.

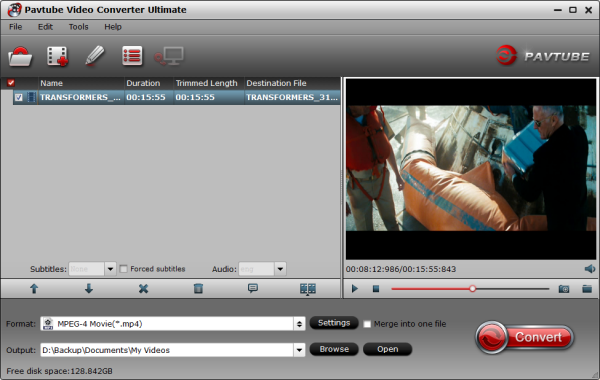
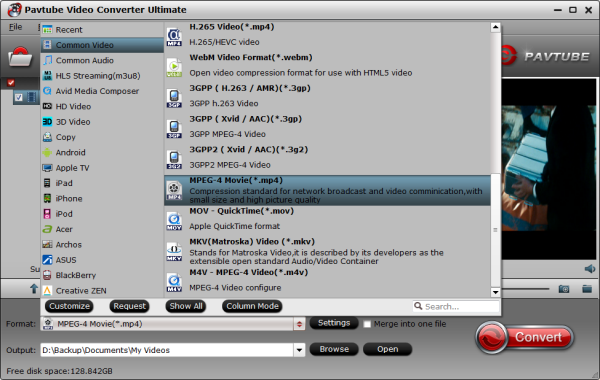
Click on "Format", and select output format from the drop-down list. Simply follow "Common Video -> MPEG-4 Movie(*.mp4)" which is accepted by Sony Bravia HDTV.


Tip: If you want to get 3D movies for your 3D TV, choose "3D -> MP4 Side-by-Side 3D Video (*.mp4)".

Step 3. Settings.

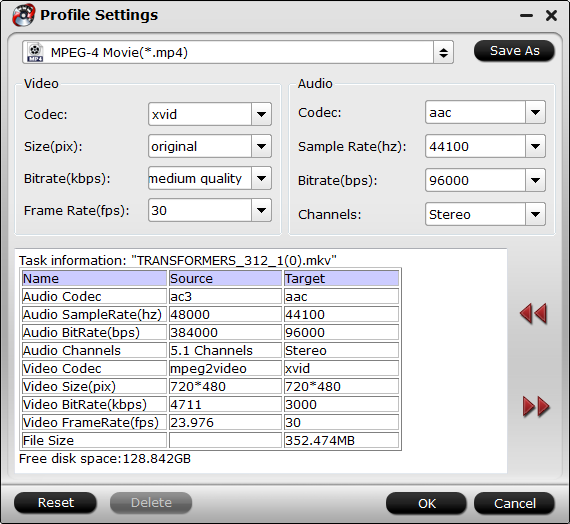
You can customize the A/V parameters based on your personal requirements. Adjust the resolution, bitrate, frame rate or codec to meet your requirement by clicking "Settings".


Step 4: Start converting 1080p MKV/AVI/M2TS video to Sony Bravia HDTV.

After the above steps are done, you can click "Convert" button to convert your MKV/AVI/M2TS Video to Bravia HDTV MP4 format.

Pavtube Video Converter Ultimate supports batch conversion so you may load multiple videos and convert at one time. You may also merge them into one file by checking the box "Merge into one file" before conversion starts. Mac version is here.

Sony HDTV Video Converter support TVs:


HBR 4K Ultra HD TV, LED HX850/HX750 serice Internet TV, XBR HX950 Internet TV, LED EX640/340/645 serice Internet TV, LCD BX450/330 serice HDTV etc.

After conversion you can click "Open" button to get the generated mp4 files. Copy converted movie files onto USB or USB Flash Disk and plug it into the Sony Bravia HX/EX/BX/HBR HX series HDTV and fall back on the couch and enjoy.

How to tranfer converted movies to Sony BRAVIA LED HX850/HX750 Internet TV?

1. Through an USB

You can connect your movable equipment (iPad, iPhone, Galaxy S2/S3, Sony Xperia S/P/U, HTC One X etc.) and TV via USB. Let TV read these video files.

USB

2. Via USB Flash Disk.

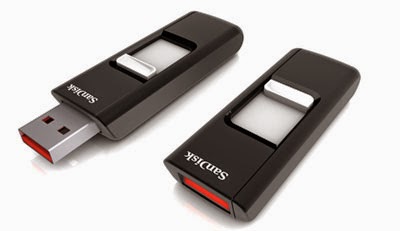
You need to transfer the movies to USB Flash Disk first. Then, insert the USB Flash Disk into USB interface.

USB Flash Disk

If you are disc lovers, you can rip Blu-ray, DVD and ISO files to play on your TV.

Friday, January 23, 2015

Convert Blu-ray to external HDD for playback via Samsung Home Cinema System

Wanna keep Blu-rays stored on external HDD for easier playback via Samsung Home Cinema System. This article mainly tells you how to copy Blu-ray to external HDD.

If you have an expansive collection of Blu-rays saved on your computer or on physical discs, a great way to make backups of your collection is to rip your Blu-ray library onto an external hard drive. If you own a Samsung Home Cinema System, having your Blu-ray collection saved on an external HDD is the easiest way to stream and watch your movies on your TV, iPad, iPhone, tablets at home as well. Sounds a pleasant experience? Action to make it now!
Convert Blu-ray to external HDD for playback via Samsung Home Cinema System

To backup your Blu-ray to external HDD for watching via Samsung Home Cinema System? A powerful third-party software is needed. It is not a big deal. Here Pavtube BDMagic is right for you. Workflow is easy and a mass of preset formats are built for output. And CUDA acceleration will bring you fast Blu-ray and DVD conversion speed. It is capable of converting Blu-ray and DVD to digital copy with various playable video formats for storage on external HDD and playback on Samsung Home Cinema System, and moreover, it also can support to backup Blu-ray/DVD without any quality loss. Now let's learn how to do it.


Guide: Backup Blu-ray on external HDD and play via Samsung Home Cinema System

Step 1: Import Blu-ray movie.

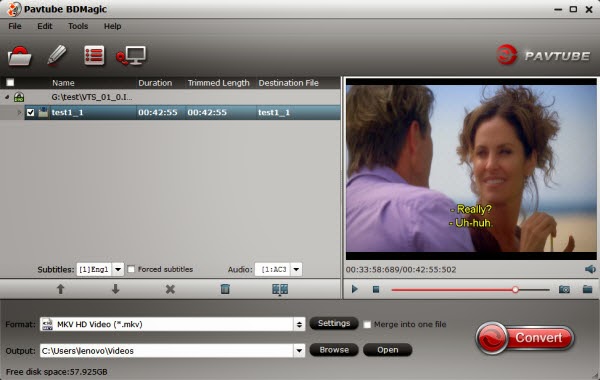
Launch the best Blu-ray to external HDD Converter(Mac version is here). Click the button like a disc or the folder, or the to add Blu-ray movie to it. If necessary, you can double click the each file to have a preview.

Blu-ray to external HDD Converter

Tip: Freely select the subtitles for you Blu-ray movies from the "Subtitles" option. Thus, you can put Blu-ray movie onto external HDD with preferred subtitles.

Step 2: Select an output format and set the output folder.

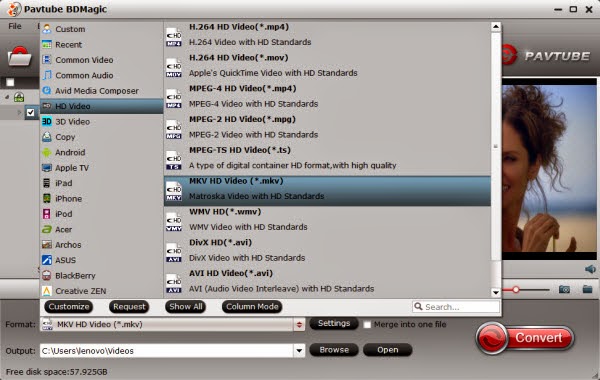
Click on the dropdown menu of "Format" and then move your pointer to "HD video > "MKV HD Video (*.mkv)" which is the compatible format for backing up on external HDD and playback on Samsung Home Cinema System. Or "HD video > "H.264 HD Video (*.mp4) is suitable. Then you can set the output folder by clicking "Browse" icon as you need. Wanna keep multiple audio tracks? Here is the solution.

external HDD video format

Step 3: Click "Settings" icon to make the best video/audio settings.

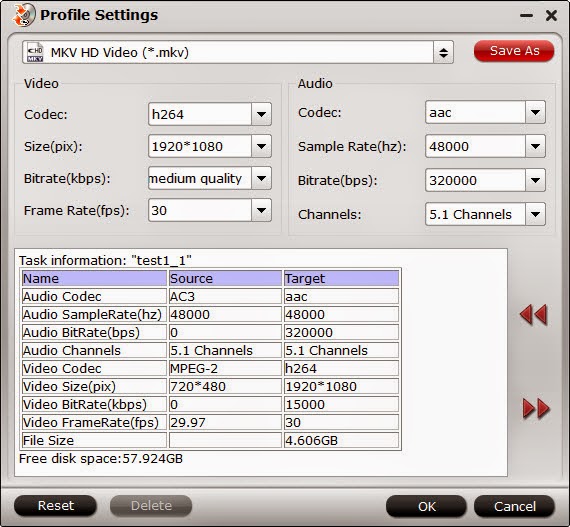
Click the "Settings" icon and you will go into a new interface named "Profile Settings". You can adjust codec, aspect ratio, bit rate, frame rate, sample rate and audio channel in the interface according to your needs and optimize the output file quality.

HD MKV video settings

Step 4: Start converting your Blu-ray movie to MP4/MKV for external HDD/Samsung Home Cinema System.

Click the "Convert" button; it will rip/convert Blu-ray movie immediately. You can find the process in the "Conversion" interface.

After the Blu-ray conversion, you can transfer/copy Blu-ray movie to external HDD for freely Blu-ray movie enjoying via Samsung Home Cinema System. Just get ready to have fun! Have a USB drive? It also functions like an external HDD to backup Blu-ray, DVD and ISO for watching.

Tuesday, January 20, 2015

Open and Play 2D/3D Blu-ray collections on Smart TV

The process mentioned below will guide you on how to convert 2D/3D Blu-ray to mp4 or mkv format for Smart TV playback via USB with just few simple steps.

Recent month, my friend asked me that he has many 2D/3D Blu-rays like Finding Nemo, Lord of the Rings: The Return of the King, The Amazing Spider-Man 2, X-Men: Days of Future Past, Edge of Tomorrow, Transformers: Age of Extinction, etc. which are wonderful movies. When he put Blu-ray onto Samsung Smart TV for playback, the TV can't read the 2D/3D Blu-ray. He is seeking help from me.
Open and Play 2D/3D Blu-ray on Smart TV

Have you decided to play Blu-ray on your Smart TV just like my friend? Chances are, you have, but you may didn't know how to. Here I will share my experience on how to convert 2D/3D Blu-ray to Smart TV supported format and copy to USB flash drive for playback. (Have some MKV or DVD? It is possible to get them to Smart TV for watching.)

Well, to accomplish the task, first of all you need to roll off the disc protection from 2D/3D Blu-ray, and then convert them to more common video formats like MP4 which is compatible with Smart TV.

Hereby you need a 2D/3D Blu-ray ripping software.

Among many Blu-ray ripping tools in various brands, Pavtube BDMagic is definitely hands down better in ease of use, ripping speed and quality of video output. It simply break your 2D/3D Blu-ray disc protection in background which you don’t need to operate manually; just set the target format and you get the best videos. Overall, it It integrates a best Blu-ray ripper and a DVD ripper together for you to rip Blu-ray discs, standard DVDs to universal video and audio file types as you need. With it, you can rip and convert Blu-ray/DVD to Smart TV with original video quality. Here is the mac version.

How to rip 2D/3D Blu-ray collection to Smart TV

Step 1: Load 2D/3D Blu-ray movies

Run the Blu-ray to Smart TV Ripper and click "BD/DVD disc" icon to load 2D/3D Blu-ray movies for converting. You can also import movies files from BD folder, ISO image files.

Blu-ray to Smart TV Ripper

Step 2: Choose output format

For streaming 2D/3D Blu-ray to Smart TV, MP4 from "Common Video" column can be a suitable choice. To get 3D movies from 2D/3D Blu-ray for 3D TV with 3D effect keeping, choose "3D Video > MP4 Side-by-Side 3D Video (*.mp4)".

Or wanna multiple audio tracks for outputting? You can rip Blu-ray to multi-track AVI for playing.

Smart TV video format

Tip: You can click settings button to customize the output parameters, such as resolution, bitrate, etc, you can also skip this step.

Smart TV video settings

Step 3: Copy 2D/3D Blu-ray to Smart TV

After all settings, click convert button to rip/convert Blu-ray to optimized format for Smart TV playback. When the conversion is over, connect the USB drive with computer and head to the destination folder where the converted files are stored, transfer the files to the USB drive then plug the drive in the Smart TV. Now, just enjoy.

Friday, January 16, 2015

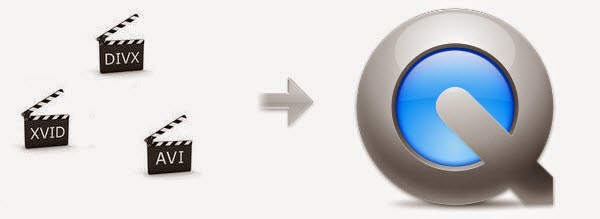
QuickTime AVI- Convert Divx/Xvid AVI to mov for using in QT player

Without installing any extra, you can also get QuickTime work with AVI files by converting Divx, Xvid AVI to mov for using in QT player as the easy solution.

QuickTime is the obvious media player for watching video clips in Mac OS X - but sadly this doesn't natively support Divx, Xvid AVI format. This article provides two solutions for you for solve this problem. One solution is to try an alternative to QT player, another solution is to convert the Divx/Xvid AVI  file into a format that QuickTime can play back, such as QT MOV. 

Convert Divx, Xvid, AVI to QuickTime on Mac 

Solution 1: 
An alternative to QT player

a. Install a codec


DivX/Xvid codec can be installed on a Mac OS X computer thanks to the Perian codec pack. ll you need to do is to download the DMG file and launch the installation process. Perian is suitable for use on Mac OS X 10.4.7 or later, and once installed you will find that QuickTime is now able to deal with a much wider selection of media formats! However, it’s pity that Perian for QuickTime has no longer been maintained and updated.

b. Try VideoLan’s VLC Player

VLC Player is an open source media player available for pretty much any platform you can think of that not only plays virtually every video format in circulation, download and install the DMG file, following any on-screen prompts. The next part is really simple – once the application has installed, all you will need to do is use the File menu to Open the DivX, Xvid AVI video clip of your choice, and sit back and enjoy the film! But there still some playback issues exist.

Solution 2. Do Divx/Xvid AVI to QuickTime mov conversion

With the purpose of making the task be finished quickly and easily, a professional AVI Video Converter for Mac- Pavtube iMedia Converter for Mac is used as the assistant to preserve the video quality. With it you can encode Divx, Xvid AVI to QuickTime mov for using in QuickTime Player. In addition to the conversion function, the Mac app even offers some useful edit functions to enrich the media converting experience.

How to Convert and add Divx/Xvid AVI to QuickTime on Mac 

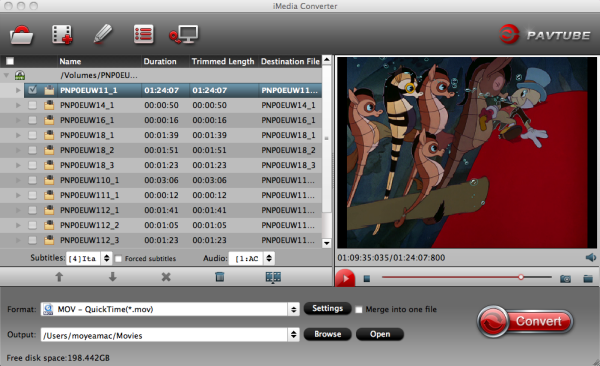
Step 1: Launch the AVI to QuickTime Video Converter; click “Add Video” button from main menu to browse your computer hard drive and select the Divx/Xvid AVI files you want to convert. Or you can easily drag-and-drop files into this application for converting.

AVI to QuickTime Video Converter

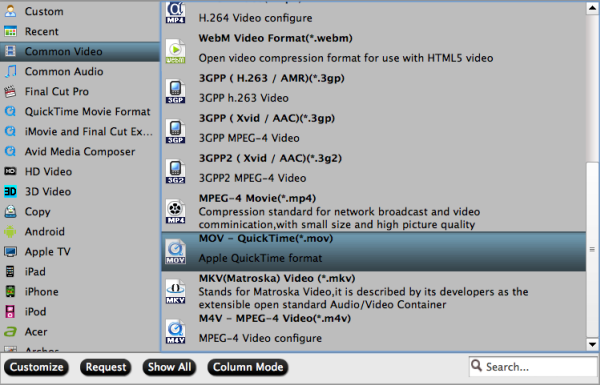
Step 2: Click the format bar, and move mouse cursor to “Common Video > MOV - QuickTime(*.mov)” as output format. Also you can transcode Divx/Xvid for playing on Apple TV, iPad Air and iPad Mini 3.

QuickTime Video Format

Step 3: Click “Convert” button to start encoding Divx/Xvid AVI files to QT MOV for QuickTime player under Mac OS X(Yosemite included).

Some more helpful features of the AVI to QuickTime Converter for Mac 

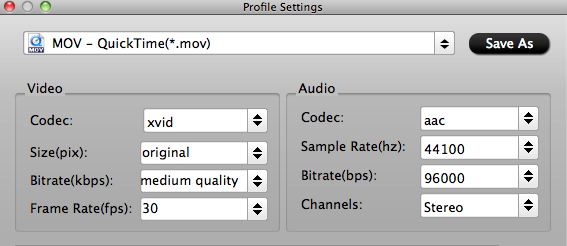
1. Settings- click to set video resolution, bitrate, frame rate, etc.

QuickTime Video Settings

2. Editor (next to “Add” icon)- click to set deinterlace, trim, crop, watermark, subtitles, etc.

3. More Inputs/Outputs- this Mac video converter not only enables you to convert AVI clips to QuickTime, but also supports converting MP4, VOB, MPG, AVI, MKV, WMV to QuickTime and video editing programs like iMovie, FCP, Avid Media Composer, etc.

Once the AVI to QT MOV conversion is done, you can add and import your Divx/Xvid AVI footage into QuickTime player for playing smoothly on Mac with ease.

Monday, January 12, 2015

Asus Transformer Book T100 Video Formats, Guide & Tips

What are the best audio and video formats for Asus Transformer Book T100? Get full details about Transformer Book T100 Video Formats, Guides and Tips.

The Asus Transformer Book T100 is a small, cheap Windows 8.1 tablet that you can use like a notebook thanks to a keyboard dock. You can use T100 as a touchscreen tablet with up to 11 hours of battery life. It houses a 10.1-inch IPS display with a resolution of 1,366 x 768 pixels and also happily play 1080p video.

Asus Transformer Book T100 Video Formats, Guide & Tips

To enjoy HD videos, TV shows, Blu-ray, DVD movies on Asus Transformer Book T100, let's have a look at the video formats for Transformer Book T100.

Part One: Asus Transformer Book T100 Video Formats and Audio Formats

Video file formats/codecs

H.263, H.264/MPEG-4/AVC video, MP4 (MPEG-4, .mp4, .m4a, .m4p, .m4b, .m4r, m4v)

Audio file formats/codecs


AAC, MP3, WMA, WMV

Tips: If you have any video in formats other than those Transformer Book T100 video formats, just get a video converter for Transformer Book T100 to convert them to the formats listed herein.

Part Two: Guide & Tips for movie playback on Transformer Book T100

It would be an extremely wonderful experience to watch HD videos like 4k or Blu-ray DVD on Transformer Book T100, here offers some guides and useful tool for playing media files on T100 with best settings.

Best Blu-ray to Transformer Book T100 Converter

For people who want to transfer Blu-ray movies to Transformer Book T100, you may need to roll off disc protection, choose target video format and adjust the best video size/bitrate/frame rate for T100.

Not tech-savvy? Now we have this Blu-ray to Transformer Book T100 Converter and you can finish your Blu-ray ripping task within a few simple clicks.

Best DVD to Transformer Book T100 Converter

You cannot miss this DVD to Transformer Book T100 Converter if you want to move DVD to your Transformer Book T100.

Best Transformer Book T100 Video Converter

Some guys suggest installing a media player app for ASUS Transformer Book T100, but it’s a pity like the popular video player MXplayer still can’t handle all of the media files. And the possible solution is to look for a tool to do video conversion, and then Pavtube Video Converter Ultimate can actually help to cope with the situation.

It can not only convert video among standard video and high definition video like AVCHD, MKV, MTS, MOV etc but also rip any protected Blu-ray DVD to the video formats supported by Transformer Book T100 with super fast speed and 1:1 lossless quality. Better still, it also plays the role of 3D Blu-ray Ripper to create 3D video from your 2D/3D Blu-ray and standard DVD discs with ease.

Wednesday, January 7, 2015

How do I Stream Amazon Instant Video on Android Tablet?

This article gives you the best solutions stream protected WMV video purchased from Amazon to Android Tablet for easy playback. Keep on reading. 

Amazon is finally giving Android users a way to watch movies and TV shows from Prime Instant Video on their Android Tablet, below is the greatest News:

Update 12 September 2014: Good News is that Amazon has released a new version of their shopping app for Android. It now supports Prime Video, so there are now two ways to access Amazon instant video on your Android device.

Stream Amazon Instant Video on Android Tablet

The Official Way

This is pretty simple. All you need to do is download and install the two following apps (which I found via Android Police). Be sure to install the shopping app first:

Amazon Shopping

File name: com.amazon.mShop.android-5.0.0.apk

MD5: C99F86CAF39444F93E54C216C1CD7A4B Amazon Instant Video

File name: com.amazon.avod.thirdpartyclient-1.0.apk

MD5: 50FAC68351E0A7AFD0E6AC0559C80505
Once you have the apps installed, log in to your Amazon account. Navigate through the menu on the left and find the Instant video option. Select it.

If you can stream video, great. If you cannot, or if the app crashes, you should try the unofficial solution.

The unOfficial Way

If you spend a little time installing and configuring a couple files, you can stream Amazon Instant Video on just about any of the newer Android tablets. This is a pretty simple trick which should be in the reach of most Android users. (If you can do the software maintenance on your PC then you can do this.)

Note: This trick won't work on the Nook HD or HD+, but there is a possible alternate solution. Scroll down to troubleshooting section at the end of the post for more details.

Note: This trick has been demonstrated as not working on Android 4.4, at least according to one user who left a comment over on TeleRead (where I learned of this trick). If your Android device runs 4.4 Kitkat, scroll down to the bottom of the page for an alternate set of instructions. It's also failed to work properly on some devices, so caveat emptor.

Note: This trick won't work for accounts on Amazon.co.uk or Amazon.de. Those streaming video platforms don't support Flash.

This trick has been documented as working on:
  • Nexus 7
  • Hisense Sero 7 Pro
  • Nexus 10
  • Galaxy Tab 10.1
  • T-Mobile Galaxy Note 2
  • Galaxy S3

What you're going to do is install Adobe Flash and a web browser that includes the option of changing the user agent. Chrome won't work for this (not for me, anyway).

Step One. The first thing you need is Dolphin Browser (or another web browser that lets you change the user agent). You can find it in Google Play.

Next, download the file attached to the first post in this XDA Forms discussion and install it:

http://forum.xda-developers.com/showthread.php?t=2139513

There are a number of ways to install the file. You can email the link to yourself and then open the email on your Android device and download it direct. You can copy the file over USB, or you can copy the file to and from Dropbox. It doesn't matter how you get the file on your device, just install it. (This step won't work on the Nook HD, so just skip it.)

Step Two. Once you have both Adobe Flash and Dolphin Browser installed, open Dolphin Browser and I'll walk you through the steps needed to stream Amazon Instant Video.

Go to the Amazon Instant Video webpage. (Bookmark so it's easy to find again.)
Log in to your Amazon account, and tell Dolphin to save the password.

Step Three. At this point your tablet is set up to stream video but Amazon won't let you because they don't support Android devices. Here's how you get around that.
  1. Press the dolphin icon in the menu bar at the top of the screen (see image one below).
  2. Select the settings icon (see image two below).
  3. Choose the customize option (see image three below).
  4. Select the user agent option (see image four below).
  5. Set the user agent to desktop, and then press the back button. (Don't leave the settings menu)
Step Four. Now that you changed the user agent, it's time to enable Flash support. Dolphin defaults to having Adobe Flash disabled, and you need to change this option in the settings menu.
  1. Scroll down and select the Web Content option (see image six below).
  2. Find the Flash option and select it (see image seven below).
  3. Change it from off to either Always On or On Demand (see image eight below).
At this point you should be able to go back to the Amazon website, reload it, and start streaming videos. Or at least, I can do it. Here's a screenshot from my Hisense Sero 7 Pro:
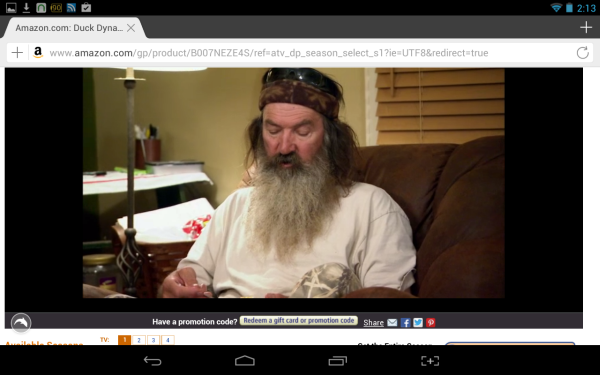
Amazon video

It works, yes, but not very well. My Sero 7 Pro has trouble keeping the audio and video in sync when I play SD resolution video (I won't even try HD video). Let me tell you, this gives me greater appreciation for the work that Amazon put into the Kindle Fire HD.

But this still works immensely better than it did before. Out of sync audio is better than none at all, IMO.Troubleshooting

Firefox - If the above instructions don't work for you, there are reports that you can do a similar trick with the Firefox Android browser. I haven't tried it, but I think it's worth a shot.

Android 4.4 - If you are using an Android device which runs 4.4 KitKat, you'll need to add a couple extra steps. The instructions above won't quite work for you, so you should instead follow this set of instructions on XDA Forums.

Microsoft Silverlight - If you try to stream a video and get an error message which says something about MS Silverlight, zoom in on that message. Do you see how the next line mentions Flash? Click it.

Nook HD - The above instructions kinda sorta work on the Nook HD+; you just have to go through a different step to install Adobe Flash. (You could also hack the tablet and install CyanogenMod, but I am too lazy for that.)

Ignore the steps above which tell you to install Adobe Flash; they won't work for you. Instead, here's what you have to do:
  1. Using your PC's web browser, go to the B&N website and buy this free app: browser plugin.
  2. Turn on your Nook HD, and open the app menu.
  3. Find and install the browser plugin.
Okay, you just installed Adobe Flash, so now scroll up to the top of this post and follow the instructions for installing and configuring Dolphin Browser.

In case you are wondering, they worked for me:
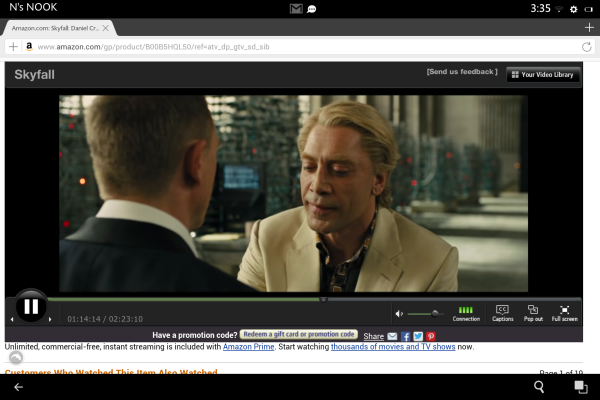
Nook HD video

There is the official way which is only intended for Android smartphones, and then there is the workaround(which works on almost everything but KitKat, and doesn't work in Germany or the UK.) For the sake of giving you multiple options, this post offers both ways to access Amazon Instant Video. I would suggest that you try both and use the one which works better for you. But is there an easier and faster way? Yeah, of course!

A Direct Way

Because Amazon Instant video just like iTunes contents, protected by DRM. To watch Amazon Instant Video on Android, you just need to strip DRM and convert Amazon WMV video to Android supported format, say H.264 .mp4 video. To get the work done, the key point is to select a useful DRM video converter.

Here Pavtube ChewTune is highly recommended to help you convert protected Amazon WMV to DRM-free MP4 for playing on all Android tablets and smartphones. With it, you can effortlessly make your Amazon WMV videos playable on Android in just a few mouse clicks in Windows 8.1/8/XP/7/Vista. Read the tutorial to see how it works.

Also, you can convert DVD, Blu-ray and Tivo to Android tablet for watching.

Sunday, January 4, 2015

Transfer The Simpsons seasons DVDs to my Samsung Galaxy Tablet

Here you will find the way to convert The Simpsons seasons DVDs to Galaxy Tablet compatible video so you can watch your DVD movies on Galaxy Devices freely.

TV shows on DVD are a wonderful product that the entertainment industry has offered consumers. It's great to be able to watch old favorites again and again, to see episodes that you never caught on TV, and to enjoy the multitude of extras that generally are included on these DVDs. And Simpsons seasons 1 – 4 series are such DVD TV shows you can choose.

Transfer The Simpsons seasons DVDs to Samsung Galaxy Tablet

However, one limitation with DVDs is that you have to load the actual DVD to be able to watch. But suppose you are going on a business trip and you might want to watch some of the episodes in the hotel on your mobile devices like Samsung Galaxy Tablet, then how to transfer your Simpsons seasons 1 – 4 DVDs to Galaxy device for watching?

In fact, it is easy to watch DVD videos on Galaxy Tablet as long as you convert DVD to video files that are supported by Galaxy tablet and then transfer the video files to your tablet for playback. Looking for a reliable way to do that?

Of course, first you need to get a DVD ripping program. Puzzle at which one to select? Here Pavtube DVDAid is highly recommended to help you easily get your work done.

This program is a dynamic DVD ripping tool that can help you rip DVD, DVD ISO to Galaxy Tablet highly supported MP4 video files with high output video quality. With it, you can bypass the digital protection and convert DVD to any format you want. The equivalent Mac version is DVDAid for Mac. Just get it now and follow the steps below to copy DVD movies to Galaxy Tablet for smoothly playing!

Guide: Convert The Simpsons seasons DVDs to Samsung Galaxy Tablet MP4 videos 

Step 1: Install and run the top DVD to Galaxy Tablet Converter, and then load your The Simpsons seasons DVD (DVD discs, DVD folders, ISO/IFO image) files.

DVD to Galaxy Tablet Converter

Tip: If you need to rip DVD with wanted subtitles and audio track, you can click the drop down menu after "Subtitles" and "Audio" to select your desired tracks.

Step 2: Choose output profile via clicking the Format bar.

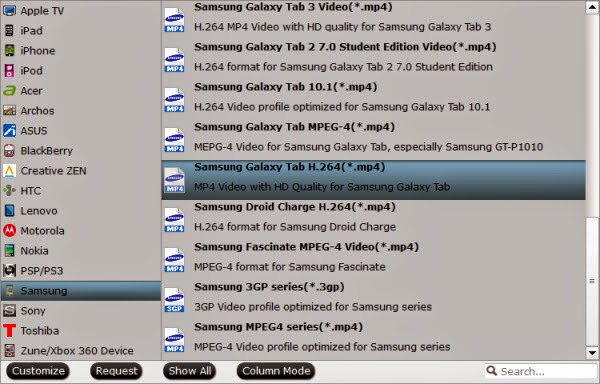
Here I recommend you select "Samsung > Samsung Galaxy Tab H.264(*.mp4)" as the export format. Also you can rip your DVD to Amazon Fire TVWD My Cloud and iPad Air for watching.

Galaxy Tablet video format

Tip: If you think the video size this not suitable for your Samsung tablet, you can first choose any one of the provided type, then change the settings. Please remember the file size is based more on bitrate than resolution which means bitrate higher results in bigger file size, and lower visible quality loss.
Step 3: Click "Convert" Button, start ripping DVDs to Galaxy Tablet MP4 Conversion.

Once the conversion completes, transfer the result video to Galaxy Tablet. Then you can watch The Simpsons seasons DVDs on Samsung Galaxy Tablet as you like. Hope this article helps.

Related articles