Kodi is a free and open-source media player software. It allows users to play and view most videos, music, such as audio and video podcasts from the internet, and all common digital media files from local and network storage media. It can even allow you to play Blu-ray movies on it, but it can only play the Blu-ray without being encrypted. Therefore, for those which have complex copy protection and region code, you have to break the copy protection and region code firstly before playing them through Kodi.
Blu-ray discs usually contain Dolby TrueHD audio and Kodi support 7.1 sound. So if you want to play Blu-ray movies on Kodi with 7.1 audio, Pavtube ByteCopy is no doubt a great choice for you. Because not all Blu-ray rippers can keep 7.1 sound when ripping Blu-ray. But Pavtube ByteCopy can convert Blu-ray to lossless MKV preserving 7.1 audio, multi-track subtitle/audio and all chapter markers. Besides, you can choose your wanted subtitle/audio track from settings or add subtitle on your own need, or extract subtitle.(review). Next is a guide for you.
Free download and install:


Other Download:
- Pavtube old official address: http://www.pavtube.cn/bytecopy/
- Cnet Download: http://download.cnet.com/Pavtube-ByteCopy/3000-7970_4-76158512.html
Steps to rip Blu-ray to lossless MKV with 7.1 audio
Step 1. Load Blu-ray disc
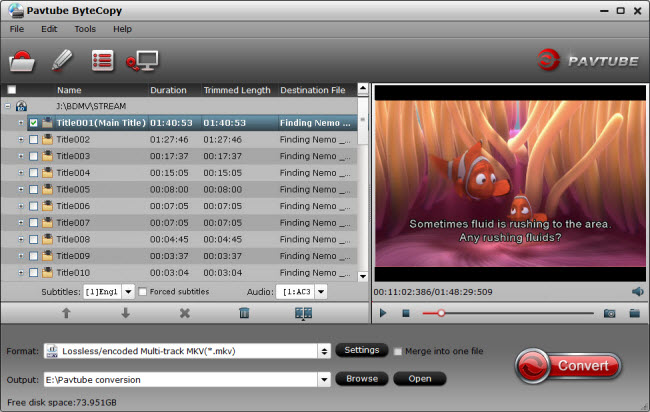
Insert Blu-ray disc into disc drive, launch ByteCopy, and browse to disc drive for importing your Blu-ray movie into this app.

Step 2: Set output format
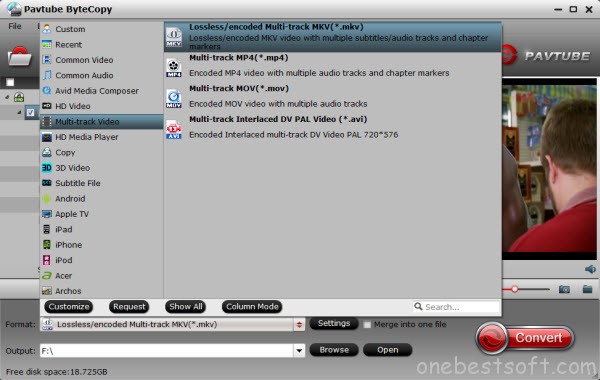
Click “Format” bar to choose the output format. To preserve riginal Dolby TrueHD 7.1 audio for Blu-ray movie ripping, just select “Lossless/encoded multi-track MKV (* mkv)” from “Multi-track Video” quality in “Format” box. Make sure the original BD disc does contain Dolby TrueHD audio, otherwise you still can’t get Dolby TrueHD 7.1 audio saved. (Learn Dolby TrueHD and DTS-HD Master Audio)

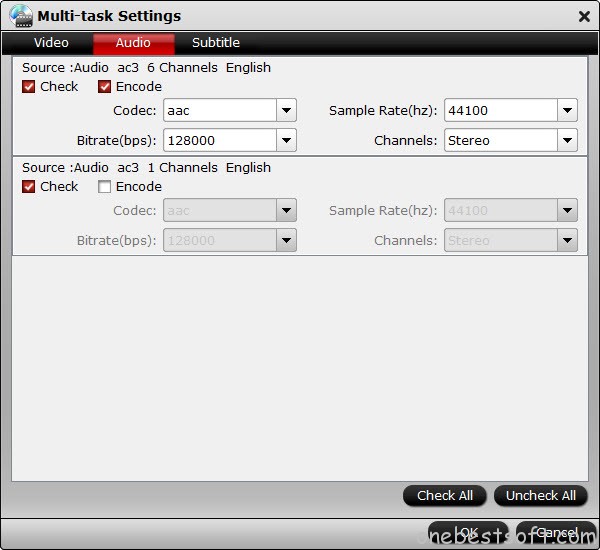
Tips: In “Settings” option, you can make adjustments on your audio, video, subtitles. It’s worth mentioning that, by default, all audio & subtitles tracks in a source file are checked to be saved in the MKV container, if there are some tracks you don’t like, you can go to Multi-task Settings window to uncheck and remove them under Audio tab and Subtitle tab. Just keep your desired Dolby TrueHD 7.1 audio channel.
PS. Make sure the original Blu-ray disc does contain Dolby TrueHD audio, otherwise you still can’t get Dolby TrueHD 7.1 audio saved.

Step 3: Start to convert
Hit the big “Convert” button, it will start converting Blu-ray movies to lossless MKV video with the original Dolby TrueHD 7.1 audio saved.
Now, you can freely enjoy the encrypted Blu-ray movies via Kodi with 7.1 Audio on TV.
Related Articles:
Blu-ray discs usually contain Dolby TrueHD audio and Kodi support 7.1 sound. So if you want to play Blu-ray movies on Kodi with 7.1 audio, Pavtube ByteCopy is no doubt a great choice for you. Because not all Blu-ray rippers can keep 7.1 sound when ripping Blu-ray. But Pavtube ByteCopy can convert Blu-ray to lossless MKV preserving 7.1 audio, multi-track subtitle/audio and all chapter markers. Besides, you can choose your wanted subtitle/audio track from settings or add subtitle on your own need, or extract subtitle.(review). Next is a guide for you.
Free download and install:


Other Download:
- Pavtube old official address: http://www.pavtube.cn/bytecopy/
- Cnet Download: http://download.cnet.com/Pavtube-ByteCopy/3000-7970_4-76158512.html
Steps to rip Blu-ray to lossless MKV with 7.1 audio
Step 1. Load Blu-ray disc
Insert Blu-ray disc into disc drive, launch ByteCopy, and browse to disc drive for importing your Blu-ray movie into this app.

Step 2: Set output format
Click “Format” bar to choose the output format. To preserve riginal Dolby TrueHD 7.1 audio for Blu-ray movie ripping, just select “Lossless/encoded multi-track MKV (* mkv)” from “Multi-track Video” quality in “Format” box. Make sure the original BD disc does contain Dolby TrueHD audio, otherwise you still can’t get Dolby TrueHD 7.1 audio saved. (Learn Dolby TrueHD and DTS-HD Master Audio)

Tips: In “Settings” option, you can make adjustments on your audio, video, subtitles. It’s worth mentioning that, by default, all audio & subtitles tracks in a source file are checked to be saved in the MKV container, if there are some tracks you don’t like, you can go to Multi-task Settings window to uncheck and remove them under Audio tab and Subtitle tab. Just keep your desired Dolby TrueHD 7.1 audio channel.
PS. Make sure the original Blu-ray disc does contain Dolby TrueHD audio, otherwise you still can’t get Dolby TrueHD 7.1 audio saved.

Step 3: Start to convert
Hit the big “Convert” button, it will start converting Blu-ray movies to lossless MKV video with the original Dolby TrueHD 7.1 audio saved.
Now, you can freely enjoy the encrypted Blu-ray movies via Kodi with 7.1 Audio on TV.
Related Articles:
- BD Solutions - Make 1:1 Copy Blu-ray on Mac OS X El Capitan
- Enjoy Blu-rays to H.265/HEVC HD MKV on Win/Mac
- Rip 3D Blu-ray to 3D SBS MP4 for Playback on Samsung 3D TV
- Blu-ray to iPhone 6 - Can I Play Blu-ray on iPhone 6 or iPhone 6 Plus?
- How to Transfer and Play Blu-ray Movies on Robin Tablet Windows/Mac?