Sunday, February 9, 2014

How can I convert DVD movies to Alcatel One Touch Pop C9 for watching when I'm boring outside

This article focus on Video Playback Tips with Alcatel One Touch Pop C9. I write it aiming to show users a perfect way to watch DVD movies on One Touch Pop C9.

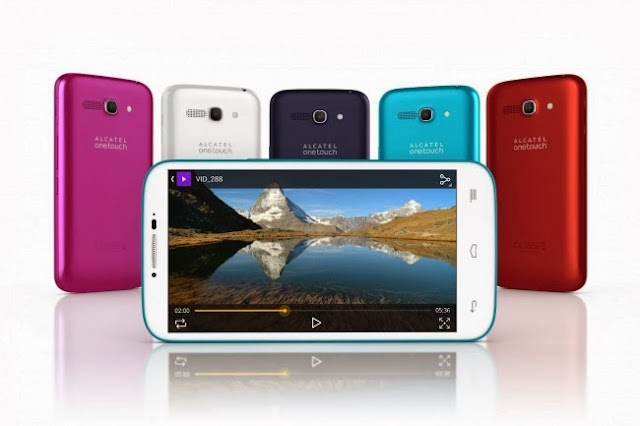
The Alcatel One Touch Pop C9 has a 5.5-inch display, 1.3GHz quad-core processor, 1GB of RAM, qHD at a resolution of 540×960 pixels, 8-megapixel camera, and 2-megapixel front-facing camera. There is internal storage of 4GB, but you can expand storage to 32GB. There is a 2500mAh battery. OneTouch POP C9 is a powerful device for playing DVD movies during a boring travel or a long flight.  

 
Unfortunately, you cannot directly transfer DVD to One Touch Pop C9. If you are intending to put your favorite DVDs to this smartphone for viewing them when you are boring outside. Then what should you do?
This tutorial is about how to convert DVD to One Touch Pop C9 highly compatible video format easily and fast so that you can watch DVD movies on Alcatel One Touch Pop C9 with best HD video quality. 

At first, you need a DVD ripper to do the DVD to One Touch Pop C9 conversion. After many trials, we select thisPavtube DVDAid from Pavtube for that it's capable of removing DVD protection quickly (a few minutes during the importing) and smoothly converting them to MP4 which is preferred by Android devices without any quality and sync issues. The Mac verison is DVDAid for Mac.

I once used this dvd ripper to convert DVD to One Touch Pop C9 mp4 format. It's a simple one, only need a few steps and the outcome is quite well I think.

Download a free trial version and follow the guide as below to convert DVD movies to MPEG-4/H.264 MP4 format for Alcatel One Touch Pop C9 with best quality.

Free download and install:
          

Other Download:
- Pavtube old official address: http://www.pavtube.cn/dvd_ripper/
- Cnet Download: http://download.cnet.com/Pavtube-DVDAid/3000-7970_4-76158510.html


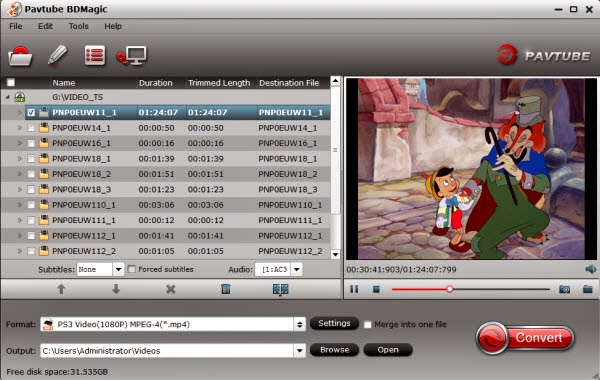
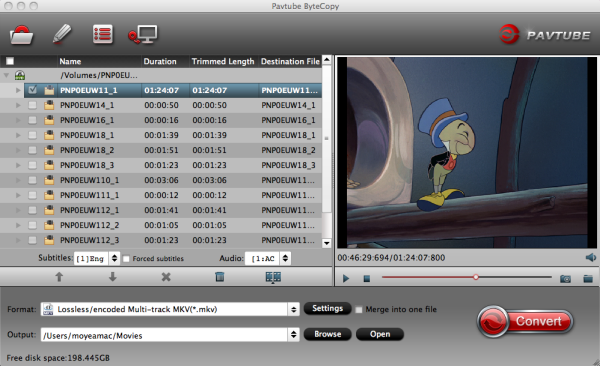
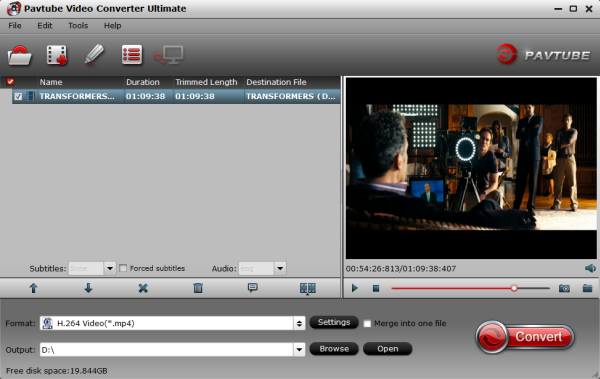
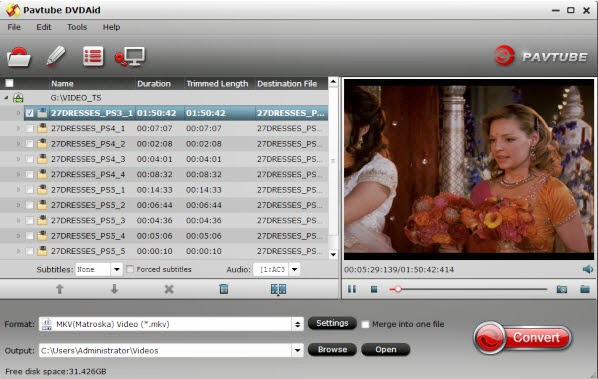
Step 1. Get this DVD to OneTouch POP C9 Converter installed and import DVD. 

Click "Import DVD" to load disc from ROM, IFO/ISO or DVD folder. Pavtube DVD Ripper will detect and check the main title automatically; keep it as default unless you also want to convert the tidbits.


Tip: You can choose the wanted audio track from "Audio" drop-down list and desired subtitles from "Subtitle" tab. 

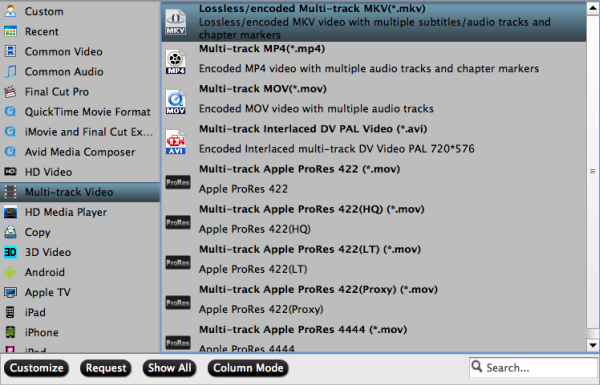
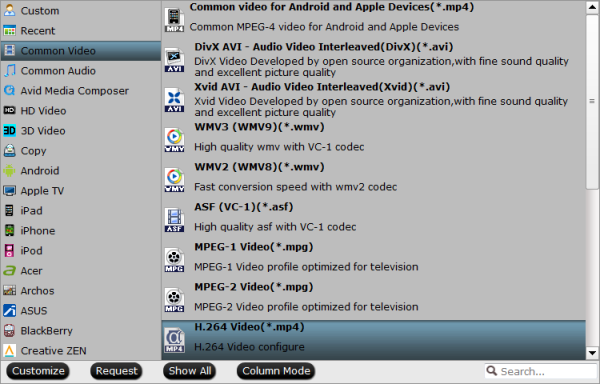
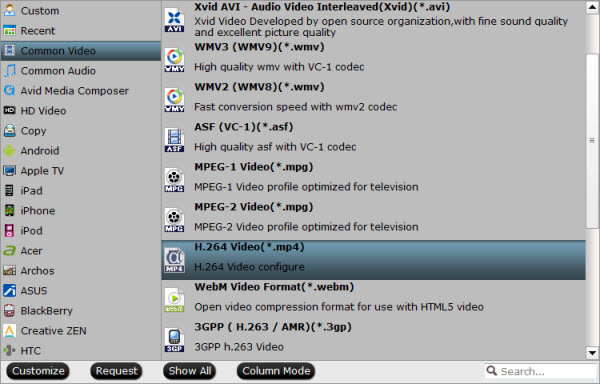
Step 2. Choose Alcatel One Touch Pop C9 video format. 


Although Pavtube does not have the specific profile for One Touch Pop C9, you could choose "H.264 Video (*.mp4)" format under "Common Video"


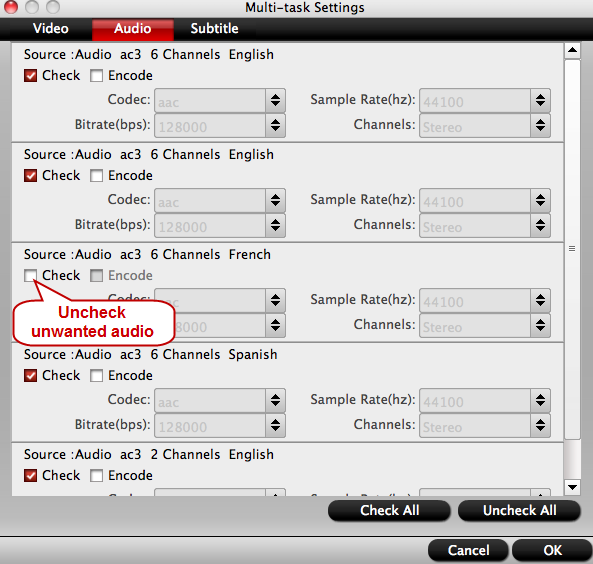
Step 3. Customize outputting video specs. (Optional) 
You can click Settings bottom to adjust the output parameters including video codec, size, bitrate, framerate and sample rate(Hz). 

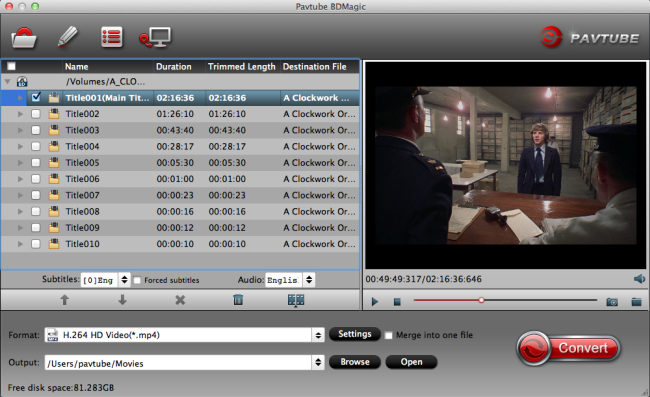
Step 4. Start converting DVD to Alcatel One Touch Pop C9. 

Click the red "Convert" to start converting DVD to MP4 for One Touch Pop C9. After conversion, you can click "Open output folder" to quick location converted videos. 

Here are some tips for Alcatel One Touch Pop C9 file transfer:

1. Try Using a memory expansion card:

Your Alcatel One Touch Pop C9 sports a microSD memory card slot. If your laptop or personal computer has a slot for that card format (Most laptops are so-equipped), you should be able to transfer the movie file from your computer to a microSD memory card, and then, from the memory expansion card to your cell phone.

2. Just use the web:

The Alcatel One Touch Pop C9 is a smartphone. Most smartphones should let you save any song found online by tapping and holding your finger on it and selecting "save." Once a movie file is saved to your media library, touch-and-hold it and choose "assign" from the drop-down menu.

Now you can enjoy ripped DVD movies on Alcatel OneTouch POP C9 with ease.

Related articles

Sunday, February 2, 2014

Play Blu-ray with multi-track MP4 on Apple Devices (iPad, iPhone, iPod & Apple TV)

This article tell you how to watch Blu-ray movies on Apple Devices (iPad, iPhone, iPod & Apple TV) in multi-track MP4 format so you can switch to the desired language during playback.
Apple Devices, like iPad, iPhone, iPod & Apple TV are becoming more and more popular, according to CNBC's All-America Economic survey, the Apple- buying household on average has a total of three Apple products. Overall, the average household has 1.6 Apple devices with almost one quarter planning to buy at least one more in the next year.


Perhaps you have many rental Blu-ray movies and was planning to watch it for enjoyment on your new Apple device. And you are so busy that you have no time to watch it. Returning date is coming soon. Then you may have the question as below:

Anyone know a way to make it possible to watch the blu-ray movie on my iPad or iPhone? Becides, I want to keep the multi-tracks of the movies, then I can enjoy it with any language by switching to the desired one.

Have you meet the same problem? To stream the blu-rays movies to your Apple device for watching without time limitantion with multiple language, you need to rip blu-ray to iPad, iPhone, iPod & Apple TV compatible mp4 format as well as multiple audio tracks saved. Below is a brief guide for you to play Blu-ray with multi-track MP4 on Apple Devices (iPad, iPhone, iPod & Apple TV).

Required Software: 

This top Blu-ray/DVD backup and coping tool can rip Blu-ray movies and DVDs to MP4 container format with multiple audio tracks and subtitles included. It could also convert Blu-ray/DVD to any video format you like. Moreover, you can edit movie by trimming, cropping, merging, etc and support adding *.srt and *.ass subtitles to BD/DVD movies.

Step by step guide to convert Blu-ray to multi-track MP4 on Apple Devices (iPad, iPhone, iPod & Apple TV)

PS:

This application can work on Windows XP/2003/Vista/Windows 7/Windows 8/Windows 8.1.

The Mac version work on Mac OS X 10.5 or 10.5 above (including Mac OS X Leopard, Snow Leopard, Mac OS X Mountain Lion, Mavericks 10.9) with 1G Hz or above Intel processor.

Step 1: Install the Blu-ray Ripper for Apple device, then load your rental blu-ray movies to the program.


Step 2: If you want to watch your rental blu-ray movies with multi-tracks, click the "Format" bar and choose the "Multi-track MP4(*.mp4)" format under "Multi-track Video" option which is designed for keeping multiple audio tracks.


Step 3: Click on "Settings" to modify video codec, resolution, frame rate, sample rate etc. Of course, different settings will have different results. And you should know, the higher video quality with bigger video size, please pay attention to your storage. You can change these settings according to your own devices.


Step 4: Start ripping rental Blu-ray movies to Apple device by clicking on the "Convert" button.

Once the conversion completed, transfer the result MP4 video file to your iPad, iPhone, iPod & Apple TV where you want to enjoy it.

How to Install multi-track player and watch multi-track video on Apple Devices

1. Type in the keyword “multitrack player” in Apple Store, many free or charged apps would show up, choose one and install it.


2. Open iTunes, and add created multi-track MP4 movie to this multi-track player.


3. Open this multi-track player, open the source multi-track MP4, and choose wanted language during movie playback.


Related articles:


Get more money-saving tip:
ByteCopy($42) + Video Converter Ultimate($65) = Only $79.9, Save $27.1 
ByteCopy($42) + DVD Creater($35) = Only $44.9, Save $32.1 
ByteCopy($42) + Vidpie($29) = Only $54.9, Save $16.1 
ByteCopy($42) + MXF MultiMixer($45) = Only $69.9, Save $16.1 
Video Converter Ultimate($65) + Vidpie($29) = Only $74.9, Save $19.1 
Video Converter Ultimate($65) + DVD Creater($35) = Only $64.9, Save $35.1

Friday, January 31, 2014

Best way to transfer Blu-ray movies to ASUS Transformer Book Duet TD300 for viewing

Simplest and most reliable guide to show you how to transfer and watch Blu-ray movies on ASUS Transformer Book Duet TD300. 
Asus has announced the world's first quad-mode, dual-OS laptop and tablet convertible: The Asus Transformer Book Duet TD300. It is an interesting device that runs both Android and Window OSes and can be used as both a tablet and a laptop, and its 13.3-inch multitouch display features a solid 1,920 x 1,080 resolution, bit bigger than the older Transformer Book Trio, which makes it a good enough gadget for you to play HD videos.


Neat device but it leaves me wondering, if you have some blu-ray movies collections, how to get them playable on Transformer Book Duet TD300 without BD-ROM?

To enjoy Blu-ray movies on your Duet TD300, you need to use a third party Blu-ray to Transformer Converter to rip Blu-ray to a format that is well compatible with your ASUS Transformer Book device. Here Pavtube BDMagic is highly recommended to do this job. It features in easy workflow, stable platform, excellent output video quality and fast converting speed, and takes simple steps to finish Blu-ray to Transformer video ripping. You load a Blu-ray disc into the program, choose a format as target for Duet TD300, and click “Convert” to start, Pavtube software will take care of the rest. The Mac version is Pavtube BDMagic for Mac. Both are 30% off now.

Step 1: Install the best Blu-ray to Duet TD300 Converter

First of all, you need download and install a free copy of the best BDMagic to Duet TD300 on your computer. It is a 100% clear software and allows you to access all the functions. To convert Blu-ray movies to Transformer Book Duet TD300 with best settings, you can adjust the video and audio parameters.

Note: This guide uses Pavtube  BDMagic for Windows screenshots. The way to rip Blu-ray movies to Duet TD300 on Mac (Mountain Lion) is almost the same. Just make sure you get the right version according to your computer operating system.

Step 2: Load Blu-ray movies

Launch the best Blu-ray to Duet TD300 Converter; click the “Load disc” icon to browse to your Blu-ray disc driver and import source Blu-ray. Don’t forget to pick up one audio and subtitle track for display.


Step 3: Select output format for Asus Transformer Book Duet TD300

You need set format for Blu-ray to Duet TD300 conversion. Just click the “ Format”, find “Android” or "Windows" category and select a desired format for Transformer Book Duet TD300; And in the options of "ASUS", although you can not find the exact format for Transformer Book Duet TD300, the "ASUS Eee Pad Transformer Pad300 Video (*.mp4)" is also appropriate to Duet TD300.


Step 4: Set customized settings

The Blu-ray to Duet TD300 Converter allows users to customize profile presets by clicking “Setting” button. You can adjust audio and video parameters to optimize the output file quality, including video and audio codec, bitrate, frame rate, display resolution, audio channel, etc. To get 1080p resolution playback on Asus Duet TD300, we recommend you to set output size at “1920*1080”.

Step 5: Rip Blu-ray to Transformer Book Duet TD300

Hit the big “Convert” button to start ripping Blu-ray movies to Transformer Book Duet TD300 compatible file format. When the BD ripping task completes, click the “Open” button to get the final output files and transfer to your tablet. Now you are ready to watch Blu-ray movies on Asus Transformer Book Duet TD300 with 1080p resolution smoothly.

Learn more on Asus tablets Video Playback: Asus Transformer Tablets Column

Tips:

1. Remember the folder where you put your output files, otherwise you would not find your output movies.

2. Would you hope the leave out the extras except the movie content? Pavtube  BDMagic  "Directly Copy" is designed for backing up only movie content to save time and storage space.


3. Pavtube BDMagic can also deal with DVD movies. And if you only want to convert DVD movies, Pavtube DVDAID is your best choice.

4. If you don't konw how to play DRM protected iTunes video on Duet TD300, get the top DRM Removal from Pavtube to help you.

Some articles you may be interested in:

Enable VivoTab Smart ME400 to play Blu-ray, DVD and 1080p videos
How to copy Blu-ray movies to MP4 for Asus Fonepad 7 tablet?
Convert DVD to Asus Transformer Pad 300 for playback
 
From: http://open-mobile-share.com/watch-blu-ray-movies-on-transformer-book-duet-td300/

Tuesday, January 28, 2014

Mac Solution: Remux Blu-ray to MKV for viewing on TV via HiMedia 900B

This article introduces how to lossless backup a Blu-ray to MKV format on Mac, so that you can watch the movie on TV via HiMedia 900B.
HiMedia 900B is a conventional specialist Media Player which supports all file formats including 3D movies. With it and a HDMI cable, you can watch most videos on TV without format problems.

HiMedia Supported Formats
  • Video: RM/RMVB, H.264, VC1, WMV, MPEG 1/2/4, MP4, DIVX, XVID, BDMV, BD-ISO, MKV, TS, M2TS, MTS, FLV, AVI, DVD-ISO, VOB, MPG, DAT, ASF, TP, TRP, SWF, 3D-SBS, VCD, DVD, AVCHD, MINIBD, RBD, BD-3D, 3D BD-ISO, FRAME PACKED 3D
  • Audio: FLAC, APE, LC-AAC, HE-AAC, MP3, OGG, WMA, WAV, AC3, DTS, DTS-HD MA, TRUEHD, CD
Although it supported Blu-rays natively, it's still not a good idea to take out Blu-ray discs frequently due to scratch issues. Also, as I own a large collection of Blu-rays, I also built a home NAS with large storage, so the file size is not the case. Like I said, generally I just want a tool that can backup Blu-rays to MKV without quality loss on Mac.
   

So I started to search online for an ideal tool. However, it's rather disappointing that most ripping software simply compress my Blu-ray to MKV container format with codec like H.264, AVC, ect., the converted video is downsized which doesn't work for me. At last one of my colleague recommended

Pavtube ByteCopy  (Review) and wow, it works like a charm! It's so easy to use, converts very fast and output lossless videos. Below is my workflow on Mac.

Operation system:
  • Mac OS X 10.10 Yosemite, 10.9 Mavericks, 10.8 Mountain Lion, 10.7 Lion, Snow Leopard 10.6. 
  • 1G Hz or above Intel processor. 
  • 1GB physical RAM (memory) or above. 
  • 1024*768 or higher resolution display. 
  • Optical Drive: DVD drive (BD drive is required for ripping Blu-ray disc)
Tips:

1. There's 6 times limitation if you use the trial version to output lossless MKV files;
2. This program also has a Windows version which works for Windows 10/Windows 8.1/Windows 8/Windows 7/Windows Vista/2003/XP find the ByteCopy here.

How to lossless backup Blu-ray to MKV for HiMedia 900B and keep multi-track?

Step 1. Launch Pavtube ByteCopy for Mac and load disc.

Firstly you need an external blu-ray drive; there's no special requirements of the drive model as long as it's supported by your Mac.

Click the top left icon and it will detect the inserted Blu-ray disc, click disc name to load them.


Step 2. Choose lossless format.

Click "Format" list and select "Multi-track Video>Lossless/encoded Multi-track MKV(*.mkv)" as below.


Step 3. Adjust V/A settings.

Click "Settings" to enter Multi-track video profile window; switch to "Video" and find the "Encode" box which is unchecked by default, so if you want a lossless MKV copy, do not touch it. The switch to "Audio", check wanted audio track; so does the "Subtitles".


Step 4. Start backing up Blu-rays to lossless MKV

Click the big "Convert" to start the conversion. It takes about 40 mins for my Macbook to backup a Blu-ray disc, but the conversion speed also depends on your computer configuration. My suggestion is not to play or edit videos when it's converting. After conversion, click "Open" or "Open output folder" to quick locate converted files.

Ok now the lossless MKV files are prepared; transfer them to your hard drive and connect it to HiMedia 900B, now you can enjoy Blu-ray movies on TV without quality loss!

Related articles:

Source: http://open-media-community.com/2014/01/23/lossless-backup-blu-ray-to-himedia-900b/

Monday, January 27, 2014

Rip BD/DVD to AC Ryan Player on Mac for viewing on TV

This article shows how to remove your BD/DVD protection and rip them into MP4 format, so that you can playback the movies on TV via AC Ryan Player.
AC Ryan Playon is a media player which works similar to Apple TV; with HDMI to your TV, it helps to playback various video formats in widescreen.

We have one AC Ryan Playon connected to our TV in living room to play TV shows downloaded from Internet. This device support video formats as below:

ASF/AVI/BD-ISO/DAT/DVD-ISO/FLV/IFO/MPG/MP4/M2TS/MKV/MOV/M4V/TP/TS/TRP/WMV/VOB/RM/RMVB

So generally we don't need to work with format transform and it works pretty well.

But recently we got plenty of DVDs and Blu-rays (most Blu-rays) from a friend; and we decide to backup them so we can view these movies on TV via AC Ryan. Don't need to keep the original file size as we have limited storage, but want to get pretty good video quality.

We did a lot of researches online and finally got this SM named Pavtube BDMagic for Mac (Mac based); it has a simple yet very easy-to-use UI, and has a large output list that supports various formats. The most important thing is it accepts my every disc, which Handbrake and Jack the Ripper couldn't.

For people who want to backup all the audio tracks or subtitles, you are suggested to try Pavtube ByteCopy for Mac.

How to rip BD/DVD to view on AC Ryan Player on MacStep 1. Load disc

Click "Load files(s)" to import DVDs and Blu-rays. Note you need to have an external Blu-ray drive if you want to rip Blu-rays.

Keep Internet connected during importing.


Step 2. Choose format.

Although AC Ryan Player support lots of formats, I still recommend MP4 format as it's most acceptable by most devices, so that you can watch the converted video on other devices also.

Click "Format" and choose "HD Video>H.264 HD Video(*.mp4)" as below:

Step 3. Adjust output settings (Optional)

Click "Settings" to change video size, bitrate, frame rate and audio specs. I chose "original" size to playback on TV.

Step 4. Start conversion

Click "Convert" in the main interface to start the conversion (batch conversion supported). After conversion, click "Open" which is below the "Settings" to find the converted video.

Use a USB drive to transfer the ripped MP4 media file to AC Ryan Player, now just enjoy your Blu-ray/DVD movies on TV!

Related articles:


From: http://device-camcorder-tips.blogspot.com/2014/01/backup-blu-ray-dvd-to-ac-ryan-player.html

Friday, January 24, 2014

How to play collected BD/DVD movies online through WD My Cloud?

WD My Cloud is an excellent choice among single-volume network storage devices. Do you have many collected Blu-ray and DVD movies and want to share with your friends online? Then, are you confusing about how to put them on your WD My Cloud? If so, just read below article and you will find an easy way.
What is WD My Cloud?

WD My Cloud is a fast, easy-to-use NAS server for your home that includes an excellent personal cloud function. It has a USB 3.0 port for storage extension or backing up data.


Instead of storing your files on the Internet, WD's My Cloud is a local networked repository for all your content so you can access it from your Mac (ideal for those of us that have a low capacity flash drive in our laptops) as well as your iPad, iPhone or Android device using free WD MyCloud apps. So by buying a device such this, you can legitimately store all your music, photos, videos and files on the device so you can access them from any Mac or PC.

“I have a DVD/Blu-ray collection and have recently purchased a WD My Cloud Network disk. I need a software to rip my collection and any future Blu-ray discs I buy onto this network server. However, I tried some software packages like DVDfab, but the results are all not so satisfied. Could anyone can give me suggestions?”

Do you have met the same problem with this customer? As a transmitter between BD/DVD discs and Internet, how can we make it come true? As we know, My Cloud is based on Western Digital's WD Red hard drives specifically designed for regular NAS use and features a new dual-core processor. It's NTFS formatted and is compatible with Windows 8, Windows 7, Windows Vista, Windows XP (SP3); Mac OS X Mountain Lion, Lion and Snow Leopard. So it supports the most formats like MP4, MOV, AVI, etc that can be played on your PC. Due to the reason of lacking BD/DVD drive, My Cloud can not meet the demands of put BD/DVD discs online. What a pity about that!

At the moment, to achieve this goal, choose a right BD/DVD Converter is very important. Pavtube Video Converter Ultimate is such a wise choice for you to solve the problem. It integrates a best blu-ray ripper, a DVD ripper, and a video converter together for you to rip Blu-ray discs, standard DVDs and convert almost all kinds of videos to universal video and audio file types with super fast conversion speed and excellent image and sound quality.

Where to get Video Converter Ultimate?

Get it now to enjoy Christmas and New Year Promotion or get the bundled product with less money:

ByteCopy($42) + Video Converter Ultimate($65) = Only $79.9, Save $27.1 
ByteCopy($42) + DVD Creater($35) = Only $44.9, Save $32.1 
Video Converter Ultimate($65) + Vidpie($29) = Only $74.9, Save $19.1 
Video Converter Ultimate($65) + DVD Creater($35) = Only $64.9, Save $35.1

After getting the converter, just begin the conversion!

How to convert BD/DVD movies to WD My Cloud?

Install and run the BD/DVD to WD My Cloud Converter on your computer, you will see the main interface. Blu-ray and DVD disc, ISO image file, video folder is supported to import.
Here is the BD/DVD to WD My Cloud converter’s main interface.


After loading, you can choose output format, to put on your WD My Cloud. As My Cloud is powerful enough to almost all kinds of formats, you can choose the format according to your own needs.


Before convert Blu-ray/DVD to WD My Cloud, you can click settings button to customize the output parameters, such as resolution, bitrate, etc, you can also skip this step.

The final step is to click convert button to rip/convert Blu-ray and DVDs to optimized format for WD My Cloud. This Video Converter Ultimate equipped with NVIDIA CUDA and AMD APP acceleration technology, so it can rip your Blu-ray and DVD movies at a fast speed.

When this software converted videos, you can view your blu-ray / dvd collection from any smart TV or devices in the house. In conjunction with the WD My Cloud disk you should be able to stream videos on holiday which will be great for the family members and friends.

Related Posts:

Thursday, January 23, 2014

Make it easy to watch DVD MPEG-2 videos on HTPC

Want to enjoy DVD movies on your HTPC for a good enjoyment? This tutorial recommends MPEG-2 as the output format for DVD playback on HTPC.
“No more waiting in the queue for a ticket; No more tolerance for the loud; No more submergence in the crowd. Just enjoy your HTPC at home in a free and comfortable posture. Make comments with your friends aloud or even pause or go backward wherever you want...”

As the descriptions above, HTPC has come to our life and make our life more convenient and bring much amusement.

What is HTPC?

HTPC is a home theatre system that is integrated with your personal computer, sometimes called a Media PC or Media Center. These can be purchased from retailers, or you can build them yourself. Building an HTPC gives you a greater degree of choice in the components involved. You can mix and match equipment to your own personal taste.

Why play DVD movies on HTPC?
HTPC has incredible excellences such as flexible configuration, powerful processing ability, outstanding display, cheap and high-capacity storage and abundant software support, which enables DVD movies playback with high quality, giving people a brand new visual experience.


Apart from these qualities, HTPC also can be applied to:

  • Being used as an integrated downloading/recording box
  • Wireless audio/video streaming from main PC
  • Highly configurable post-processing and upgrading
  • Supporting file formats as many as possible
  • Saving lots of files as buffer
  • Online suffering and gaming
  • Adjusting image color with a calibrator
Ripping DVDs on HTPC can spare you the trouble of finding and changing DVDs, can leave a replica as backup copy and reduce the wear and tear of DVD-ROM. Do you have quite a large collection of DVDs that you want to play on your HTPC? If so, firstly, you should convert your DVD movie to HTPC compatible format.

What format for ripping DVD onto HTPC

As HTPC is powerful enough to support all possible video formats, you can backup DVD to ISO image, copy DVD to VITEO_TS file, or just convert to MP4, MOV, MKV, etc. Here we take MPEG-2 as an example.

Note: If you want to enjoy DVD movies on HTPC with multiple tracks and multiple subtitles (if the original DVD has any), it is recommend converting to MKV with ByteCopy which also can preserver the chapter information.

How to play DVD MPEG-2 video on HTPC

In order to convert DVD to MPEG-2 and play MPEG-2 video on HTPC, you should download a fast and trustworthy DVD to MPEG-2 ripper. Pavtube DVDAID (or DVDAID for Mac) is such a professional converter to meet your demand. This software will help you rip latest DVD disc movies to any formats you need, such as MKV, WMV, MOV, MO4, etc. This DVD converter has powerful feature, with it you can adjust the subtitle, select chapter and adjust output video and audio parameters, such as adjust audio to Dolby 5.1 channel. What’s more, it can also rip DVD ISO files, DVD folder fires, DVD IFO files.
 
Now please follow the easy guide below to rip DVD to MPEG-2 for playing on HTPC.

1. Free download and install DVDAID for Windows/Mac launch it as the best DVD video converter.


2. Load your DVD movie to this program, it supports DVD disc, DVD ISO/IFO file, DVD folder.

3. Choose output format you need, For example, to rip DVD to MPEG-2, you just need to choose "Common Video> MPEG-2 format" in the format column, for other formats, just choose as you want.


PS: If you just leave out the extract and just output the main movie, “Directly Copy” is your first choice which save storage and conversion time.


4. Click convert button to rip DVD to MPEG-2 file.

This software equipped with NVIDIA CUDA and AMD APP acceleration technology, so it will rip DVD at a fast speed, when the conversion finished, you can stream the videos to HTPC and use them as you want.

Still have trouble about ripping DVD on HTPC? Never mind, Pavtube has professional support team to provide the help you need, free to Email us: support@pavtube.com (Win)
macsupport@pavtube.com (Mac)

Realated Software

Pavtube Video Converter Ultimate: An all-in-one solution to rip Blu-ray fiscs, standard DVDs and convert almost all kinds of videos to universal video and audio files type.

Pavtube iMedia Converter for Mac: Mac version of Pavtube Video Converter Ultimate Platinum, runs perfectly on Mac OS X Tiger/Leopard/Snow Leopard, convert BD/DVD and videos to the formats that are playable on Mac computer, as well as iPhone, iPod, iPad, Apple TV, etc.

Pavtube DVD Creator: Let you burn all kinds of video source to playable DVD.

Pavtube DVD Creator for Mac: Professional and fast DVD burner on Mac OS, provides the perfect solution to burn DVD folder/ISO image/various video formats to DVD.

Related Source

Pavtube Studio release Free DVD Ripper, Free Video DVD Converter Ultimate
Play DVD movies on LG 32LV2400 HDTV and Nook HD
Enjoy commercial DVDs on your wide screen TV via WD TV Mini Media Player