Showing posts with label Media Player. Show all posts

Tuesday, May 12, 2015

How to Add External SRT Subtitles to AVI Video on Mac?

You don’t have to be a movie buff to appreciate a good foreign film, but unless you know the language, you will need to watch with subtitles. Or, If your video doesn’t include any subtitles, you can add a .srt file to this video folder, then you will be able to get a video with subtitles by converting to AVI files on Mac. Adding SRT subtitles to your AVI videos can be fairly easy. Here, we will show you an example on how to download External SRT Subtitle or Create Your Own SRT and add an external .srt file to an AVI video. 


Part 1: Download External SRT Subtitle or Create Your Own SRT before Adding to MP4 Video

SRT file does not contain any video data, it is a simple text file you can edit by any text editor (translate subtitles into another language). The purpose of srt subtitle file is to use it with desired movie file together to display subtitles when you play video file by any player supporting srt subtitles. As a result, you'll need to add subtitles of your preference while appreciating a foreign movie, unless you know the language. (Related: Top 5 Subtitle Download Sites). 

This part is available for people who do not have any .srt subtitle or who want to add some of their own words to the .srt subtitles displayed onscreen. If you have saved SRT subtitles you need, just skip this part and directly move to part 2.

Download SRT subtitle: You can put "movie title" + "your preferred language" + "subtitle" as the search strings and select the subtitle file saved in .srt for an effective SRT subtitle file searching. Alternatively, finding the needed subtitle in .srt format from those popular subtitle download sites like Moviesubtitles.org is also a practical way. 

Edit or make your own .srt file: Here we take Notepad as an example. Just open Notepad, create the subtitle you like in the text editor, click menu File->Save As; change the subtitle file name based on your name of video file and save it in .srt format. 

Tips: The SRT subtitle needs to contain the following parts while creating the SRT subtitle: 

1. The number showing which subtitle it is in the sequence.
2. The time that the subtitle should appear and disappear on the screen.
3. The subtitle itself. 
4. A blank line indicating the begin of a new subtitle. 


Part 2: How to Add SRT Subtitle to AVI File on Mac

To load your desired subtitles to any format movie you have, we highly recommended our Pavtube iMedia Converter for Mac (Yosemite 10.10 include). With it, you can add subtitles to AVI video for either saving to a video file to play virtually anywhere. It supports adding all kinds of subtitles to AVI video whatever the subtitle is in .srt, .ass, .ssa, etc. Moreover, It also helps to set the subtitle size, subtitle style, etc according to your preference. Aside from inserting subs to AVI, it also can add watermark/effect/audio track to AVI, trim AVI, crop AVI, and etc. 

The following is a step by step guide on how to add subtitle .srt to AVI video file with the help of iMedia Converter for Mac. If you are on Windows, please get Pavtube Video Converter Ultimate. Here is reason why you choose Pavtube for Add SRT Subtitle to AVI File. 

Hot News!!! - (Now, you can get 50% OFF discount after liked our FaceBook.) More Money Saving Tips, you can ClickSpecial Offer

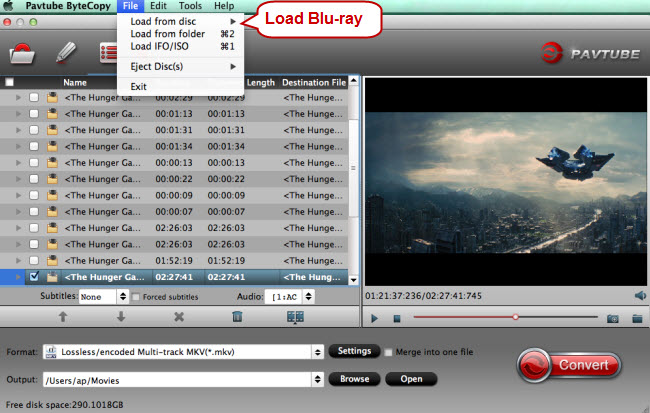
Step 1. Import AVI video

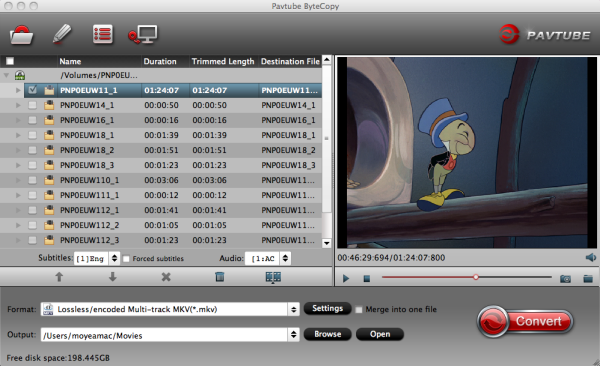
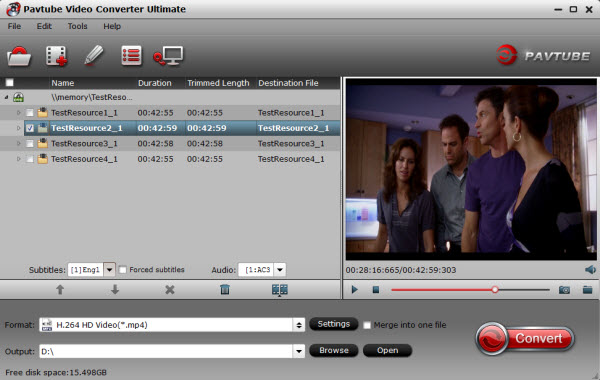
Click "Add" button to import the AVI video file which you want to add subtitle .srt or .ass/.saa to. Or simply drag and drop the AVI video into the interface of program. 


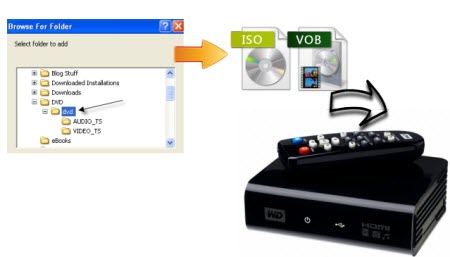
Tip: Before loading source video, you need copy .srt file to AVI video folder, rename .srt file according to the video name. And if you add more than one .srt files to the AVI folder, you can rename the .srt file name like this: if source AVI file name is “michael.avi”, the .srt file names can be “michael001”, “michael002”, etc. 

Step 2. Embed subtitles into AVI video

Click on "Edit" button, the video editor will pop up. Tap "Subtitle" option and check the "Enable" icon. Then, by clicking on "Browse" to import your *.srt, *.ass, *.ssa subtitle file you've downloaded. After the subtitle is loaded, you can preview it. 


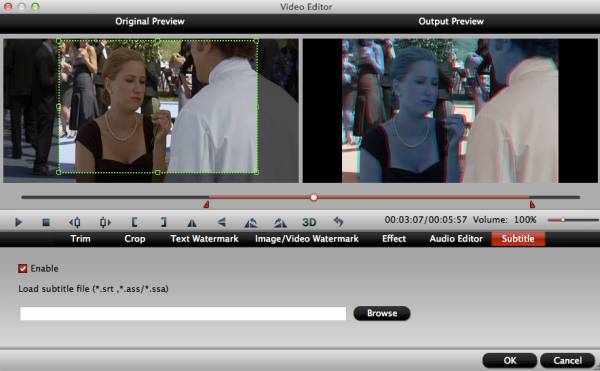
Tip: You can change the subtitle size, style, font if necessary. When everything is done, simply click "OK" button. Plus, you can also add watermark, apply effects, and crop, trim your AVI files in the above video editing window. 

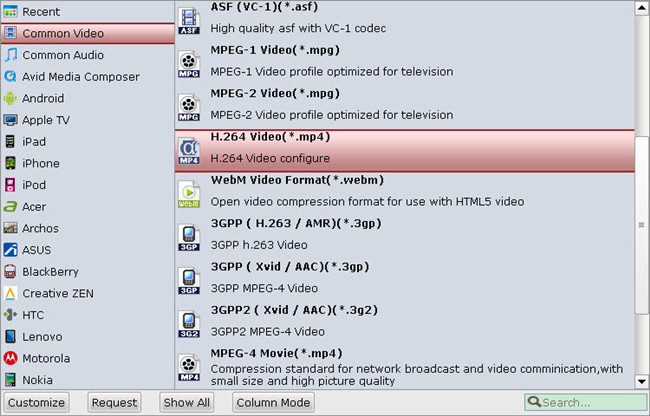
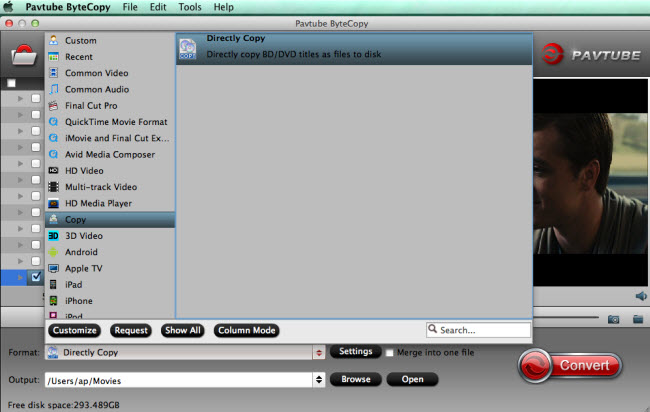
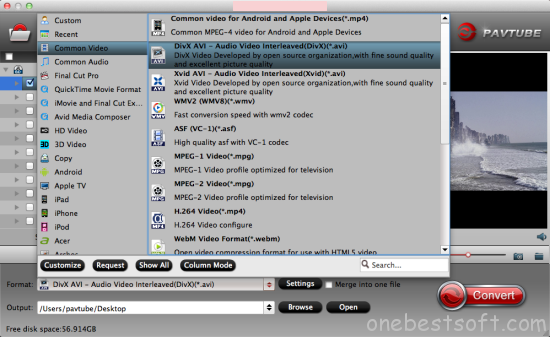
Step 3. Set output video format

To add subs to AVI (to keep the output video as AVI with subtitle), click the "Format" drop-down button to select AVI format from the Common Video profile.


Step 4. Finish AVI subtitles merging

Click the "Convert” button to start adding SRT or ASS, SSA to AVI video, when the conversion is completed, the subtitles file will be embedded into the output AVI video. Now you can play your AVI files with SRT subtitles on Mac at anywhere. 

Note: Once you have merged subtitle text and video into one file, the subtitles would be hard subtitles and become a part of video, in other word, you cannot turn it on or off during playback. 


Read More: 

Friday, May 8, 2015

Make full copy of Blu-ray Discs to HiMedia Box on Mac

For some movies we love, If we haven't backed up our beloved blu-ray disc to Mac, we might fail to find it at the proper time when we need it. On the contrary, if we backup Blu-ray disc to a Blu-ray BDMV folder, we will be lucky to have an insured Blu-ray copy permanently saved on the Mac and entitled to burn the Blu-ray folder into disc at any time. Then, you can playback them on Any devices via HiMedia Box. Here is an easy way for you to copy a Blu-ray disc with original structures or menus for HiMedia Box. Read on to learn the instruction.  


Although HiMedia box supported Blu-rays natively, it's still not a good idea to take out Blu-ray discs frequently due to scratch issues. So the best workaround is that you can use a professional tool which can help you make full disc copy of Blu-rays to HiMedia box best formats without quality loss on Mac.  

To permanently saved Blu-ray on HiMedia Box, Pavtube ByteCopy for Mac is high recommended, it works like a charm! Read the Review.  It will help you to lossless copy your Blu-ray/DVD collections to MKV for HiMedia Box on Mac with all subtitles and original audio track for future usage like disc burning. Meanwhile, this app equips with all features other BD ripping tools do so that you can rip your BD/DVD movies to any other video and audio format you like on Mac and do simple video editing here. 

Tips: 

1. There's 6 times limitation if you use the trial version to output lossless MKV files; 
2. This program also has a Windows version which works for Windows 10/Windows 8.1/Windows 8/Windows 7/Windows Vista/2003/XP find the ByteCopy (windows) here. 
3. Hot!!! - (Now, you can get 50% OFF discount after liked our FaceBook.) More Money Saving Tips, you can Click Special Offer

How to Full Copy of Blu-ray for HiMedia Box and keep multi-track? 

Step 1. Launch Pavtube ByteCopy for Mac and load disc. 

Firstly you need an external blu-ray drive; there's no special requirements of the drive model as long as it's supported by your Mac. Click the top left icon and it will detect the inserted Blu-ray disc, click disc name to load them. 


Step 2: Copy Blu-ray and DVD movie

- Option A: “Full Disc Copy” without anything loss

Click quick button “Copy the entire disc” to starts copying the BD/DVD disc to hard drive maintaining the original structure.

When the copying task finished, you can click “Open” button to get the output videos. The backed up Blu-ray/DVD movie is usually saved as a directory file structure in VIDEO_TS or BDMV folder.

- Option B: Directly Copy only Blu-ray and DVD main movie

Click “Format” bar, choose “Copy” > “Directly Copy” from the Format menu to copy the . vob files or .m2ts only which contains the main movie of Blu-ray and DVD. Then hit the “Convert” button to do Movie-only copy. Then, Click "Browse" button to select a destination folder for the output files.

Step 3: Copy the entire Blu-ray structure

Click the quick button "Copy the entire disc" to start copying the Blu-ray disc to hard drive, including the menus, titles, ads, etc. Full disc copy means to help users to backup the whole contents of a Blu-ray disc remaining the original structures. The decrypted Blu-ray folder contains all information and contents in the original disc. Among them, the BDMV folder is the most important one with audio and video files in it. Open BDMV -> STREAM folder and you will find all the .m2ts movie clips for HiMedia Box, now you can enjoy Blu-ray movies on TV without quality loss!

You can also use Pavtube ByteCopy for Mac to backup Blu-rays without quality loss. Meanwhile, several audio tracks and subtitles are preserved so that you can switch language when watching movies. Have a try!

Related articles: 

Friday, April 24, 2015

How to View iTunes Movies via Kodi?

XBMC, officially renamed to Kodi on 1 August 2014, is a free and open-source media player software which allows users to play and view most videos, music, and podcasts from online services and all common digital media files from local and network storage media. If you’re would like to create a home theater system to enable media sharing among all of our digital devices, there will be a trouble that you are not able to play the movies downloaded from iTunes Store via Kodi. In this guide, you can learn how to play iTunes DRM M4V to Kodi player on Mac and Windows. 


Apple protects the media contents from iTunes Store with DRM which makes it impossible to view iTunes movies via Kodi. So, the best way to get Kodi play iTunes movie is to remove DRM from those M4V movies. To accomplish this goal, Pavtube best DRM Converter and Removal - ChewTune is highly recommended for its easy-to-use interface, straight workflow and reliable video quality. It can easily get rid of Apple’s DRM protection from those iTunes downloaded m4v video, and transfer it to various video formats including MP4 profiles for Kodi. (Here is the review). 

The Video Formats Kodi (XBMC) Supports

To better play iTunes DRM M4V via Kodi, we have to know what's the video format the Kodi supports at first. 

Kodi as a common used Add-on tool for many online streaming websites like PrimeWire, IceFilms and Project Free TV etc., it can support most common video formats including MPEG-1, MPEG-2, H.263, MPEG-4 SP and ASP, MPEG-4 AVC (H.264), HuffYUV, Indeo, MJPEG, RealVideo, RMVB, Sorenson, WMV, Cinepak. 

Step by Step Guide on Converting iTunes DRM M4V for Kodi Player

Step 1. Download Pavtube ChewTune as the Best DRM removal software.

   (Click here for Mac OS X 10.5) 

There would be a command window pop up during the installation to install specific soundcard drive for DRM Removal, please do not shut down it and let it running until the installation completed. 


Step 2. Run Pavtube ChewTune, drag and drop the source iTunes video and music from local computer to ChewTune. Or hit the “Add Video” button to import your iTunes DRM contents. 


Step 3. Let’s click the drop-down-list besides “Format” and move to “Common Video” column and choose “H.264 Video(*.mp4)” as output format for your Kodi. 


Step 3. You can click “Settings” to enter Profile Settings window and customize target video spec, you can find settings for video size, codec, bitrate and frame rate.

Step 4. Click the big “Convert” button on software main UI to start iTunes to Kodi conversion. After the conversion completes, you may find the iTunes movies in MP4 format and add them to XBMC as freely as you like.  

Tips:

1. The DRM removing process may mislead your anti-virus software to falsely report virus/worm. Please ignore the report to keep on ripping.

2. This product cannot convert unplayable video (damaged, unauthorized, etc).

After that, you can directly play the movie on your PC or you can stream the movie to your HDTV for playback with families and friends via Kodi home theater system. 

Read More: 

Thursday, April 9, 2015

Chromebook Video Playback - Get Videos to Play on a Chromebook

Chromebooks are great little machines with a wide range of features. However they are still struggling more than Mac, Windows or Linux computers when it comes to flawlessly playing every video file you throw at them. Sometimes, the video plays but there is no sound, or the video playback is patchy and shows artefacts that don’t appear in video player apps on other computers. Sometimes, subtitles that should be there don’t get displayed or the video doesn’t play at all. If you have lots of videos which download from website as: AVI, MKV, DivX, XviD, MP4, MOV, MPG, F4V, FLV, 3GP, MTS, M2TS, MOD, TOD, WebM, OGM, MXF etc. you may want to enjoy them to your HDTV via Chromebook. Hold on reading and you will find the answer.  

Hot Search: Video to iPad, Video to H.265, Video to Note 4, Video to  iPhone 


Wanna playing all of your videos on Chromebook? A professional Video Converter Ultimate is the key. Here, Pavtube Video Converter Ultimate is the best Blu-ray converting software so far, you can rip and convert AVI, MKV, M2TS, VOB, Tivo, FLV, WMV, MOV, MTS and other Videos to any video format. You can play the ripped/converted Blu-ray/DVD on Smart TV, Windows/Android tablet, etc. In addition, you can convert MKV, AVI, MTS, MXF video to MP4 as Chromebook supported video format. If you are Mac user, you can free download iMedia Converter for Mac. 

Free download videos to Chromebook Video Converter Ultimate: 


Get MKV/M2TS/VOB/FLV/AVI/WMV etc to Chromebook for playback easily

Step 1: Load MKV/M2TS/VOB/FLV/AVI/WMV files. 

Insert Blu-ray/DVD dice into BD room. Run this Best Video to Chromebook Converter, click "Add Files" icon to load your movie files. Freely select the subtitles for your movies from the "Subtitles" option. Thus, you can watch any movie on Chromebook or other devices with Subtitle. 


Step 2: Choose output format for streaming via Chromebook. 

Click "Format" dropdown list to choose "MKV HD Video (*.mkv)" or "H.264 HD Video (*.mp4)" under "HD Video" option as Chromebook compatible video. H.264 MP4 will create high quality files and generate big file size. 


Step 3: (Optional) Edit videos.

Click "Edit" icon to edit the videos. You can "Trim" it to cut out the undesired part or cut off the annoying black edges with "Crop" option. Add image, text, or video watermark will help to customize the videos. And so on. 

Step 4: Convert All kinds of Videos for steaming.

Click "Convert" button to start converting your MKV/M2TS/VOB/FLV for streaming to Chromebook. If you do not like the default path for output files, you can click "Browse" button to find a new folder before conversion. Once the conversion is finished, click "Open" button to get the generated files quickly. 

With this best movie converter for Chromebook, you can easily backup different videos like ISO/MKV/M2TS/VOB/FLV for streaming and playback on Chromebook smoothly. 
  
Besides Chromebook, this top Video Converter Ultimate can also support: Samsung Chromebook 2, Toshiba Chromebook, HP Chromebook 11, HP Chromebook 14, Acer C720P Chromebook, Acer C720 Chromebook , Acer C7 Chromebook, Samsung Chromebook, Chromebook Pixel and any devices as you want.  

Further Reading: Why some videos won’t play on Chromebooks?

There are a number of possible reasons for these problems and they include:

Chrome OS (the operating system on Chromebooks) lacks support for the video codec and/or audio codec inside your video file – see here for currently supported media file types and codecs
Interlaced video is not supported on some Chromebook models
Subtitle streams inside your video file are of an unrecognised format
An update to Chrome or Chrome OS introduced a bug that causes video playback issues. 

Read More:

Tuesday, April 7, 2015

Convert Video_TS to VOB for WDTV smoothly playback

This article shows you an easy way convert VIDEO_TS to VOB files for WDTV playback with top VIDEO_TS Converter for WDTV. 


“ I'm probably just being dense, but I think I have a simple problem for which I can't find the right Mac solution. I have non-DRM VIDEO_TS files available from DVDs I want to view on a WDTV. I've chosen not to Handbrake it, because my iBook takes 20 hours to make an .mkv. Besides, I can simply drag the VIDEO_TS folder over to the hard disk, but that wastes a lot of space as I only want the main feature and the English soundtrack. It see that the Windows people use DVDShrink to quickly extract the main feature and write it to a .vob or .iso, claiming it takes about 10 minutes. I don't really own a Windows machine (I've only ever owned Macs, since the '80's) other than a 8 year old (perhaps) 800gHz pIII notebook garbage pile find.

Is there a Mac solution that would do what I want, or should I see if I can run DVDShrink on that old Windows notebook?” 

Hot Search: ISO to WD TV, iTunes to WD TV, Blu-ray to WD TV  
  
While the copied DVD VIDEO_TS folder is not compatible with WD TV player, and you may need to convert DVD VIDEO_TS folder to WD TV/WD TV Live playable file in advance. First download and install the Pavtube ByteCopy for Mac (Now, you can get 50% OFF discounts from Pavtube FaceBook). It should be the app helping us finish the DVD VIDEO_TS ripping task. With it, you can convert the Blu-ray, DVD, VIDEO_TS as well as ISO/IFO to MP4, AVI, MKV, MOV, MPG, etc. for playing on WDTV. 

This is the top VIDEO_TS Converter for WDTV which is ease of use with reasonable price and fast speed. Probably the main feature is multi-track preservation which means you can backup your Blu-ray/DVD to lossless MKV files with all multiple audio and subtitle tracks, and chapter markers keeping. Read the Mac review. 

Note: If you are on Windows, turn to Pavtube ByteCopy for Windows. Don’t hesitate to get it now and follow the easy steps below to make your VIDEO_TS playable anywhere on WDTV or WDTV Live. 

How to rip VIDEO_TS to WD TV/WDTV Live playback format:

Step 1: Run the best VIDEO_TS to WD TV Converter and click DVD folder icon to load the whole VIDEO_TS folder to the UI. Besides, you can also load Blu-ray and DVD discs, ISO/ISO files. 


Step 2: Copy DVD main movie as VOB files

Click the format bar to follow “Copy” and “Directly copy”. Directly copy allows you to copy the main movie from your DVD disc without extras. If you want your converted DVD supported by more devices, take a try with other popular video formats suitable for your device. Please kindly note that Pavtube trial version only supports 6-time directly copy.


Step 3: Choose your desired output format for WD TV, like MKV, H.264 MP4 and more. Clicking the “Format” menu, here you are suggested to choose “Common Video > H.264 Video(*.mp4)” or “MOV - QuickTime(*.mov)”or "HD Video > AVI HD Video(*.avi)".  It is suitable for playback on Mac and for iTunes importing. 


Step 4: If you like, modify profile settings such as video size, bitrate, frame rate, etc to get optimized video and audio playback. 

Step 5: Hit the Convert button to start converting Video_TS to VOB as WDTV video. After a short conversion, you will get the converted VIDEO_TS files. And then you could stream VIDEO_TS DVD movies to WD TV for HD playback. Don’t worry you can’t play VIDEO_TS on WD TV flawlessly. Enjoy. 

See Also: